Commit Changes with Git
To start working with Git, let’s walk through your first commit in your CollectionBuilder project.
Edit README
With your project folder open in your text editor, open the file “README.md”. The README file is a place to describe your repository and its contents. By default, GitHub displays the README on the repository home page, so it is often the first place visitors will look for information about your project.
The first line at the top of the template file will look something like:
# CollectionBuilder-CSV
Leaving the #, edit that line to be the title of your project instead. For example: # Example CollectionBuilder Project. Then save the file (Ctrl + S).
Commit & Push Changes
Now that you made a change, Git knows… But we have to tell Git to record the update in the repository’s history.
This is called a Commit. When you make a commit, Git takes a snapshot of the changes you made and permanently stores it in your repository’s history. Every commit records a user name, email, and message along side the exact details of the changed files. Your “commit message” is a short description of what the changes do or why you made them–this is your note to the future to help everyone understand the code and history. (see “The Art of the Commit” if interested in the craft of creating good messages!)
Once you have made a commit(s) locally, the GitHub version of your repository does NOT automatically know about it.
The next step is to Push your changes. Git push uploads your local history to update the version on GitHub. This allows you to work on multiple computers, collaborate with others, and share your code.
We can commit and push via VS Code Source Control pane, GitHub Desktop, or Git on the command line (choose only one!).
Commit & Push on VS Code
VS Code has basic GUI support for Git commands built in, which is convenient so you don’t have to switch out of your editor. The main controls are available on the “Source Control” pane, i.e. the network icon on the left side nav, or Ctrl + Shift + G.
- Click on the Source Control pane (or
Ctrl + Shift + G). - Changed files will be listed under “Changes.” Hover over the file name and click on the plus icon to add individual files, or hover next to “Changes” and click on the plus icon to add all (the pop up label when hovering above the plus icon will be “Staged Changes,” which is the same as “Git Add”). Once added, the files will move to a new list “Staged Changes” which are ready to commit.
- Click in the text box at the top labeled “Message.”
- Type your “commit message” into the box (in this case something like “Updated README title for new project”).
- Click the blue button below the message box to Commit.
Next, look in the lower left of the blue bottom bar of the editor window which provides Git status information. First is the branch you are on (currently “main”), then a sync icon with counts representing commits on GitHub to Pull and commits on your local to Push.
To Push your local changes up to GitHub, either:
- Click the blue Sync Changes button at the top of the “Source Control” pane.
- Or click the sync icon in the lower left bottom bar that looks like two arrows in a circle.
When you are working on multiple computers or collaborating with others, be sure to Fetch and Pull changes from GitHub before you start working – Pull can be accessed by the same methods as Push in VS Code.
Tip: Hovering over icons on VS Code will pop up more information about what they represent.
Important Note: Your computer may prompt you to authorize Visual Studio Code to make changes and then ask you to sign in to GitHub. For step-by-step instructions on the authentication process, check out this timestamped section of the Using Git with VS Code video from the Visual Studio Code website.
Commit & Push with GitHub Desktop
- Switch over to the GitHub Desktop app.
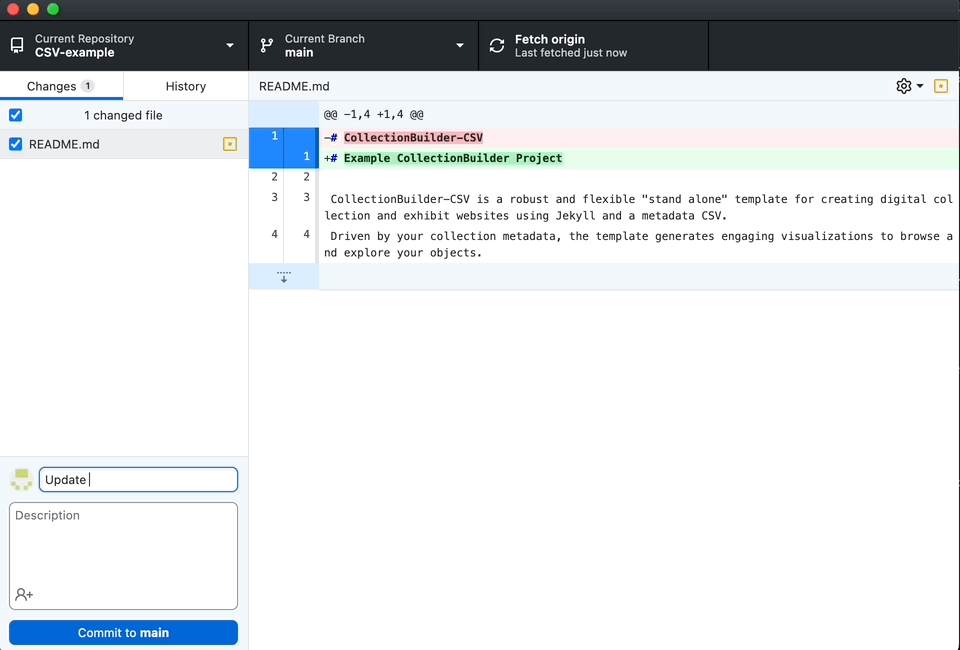
- The left hand column of the interface will list the “Changes”, including any files that you edited.
- Select the checkboxes next to the files you would like to commit (this is “Git Add”).
- Below the column that lists your changes, you’ll see a text-entry box labeled “Update README.md.” Click in the box.
- Type your “commit message” into the box (in this case something like “Updated README title for new project”).
- When you’ve finished your commit message, click on the blue button that says “Commit to main.”
The “Changes” disappear, and you’ve just made a Git Commit!
Once you have made one or more commits, the button on the top right side of the GitHub Desktop window will say “Push origin.” Click the button to push, sending your changes up to GitHub.
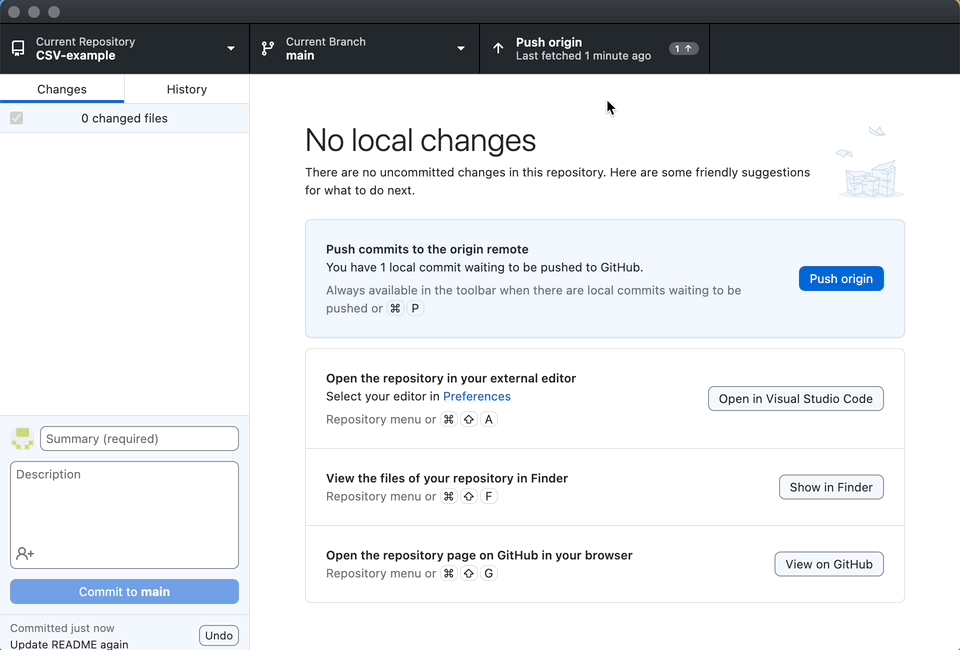
If you want to check if your commit went through, click GitHub Desktop’s “Repository” menu and select “View on GitHub” to open the repository in your web browser. The commit should show up at the top section of the Code tab.
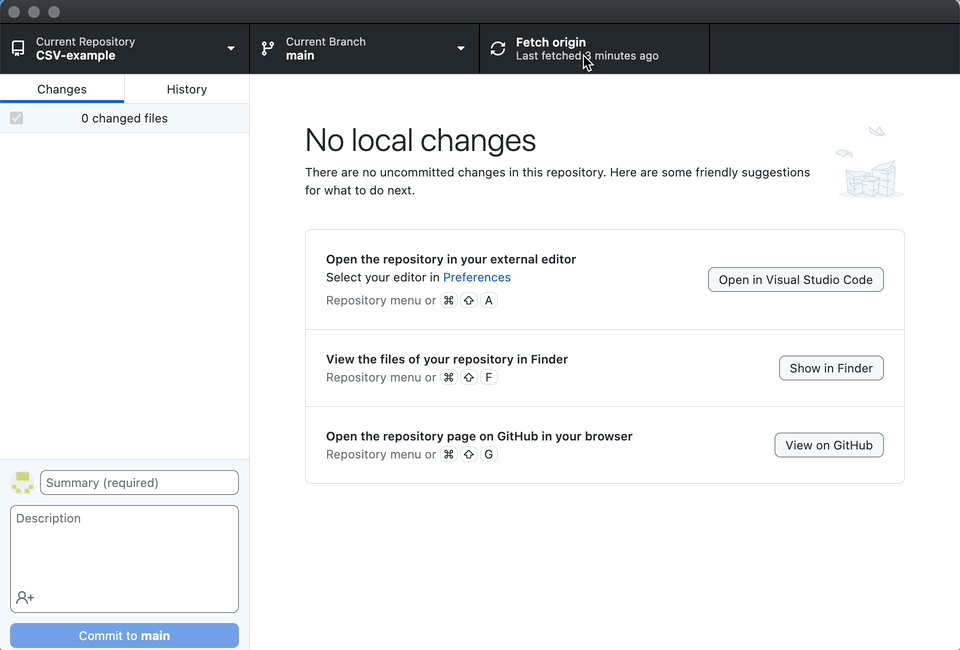
When you are working on multiple computers or collaborating with others, be sure to Fetch and Pull changes from GitHub before you start working and before you Push changes. In GitHub Desktop, click on the button in the top right labeled “Fetch origin.” After the Fetch, if there are new changes available, the button will change to “Pull origin.” Click on the button to Push the changes, which will update the files in your local repository.
Commit & Push on Command Line
Using Git on the command line can be fairly straightforward, or can be mixed with using the GUI tools integrated in your text editor to form an efficient workflow. Type the commands into a terminal window opened in the root of your repository folder and press “Enter” to execute them.
To make a commit:
- Open the integrated terminal in your text editor (or open a normal terminal window and navigate to the repository folder).
- type
git statusto see what Git knows! - type
git add -Ato add all changes, orgit addplus the filename to add individual files. This stages the files that you want to commit. - type
git commit -m "type your message here"to make your commit. Be sure to include your message after the-mflag in quotes!
Once you have made one or more commits, use the command git push to upload your changes to GitHub. Using the command git status at any time will give you useful information about the state of the repository along with tips about what to do next (messages provided by Git on the command line are usually quite helpful!).
When you are working on multiple computers or collaborating with others, be sure to Pull changes from GitHub before you start working and before you push, using the command git pull. Git will output detailed information about any changes and update your local history and files. If there are no changes to pull, the terminal will say “Already up to date.” This feedback can be helpful for understanding recent updates, providing more reference information than the GUI methods of Pull.
Tip: While typing Git commands and filenames, you can use “tab complete”–start typing the first few letters of the name then hit Tab, if something matches it will automatically finish typing the command or filename.