SHEETS Walkthrough: Part 1
The first part of this walkthrough provides steps for using CollectionBuilder-Sheet’s built-in development mode to prototype, test, and share a draft of your digital collection site.
For this section of the walkthrough, you will use demo metadata from the University of Idaho’s Carleton Watkins Mine Interiors Collection and the CollectionBuilder-Sheets default template site.
Done prototyping already? If you are ready to publish an ongoing collaborative site and/or a permanent collection site using CollectionBuilder-Sheets, please jump to Part 2 of this walkthrough.
Note: You will not need to install any software on your computer for this walkthrough, but you will need to create a free GitHub account.
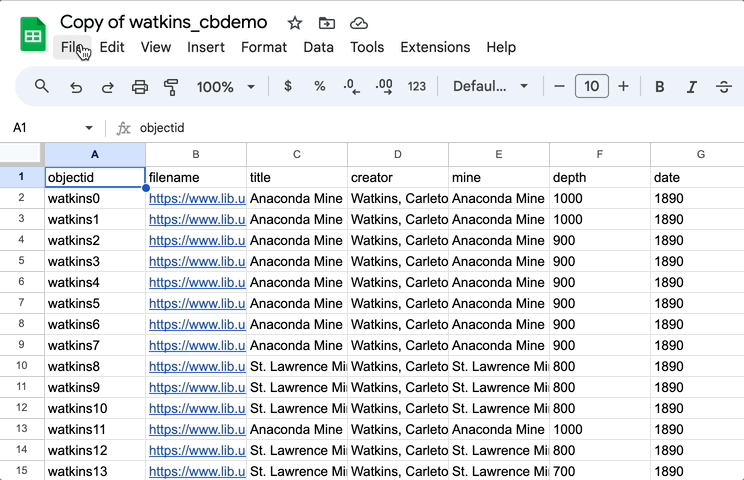
1. Make a copy of demo metadata.
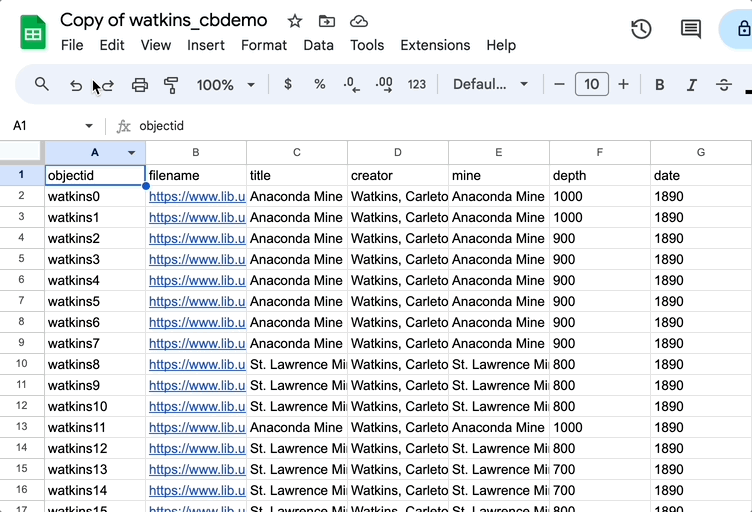
- Make a copy of this Google Sheet of pre-made demo metadata: Watkins Digital Collection Metadata
2. Publish your Google Sheet to the web.
In your Google Sheet, ensure that your metadata is the first sheet in the spreadsheet (by default named Sheet1). In the demo metadata, the sheet is called watkins_cbdemo. The tabs can be dragged to reorder if necessary.
Publish the spreadsheet to the web by clicking File → Share → Publish to web
In the box that pops up, use the dropdowns in the Link tab to select the Entire Document and Comma-separated values (.csv) options, and then click the Publish button.
You may receive a prompt that says: “Are you sure you want to publish this selection?” If you receive this message, select OK.

- This will generate a shareable link to your published CSV that looks something like this:
https://docs.google.com/spreadsheets/d/e/2PACX-1vRJhe6UcNZXItEtHlxQFOaHBBD2SDU8nyNOAROtcLWLrl83sYaCNBNYHOvhM_xZ7SVnnOrjCzo6U5_o/pub?output=csv
The end of your link should have output=csv indicating that your metadata is being published to the web in a CSV format.
Copy the shareable link. (You will use this link in the next step.)
Leave the check mark checked next to the Automatically republish when changes are made option.
Unpublishing a Google Sheet: You can unpublish your sheet from the web at any time by clicking Published content & settings and then the Stop publishing button.
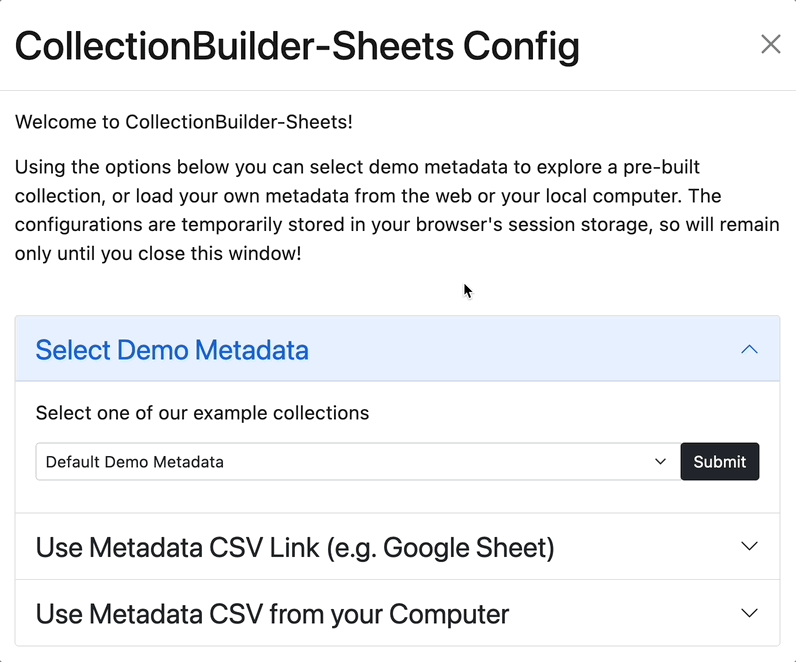
3. Set up your prototype site.
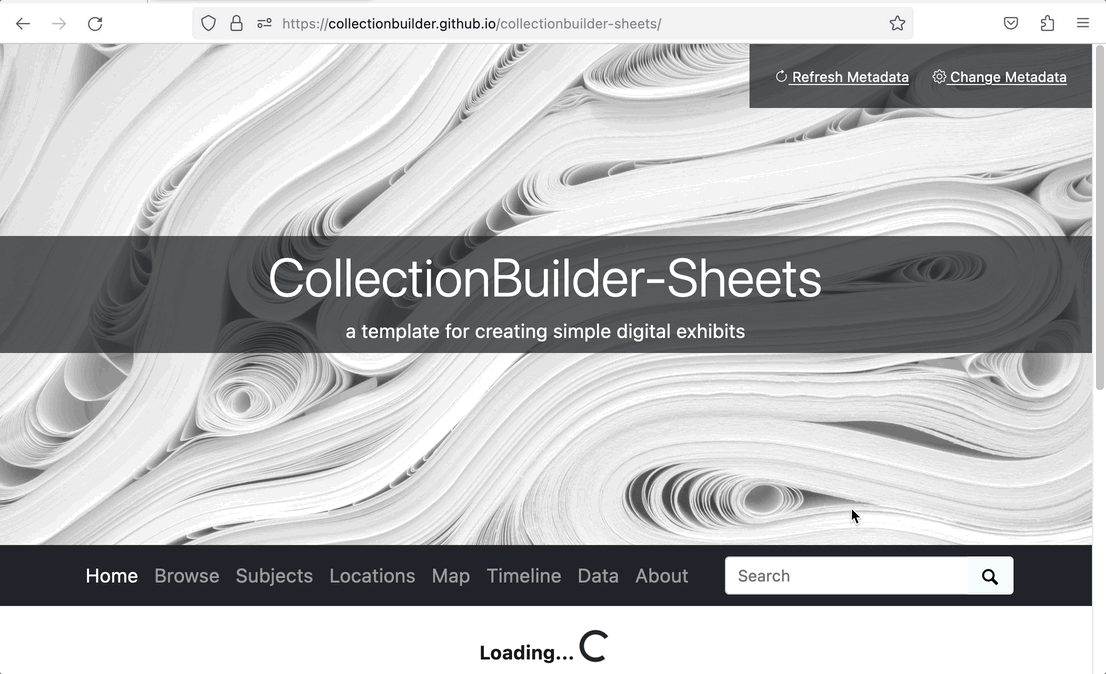
Visit the CollectionBuilder-Sheets default template site. This configuration site is a great tool for testing to see what your metadata looks like as a digital collection website.
Click the Use Metadata CSV Link (e.g. Google Sheet) option and paste the shareable link from the Step 2, and then click Submit.
- You should now see a prototype site featuring objects and metadata from the Watkins Digital Collection. Please leave this site open in its own tab since you will need it for the next step.
Important: To view your objects on the prototype site, the files will need to be available externally on the web (e.g., hosted on your organization’s server or via a platform such as Digital Ocean or Reclaim Hosting). You can also host files for free via GitHub pages.
External links to your objects should be included in the filename column of your metadata spreadsheet. Please read our Metadata Documentation to learn more about external item files.
4. View live changes to your metadata.
- In the metadata spreadsheet that you published to the web in Step 2, for
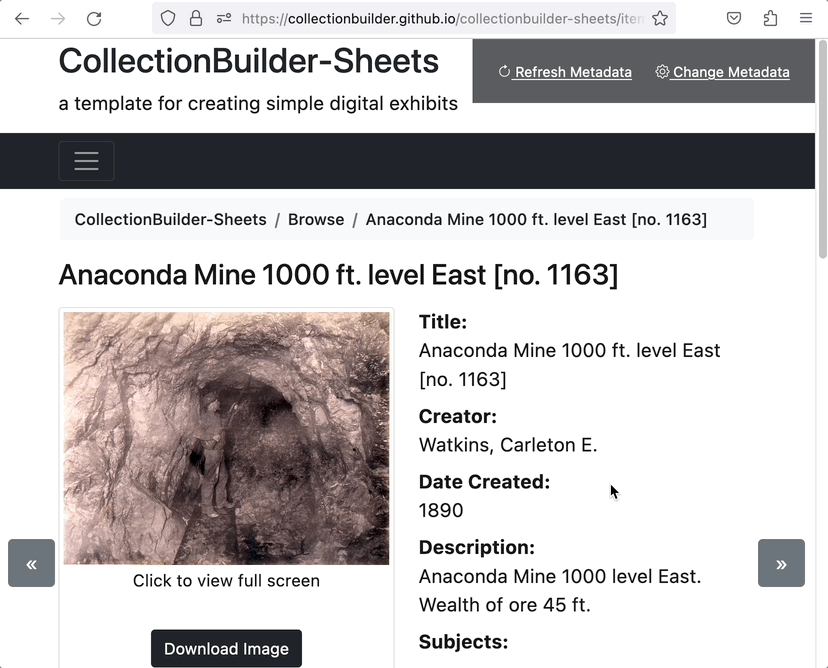
objectid“watkins0” add “This is a test change” to the description cell.
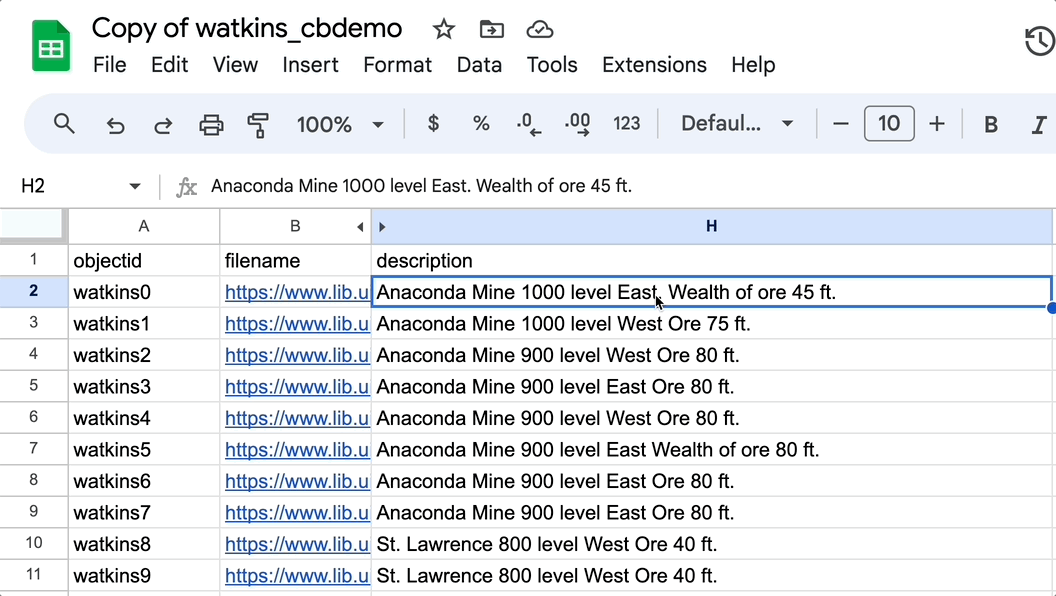
The new description for this object should now be: “Anaconda Mine 1000 level East. Wealth of ore 45 ft. This is a test change.”
Navigate to the prototype site you created in Step 3.
Click on Browse in the top navigation menu.
Type “Anaconda Mine 1000 ft. level East [no. 1163]” in the empty box underneath Browse Items and click on the result that shows up.
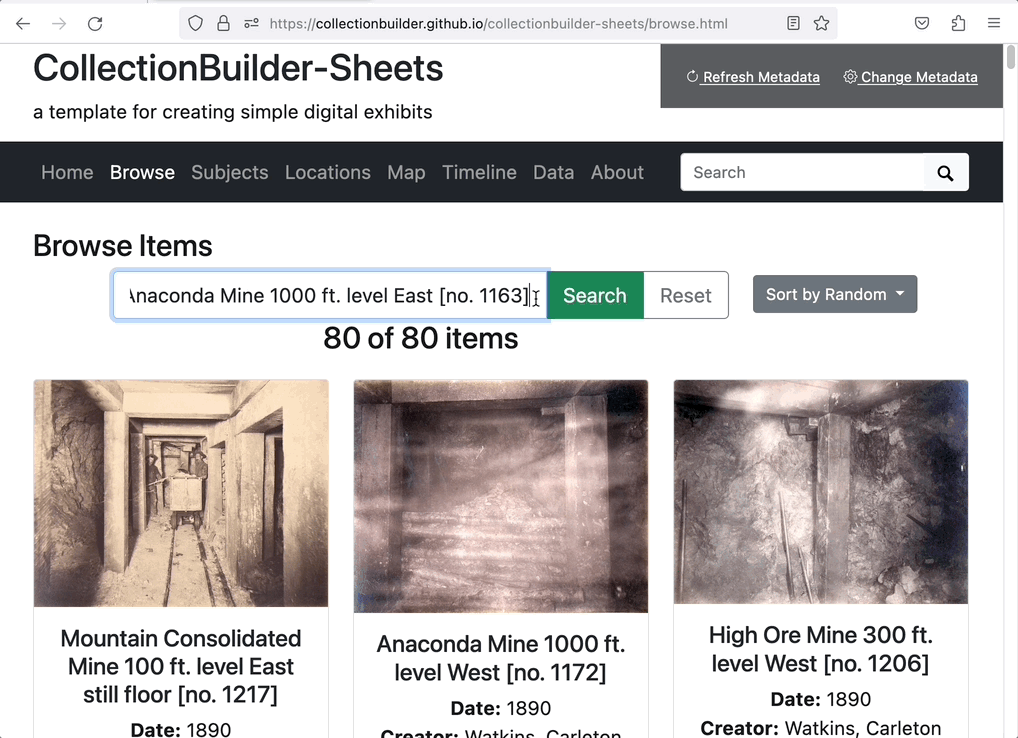
- Once you have navigated to the item page for “Anaconda Mine 1000 ft. level East [no. 1163]”, click Refresh metadata in the top right corner of the screen. You should now see the sentence “This is a test change” appear in the description field.
- You can practice editing the metadata sheet and viewing changes live with the Refresh metadata option.
Note: Sometimes you will not see your metadata edits right away! It may take a minute or two for the servers storing the data to update.
5. Share your test site via URL.
- To share your test site with others, add your full metadata link to the end of the CB-Sheets default template site’s URL as the “csv” option, like: https://collectionbuilder.github.io/collectionbuilder-sheets/?csv=your metadata URL here
For example:
Warning: The metadata URL cannot have any & symbols (i.e. additional query string parameters). Having an ‘&’ symbol in the URL will cause the parsing to fail.
You can share this link with your collaborators, as well as a link to your working copy of your metadata spreadsheet so they can also make changes to the metadata and continue testing the site. This prototype site is suitable for when you are still in the development and testing stage of your project.
To publish a permanent digital collection site using CollectionBuilder-Sheets, please continue to Part 2 of the walkthrough.
SHEETS Walkthrough: Part 2
The second part of this walkthrough provides steps for publishing an ongoing collaborative site and/or a permanent collection site. You will see how to link your published Google Sheet in your collection settings to see changes live. You will also learn how to add your csv file to the assets folder in order to publish a permanent collection site.
For this part of the walkthrough, you will use demo metadata from the University of Idaho’s Carleton Watkins Mine Interiors Collection, the CollectionBuilder-Sheets Template, and GitHub Pages.
6. Create a GitHub account. (Video Version)
- If you don’t have an account, visit GitHub and click the Sign up button. You do not need a paid account for using CollectionBuilder. After signing up, check your email to verify your account.
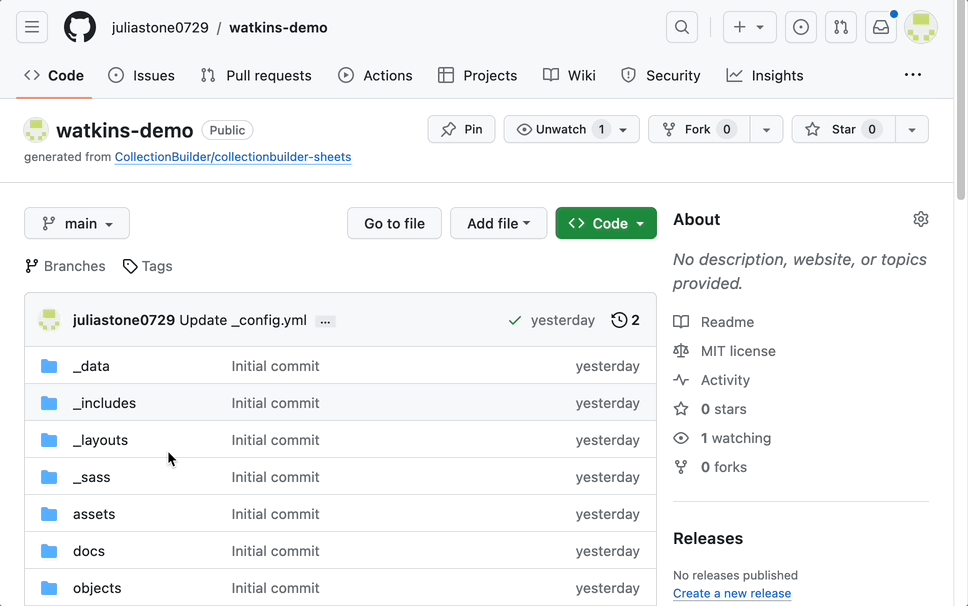
7. Create a new repository.
After ensuring you are logged in to your GitHub account, visit the cb-sheets repository page.
Click the green Use this template button and then the Create a new repository dropdown option.
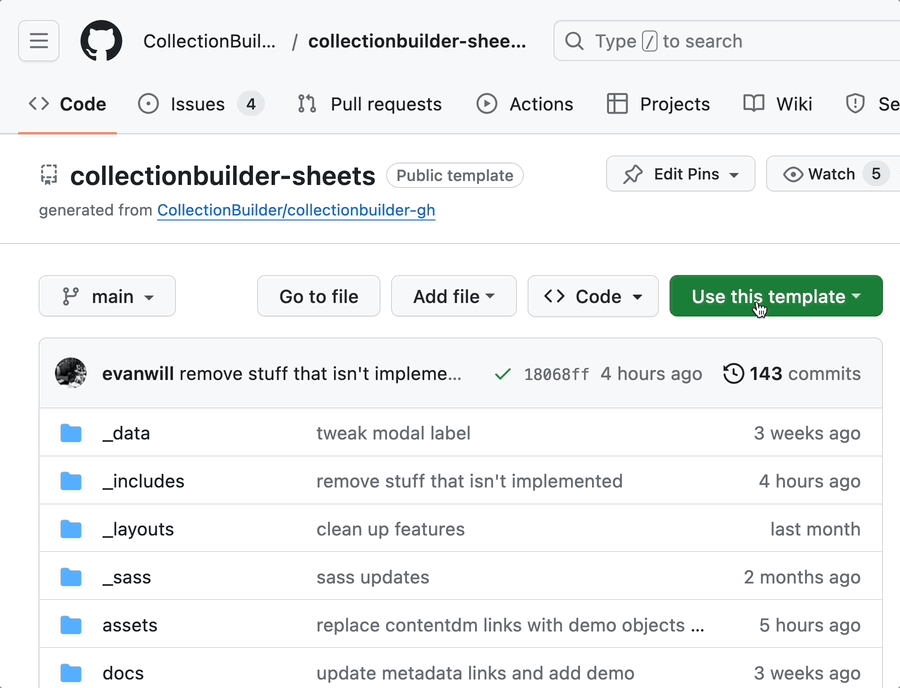
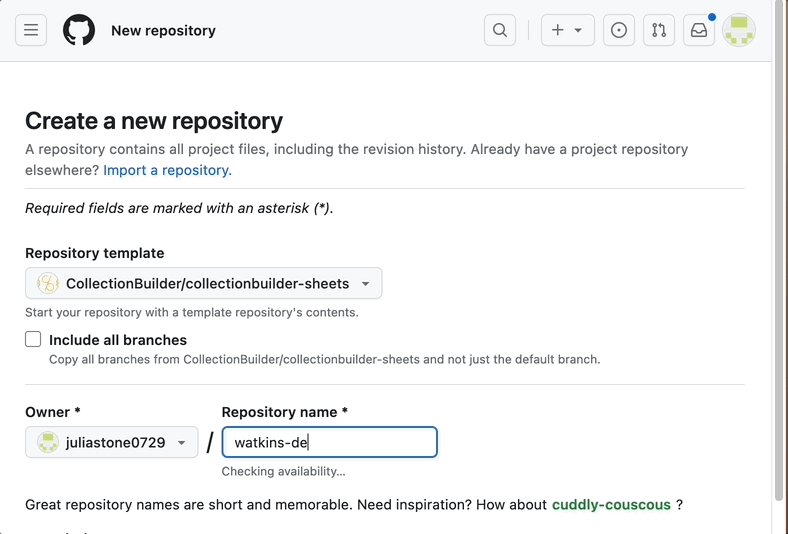
- Leave the repository as Public. Enter a repository name (use a lowercase name without spaces or odd characters, e.g. watkins-demo) and click the Create repository button.
8. Add objects to your repository directly (if necessary).
Important! The demo metadata for this walkthrough already contains links to external objects in the filename field, so you do not need to add any object files directly to the repository for this walkthrough.
However, if your metadata spreadsheet does not link to external item files (e.g., objects hosted on your organization’s server or via a platform such as Digital Ocean or Reclaim Hosting), then you will need to add your object files to the “objects” folder.
To add objects to your repository, visit the homepage of your repository and click on the “objects” folder.
On the “objects” folder page, click the Add file button and select Upload files.
Click Choose your files, navigate to the location of the object files on your computer (probably in a folder).
To select all the objects to add, click the first object file in the list and then hold down
Shift, scroll down, and click the last file in the list. Press Enter to begin the upload.
Warning: Make sure to select all the object files instead of just adding a zip file.
- Scroll down to the Commit changes box, write a short commit message describing what you did (e.g. Add objects), and then click the green Commit changes button.
9. Link to your Google Sheet in the _config.yml file.
Note: This step is recommended if you are working on an ongoing collaboration where your Google Sheet is not completed yet. If your collaborative metadata work is done and you are ready to publish the site in a more permanent and secure way, please move on to Step 11.
On the homepage of your repository, click on the “_config.yml” file.
Click on the edit button (the pencil icon) to edit the file.
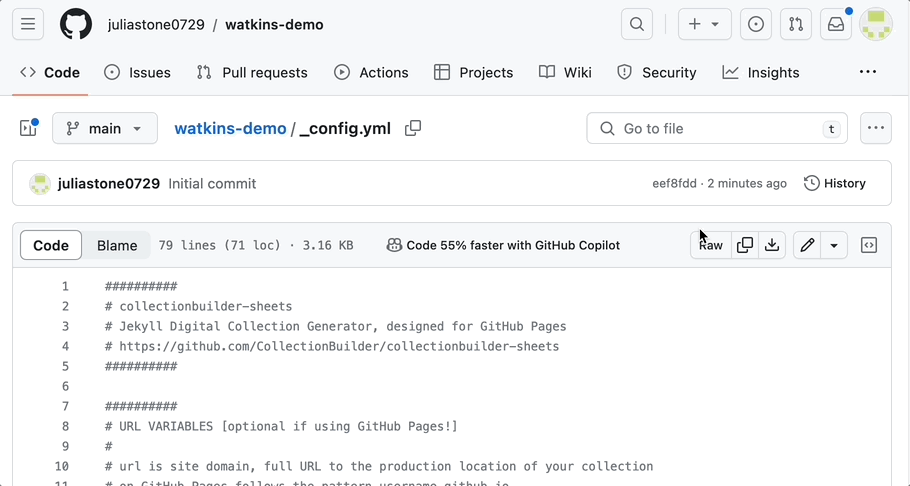
- Under the COLLECTION SETTINGS section, where it says
metadata-csv, paste the full URL to your CSV file, such as a published Google Sheet. (If you need a reminder of how to publish a Google Sheet to the web, see Step 2.
For example:
metadata-csv: https://docs.google.com/spreadsheets/d/e/2PACX-1vRJhe6UcNZXItEtHlxQFOaHBBD2SDU8nyNOAROtcLWLrl83sYaCNBNYHOvhM_xZ7SVnnOrjCzo6U5_o/pub?output=csv
- Under the SITE SETTINGS section, replace the
titleplaceholder text with a title of your choice.
For example:
title: Watkins Demo Collection
Optional: Write a new
tagline,description, andauthor.Scroll down to the Commit changes box, write a short commit message describing what you did (e.g. Update site settings), and then click the green Commit changes button.
10. See your live changes by editing the Google Sheet.
You can make changes to the metadata spreadsheet that you published to the web and view the changes on your live site.
Need a reminder on how to do this? Visit Step 4 to practice editing the metadata sheet and viewing changes live with the Refresh metadata option.
Ready to publish: The following steps are for when your collaborative metadata work is done and you are ready to publish the site in a more secure way.
11. Add your metadata CSV file to the “assets” folder.
- Download your Google Sheet as a .csv file by clicking File → Download → Comma Separated Values (.csv).
- Locate the CSV file on your computer (probably in the Downloads folder).
Warning: Do not open the CSV file to avoid issues with Microsoft Excel scrambling your UTF-8 encoding. Excel cannot correctly export a CSV for use with CollectionBuilder.
Without opening the CSV file, rename it using all lowercase letters, no spaces, and no special characters (e.g. watkins-demo.csv)
On the homepage of your repository on GitHub.com, click on the “assets” folder.
Then click the Add file button and select Upload files.
Click Choose your files, navigate to the location of your metadata CSV (probably in your Downloads folder), and select the file. Press Enter to begin the upload.
Scroll down to the Commit changes box, write a short commit message describing what you did (e.g. Add metadata file), and then click the green Commit changes button.
12. Configure site settings.
- Under the COLLECTION SETTINGS section, where it says
metadata-csv, put the relative path to your CSV in the “assets” folder following the pattern of/assets/filename.csv.
For example:
metadata-csv: /assets/watkins-demo.csv
Next, scroll down to the BUILD SETTINGS section. Find where it says
development-mode: true. Replacetruewithfalse. This will turn off the ability to change the metadata on your live site.Scroll down to the Commit changes box, write a short commit message describing what you did (e.g. Update site settings), and then click the green Commit changes button.
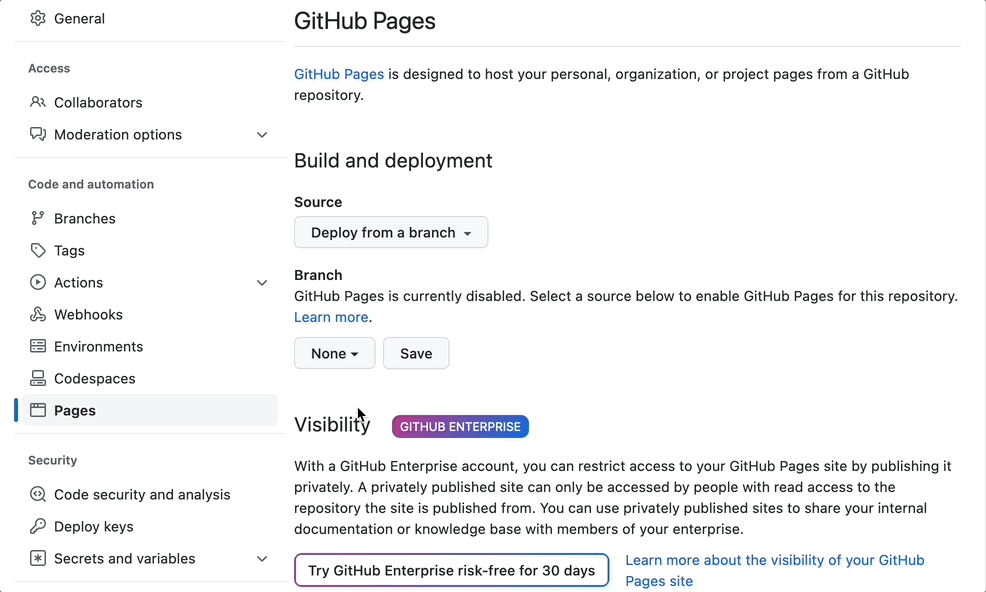
13. Publish your site using GitHub Pages.
Note: The following steps are the same as the steps in the CB-GH Walkthrough for publishing a GitHub Pages site.
- On your repository homepage, click the Settings tab in the top right and then click Pages in the left side menu.
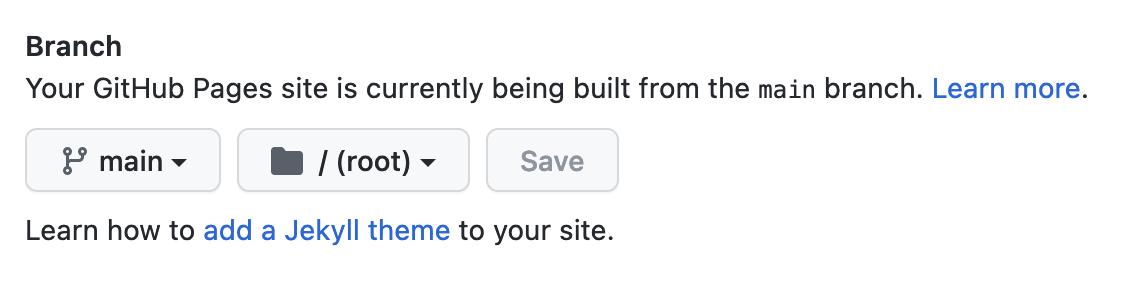
Under Source leave the dropdown option as Deploy from a branch.
Use the dropdown to change from “none” to “main” (leave the folder option as “/root”). Then click the Save button.
- It will take a few minutes for your site to go live. You will see a message that your site is currently being built.
- After waiting a bit, refresh the page. If the build is successful, an alert will appear providing the URL to your live site. The URL will follow the pattern: https://username.github.io/repository-name
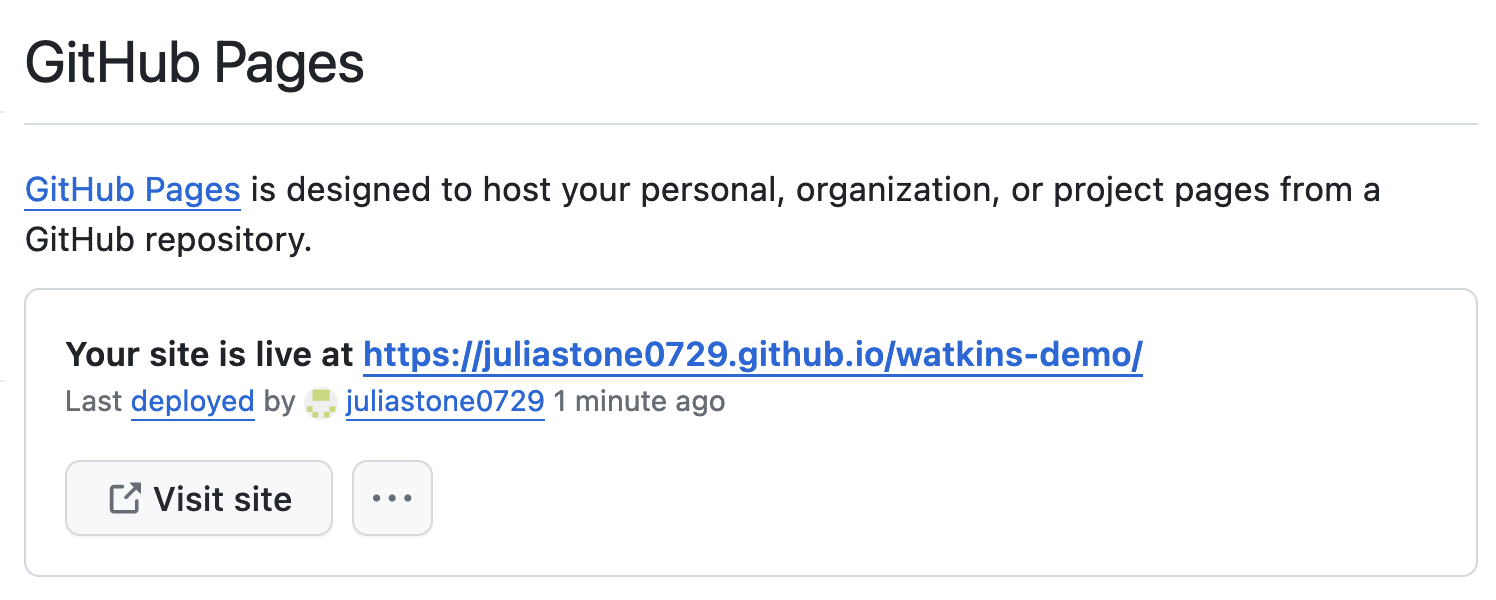
- You can visit this URL to see changes to your live site. To ensure any changes you commit are complete, look for a green check mark instead of an orange dot in the Code section of your repository’s homepage.
Tip: You may need to refresh the collection website for the changes to display.
14. Add a featured image.
On your repository homepage, click on the “_data” folder and then click on the “theme.yml” file.
Under the HOME PAGE section, replace the
objectidplaceholder text with theobjectidof an image in the collection that you want to be the top image on the homepage.
For example:
featured-image: watkins37
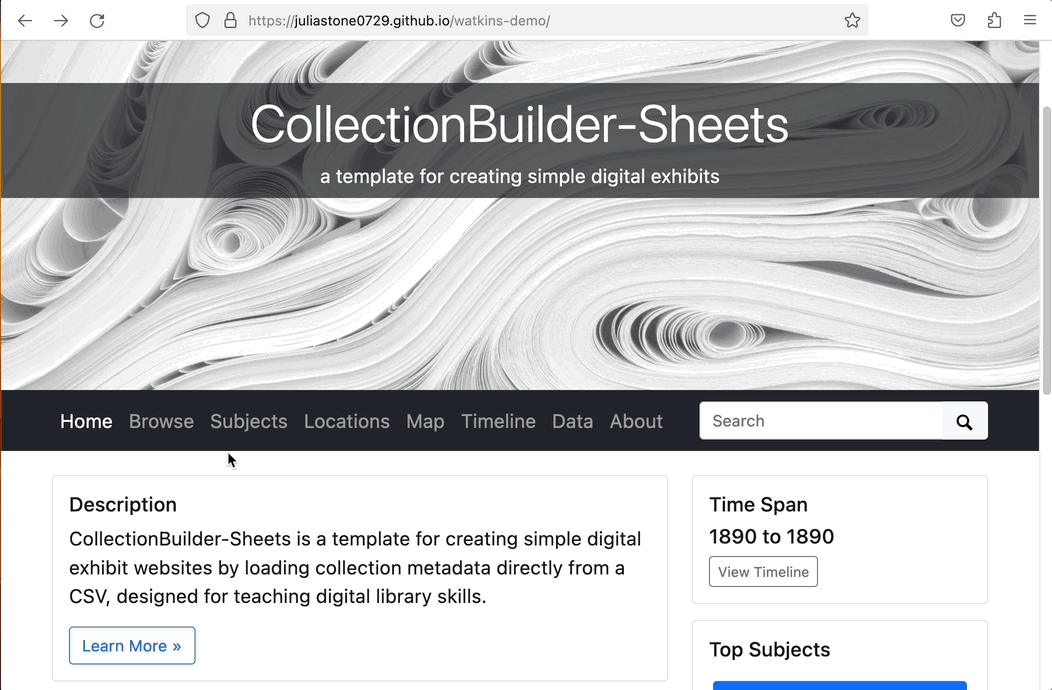
- Visit your live site and use the Browse page to view potential featured images.
- To find the
objectidfor an image, click on the image title and then check the end of the URL of the item page. The URL will include theobjectidafter id=.
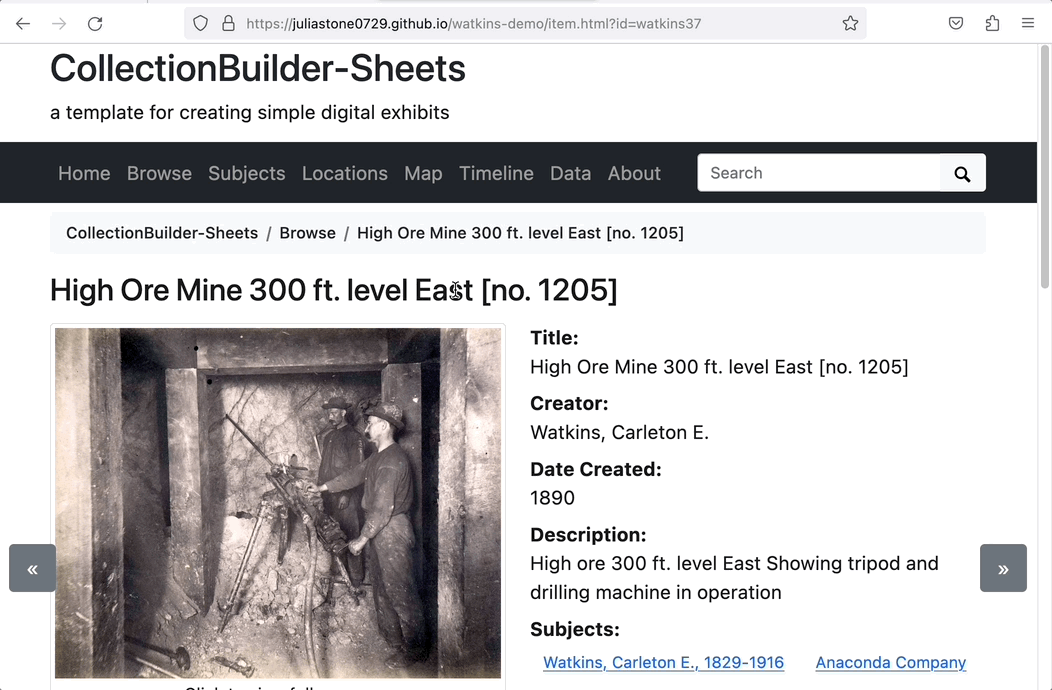
For example:
For the URL, https://juliastone0729.github.io/watkins-demo/item.html?id=watkins37, the objectid is watkins37.
Tip: It is best to choose a large horizontal image if possible.
- After you have updated the featured image, write your commit message (e.g. Add featured image) and commit your changes. View your changes by visiting your site’s URL.
15. Edit the About Page.
On your repository homepage, click on the “pages” folder and then on the “about.md” file.
Write some text on this page using Markdown.
Optional: Practice using example code from our Feature Includes Bonanza page.
After you are done editing the About page, write your commit message (e.g. Edit About page) and commit your changes. View your changes by visiting your site’s URL.
16. Explore potential next steps.
Your collection website is complete! To implement additional Customization Options, your next steps could be:
If you want to get into more Advanced Options, you could explore:
To build your own custom digital collection website, you can follow these steps again after creating your own metadata file.