CollectionBuilder-CSV Walkthrough
This walkthrough provides steps for creating an example digital collection using preexisting demo metadata from the University of Idaho’s Psychiana Digital Collection, the CollectionBuilder-CSV Template, and the GitHub Actions feature.
Important Note: You will need to install free, open-source software on your computer and create a free GitHub account for this walkthrough.
Video Option: If you would prefer to move through a video version of this walkthrough, check out our YouTube Playlist or click on the video version of each step linked below.
1. Create a GitHub account. (Video Version)
- If you don’t have an account, visit GitHub and click the Sign up button. You do not need a paid account for using CollectionBuilder. After signing up, check your email to verify your account.
2. Download and install software on your computer (Git, GitHub Desktop, Visual Studio Code, Ruby, Jekyll, ImageMagic and Ghostscript) (Video Version)
Click on the links below to our documentation for detailed help with the installation process for each piece of free, open-source software:
- Install Git
- Install GitHub Desktop
- Install Visual Studio Code (VS Code)
- Install Ruby
- Install Jekyll
- Install ImageMagick and Ghostscript (Optional: You only need this software if you want to create object derivatives)
In our documentation we’ve tried to anticipate common issues to help with troubleshooting, but if these options do not work, try Googling your problem using a specific search (include the error message you are getting!).
If you are still having problems installing software, please feel free to reach out to the CollectionBuilder team at collectionbuilder.team@gmail.com.
3. Create a new repository (Video Version)
After ensuring you are logged in to your GitHub account, visit the collectionbuilder-csv repository page.
Click the green Use this template button and then the Create a new repository dropdown option.
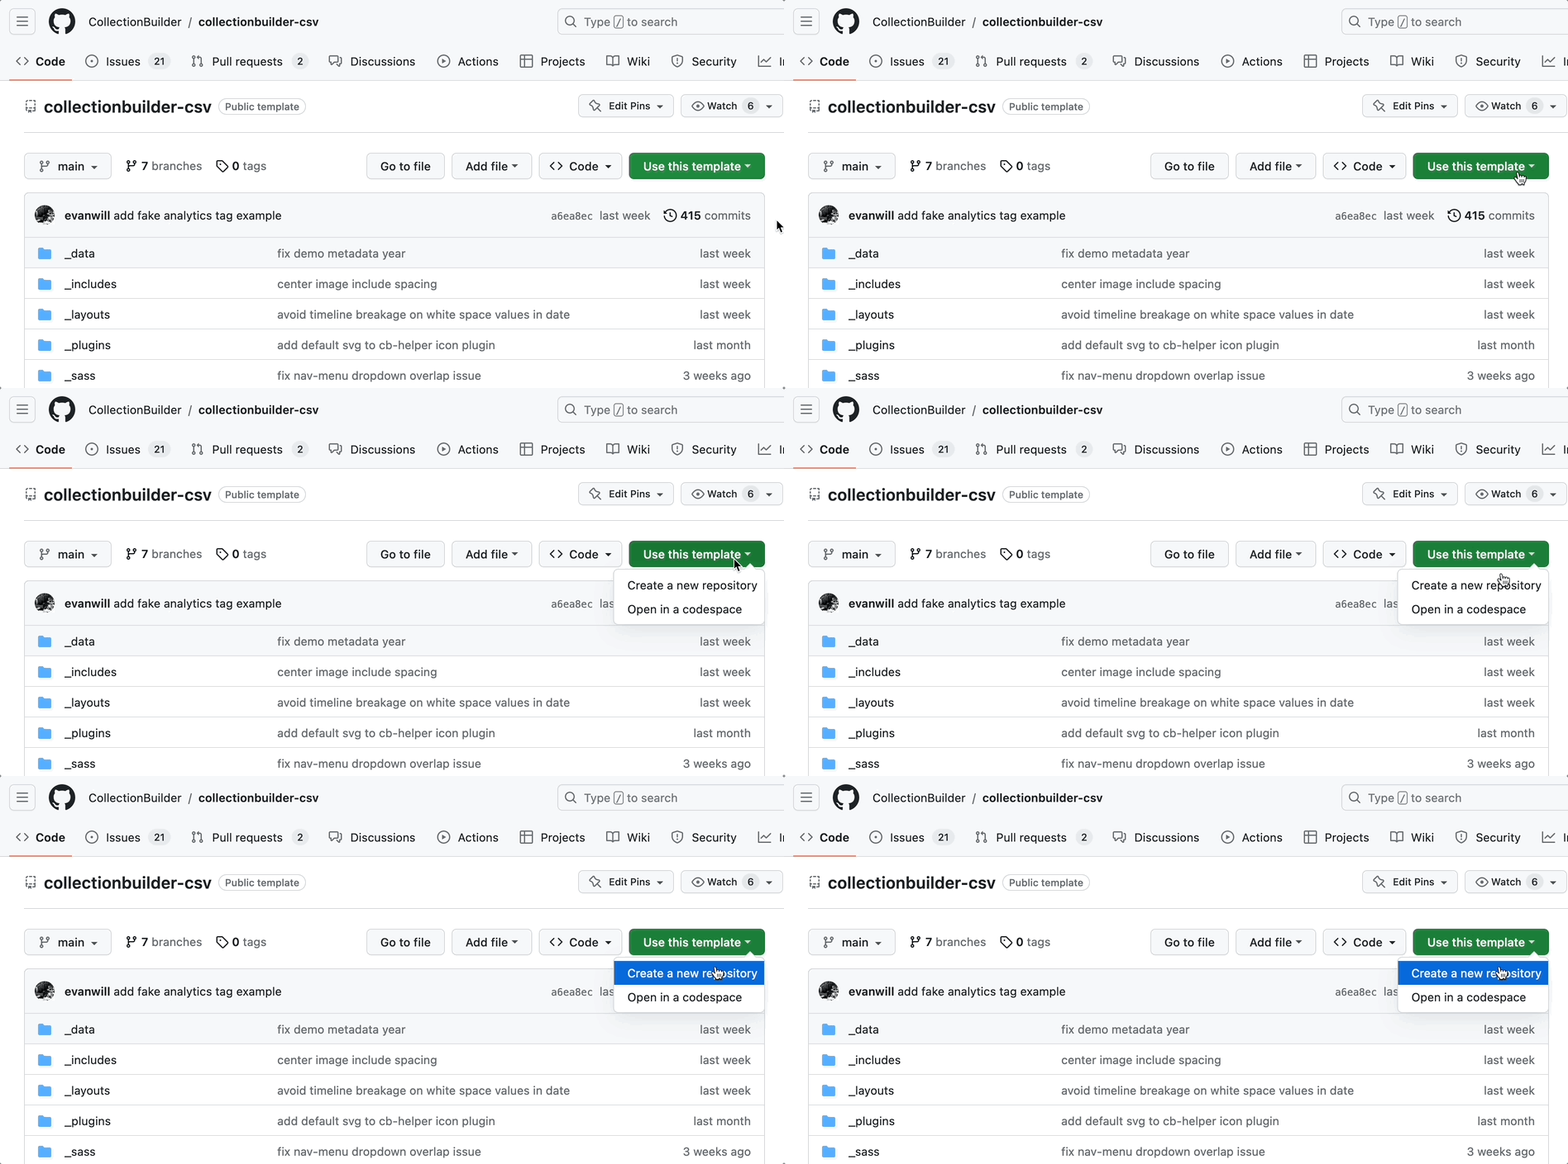
- Leave the repository as Public. Enter a repository name (use a lowercase name without spaces or odd characters, e.g. demo-repository) and click Create repository from template.

4. Clone your repository using GitHub Desktop (Video Version)
- On your new repository’s home page, click on the green button labeled Code. In the box that pops up, click on the button labeled Open with GitHub Desktop. This action will open GitHub Desktop on your computer.

- GitHub Desktop will ask you to confirm the path of the repository you are cloning. Once you click the blue Clone button, GitHub Desktop will create a new folder on your computer with the matching your repository name and clone the contents of the repository from GitHub.
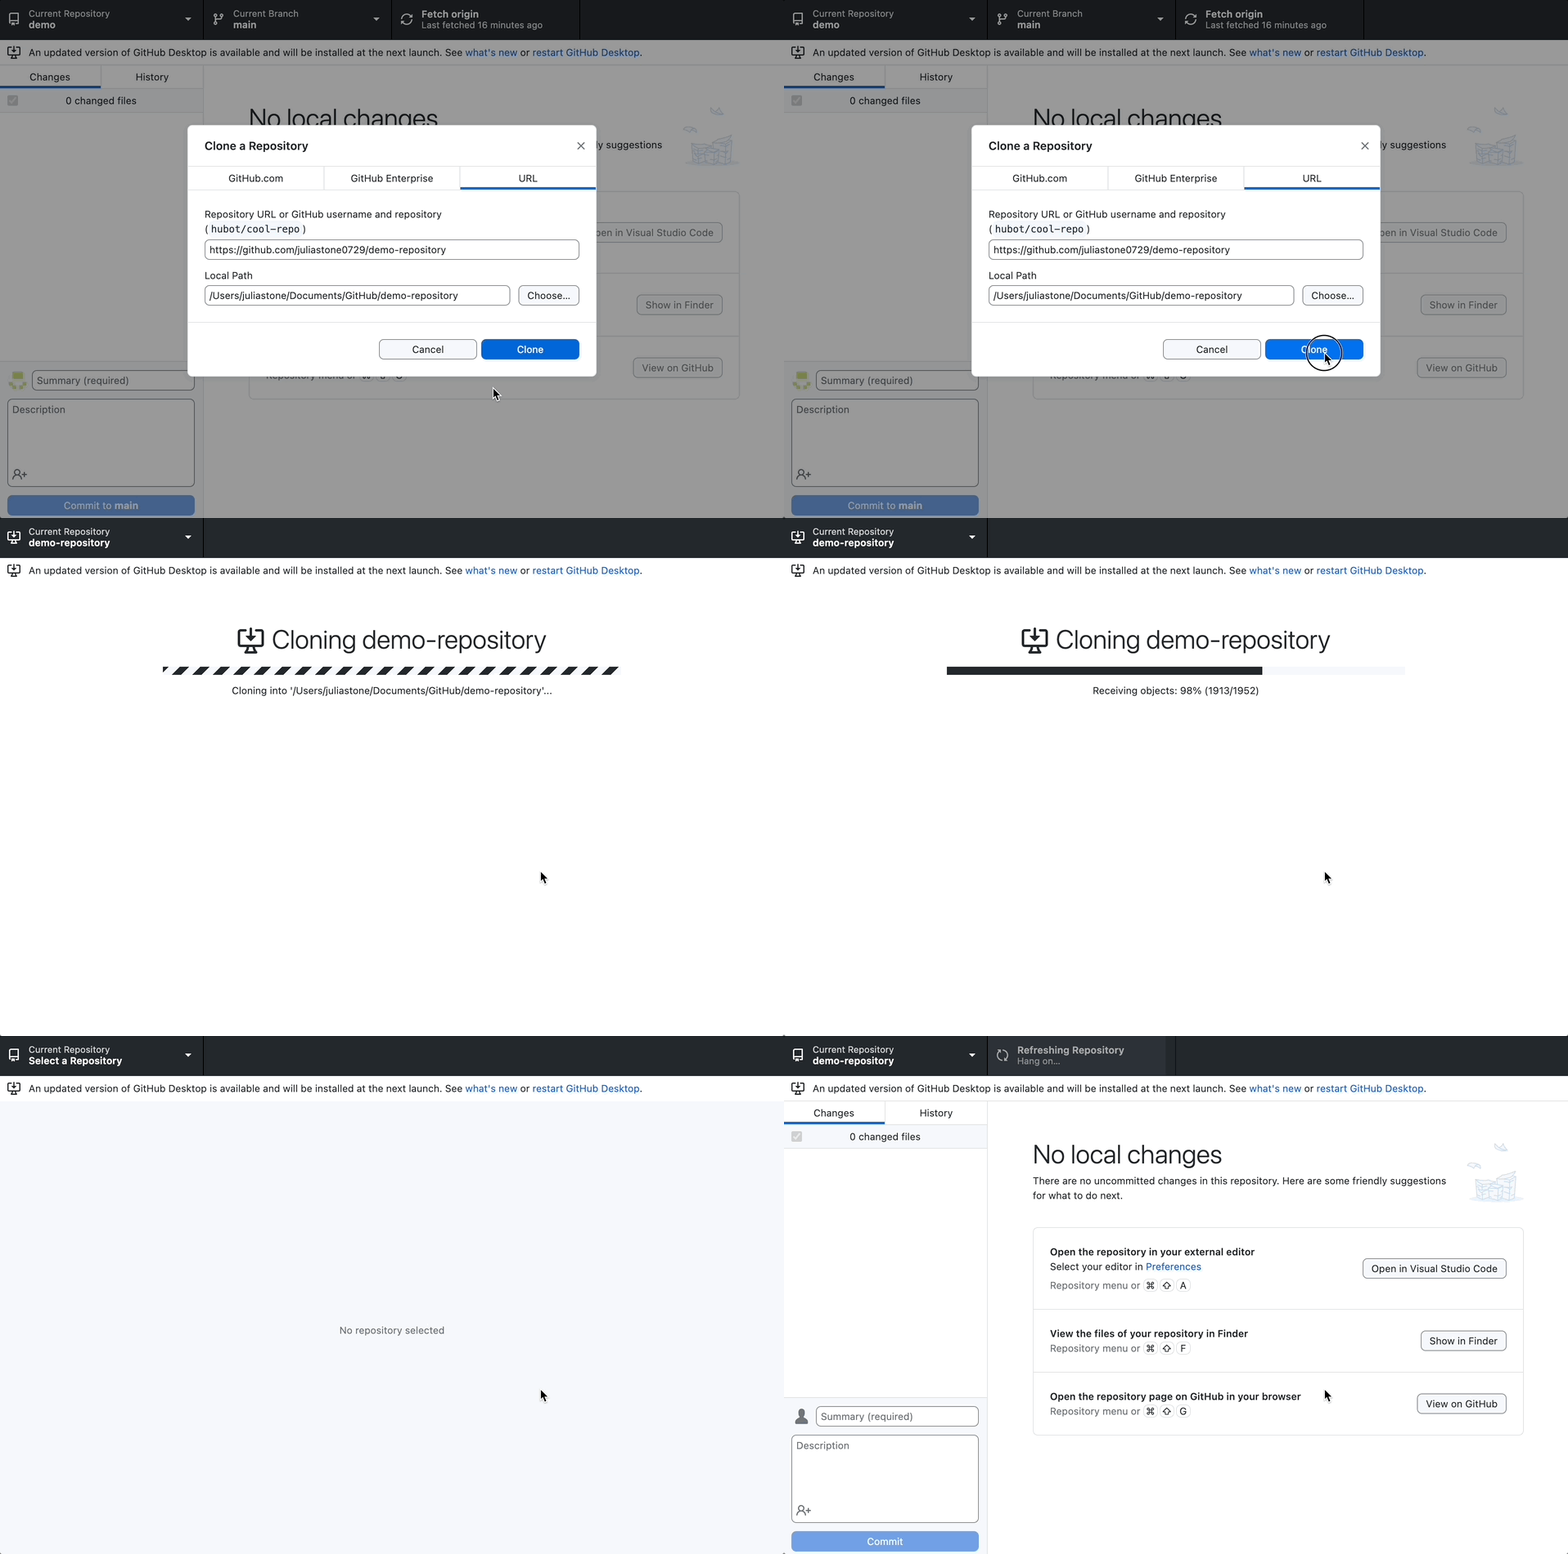
- Note: The repository is a folder of files and you can store it anywhere, but we recommend using the default storage location on your computer: documents/GitHub.
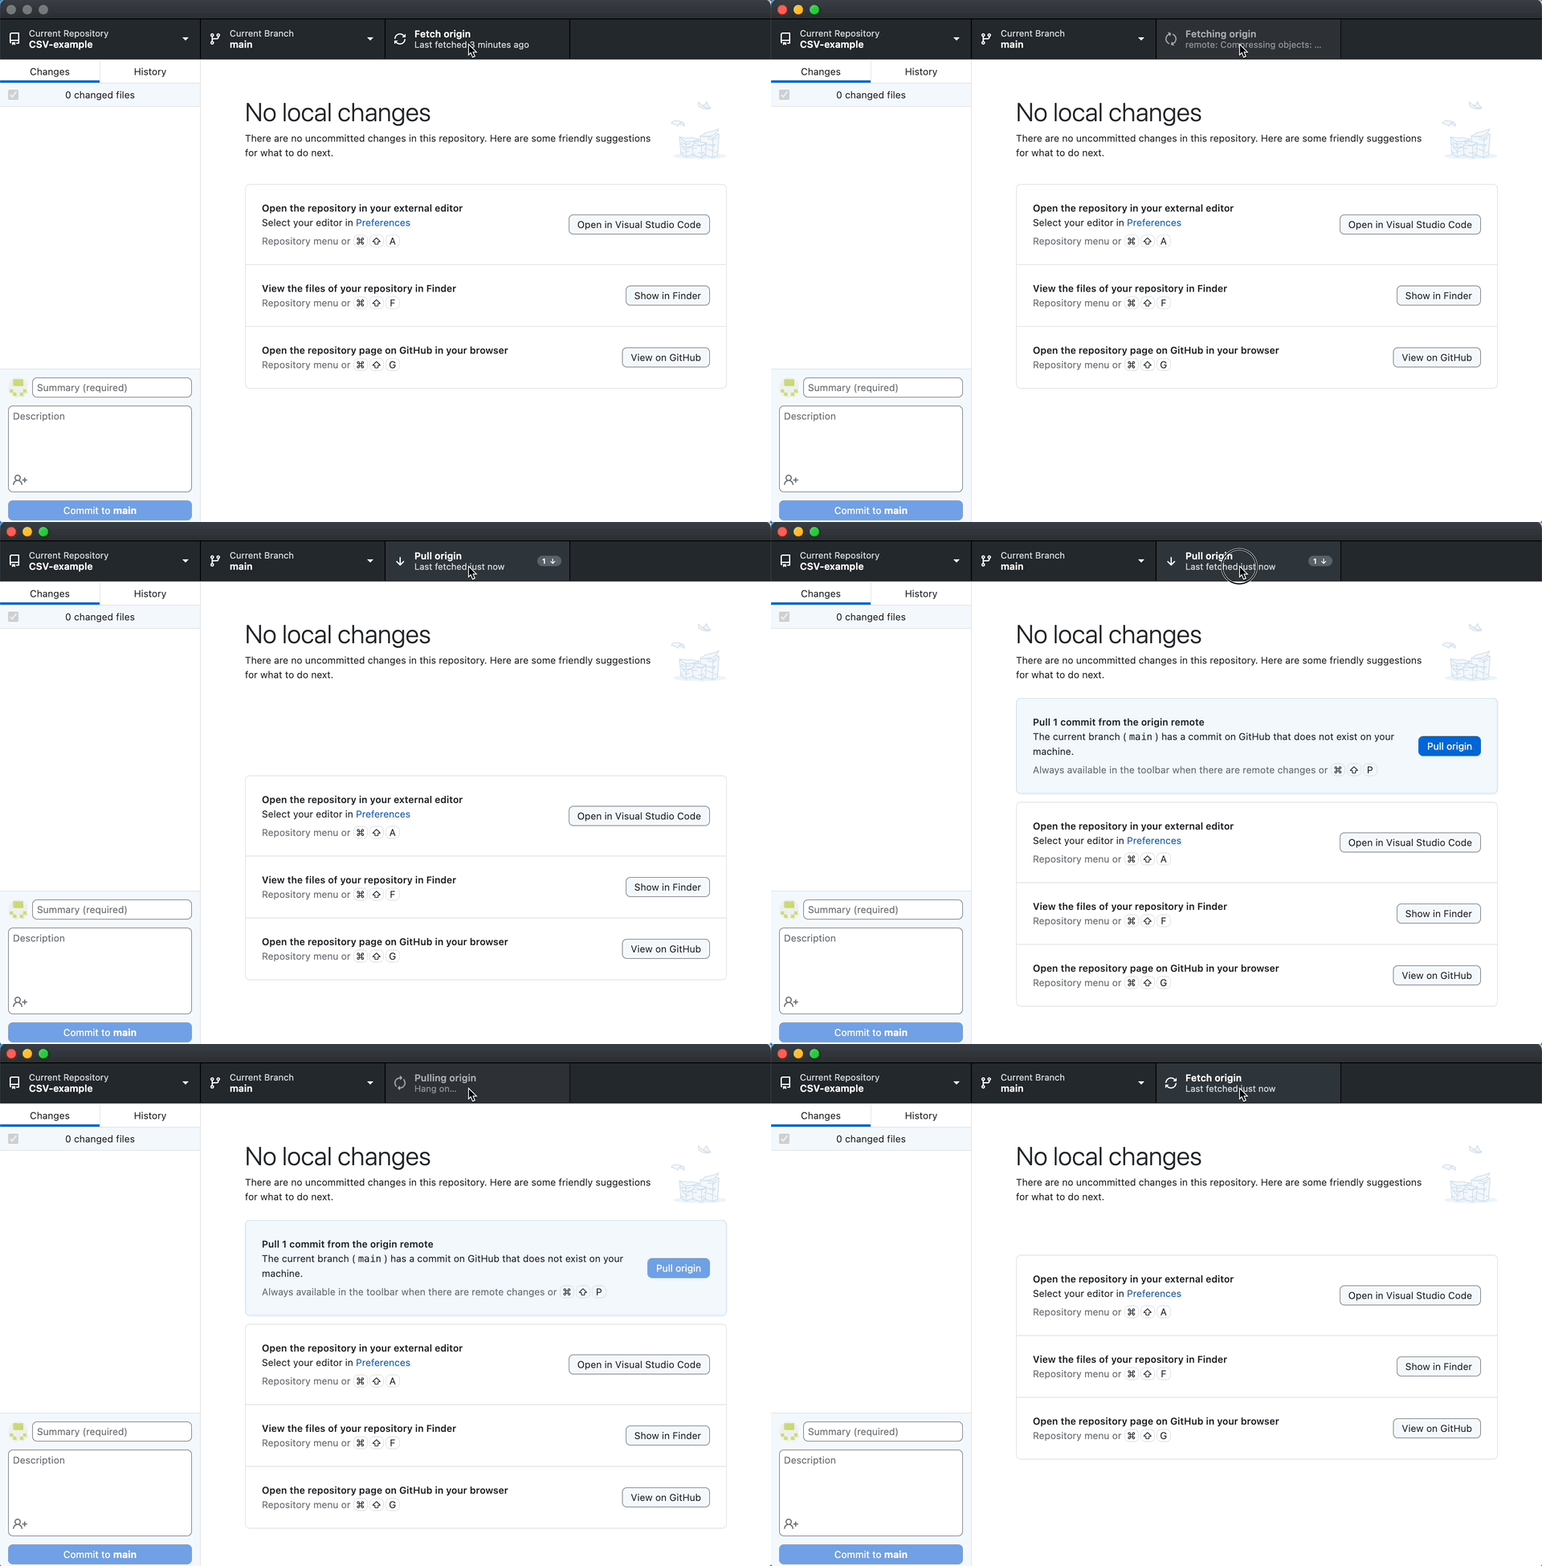
A quick explanation of Fetch, Pull, and Push: On the top right of GitHub Desktop, you can Fetch origin, Pull origin, or Push origin. Clicking these commands allows you to sync the local version of your repository with the version on GitHub, using Git to push and pull changes between them.
- Reminder: When you are working on multiple computers or collaborating with others, be sure to fetch and pull changes from GitHub before you start working on your project.
5. Use GitHub Desktop to open your repository in VS Code (Video Version)
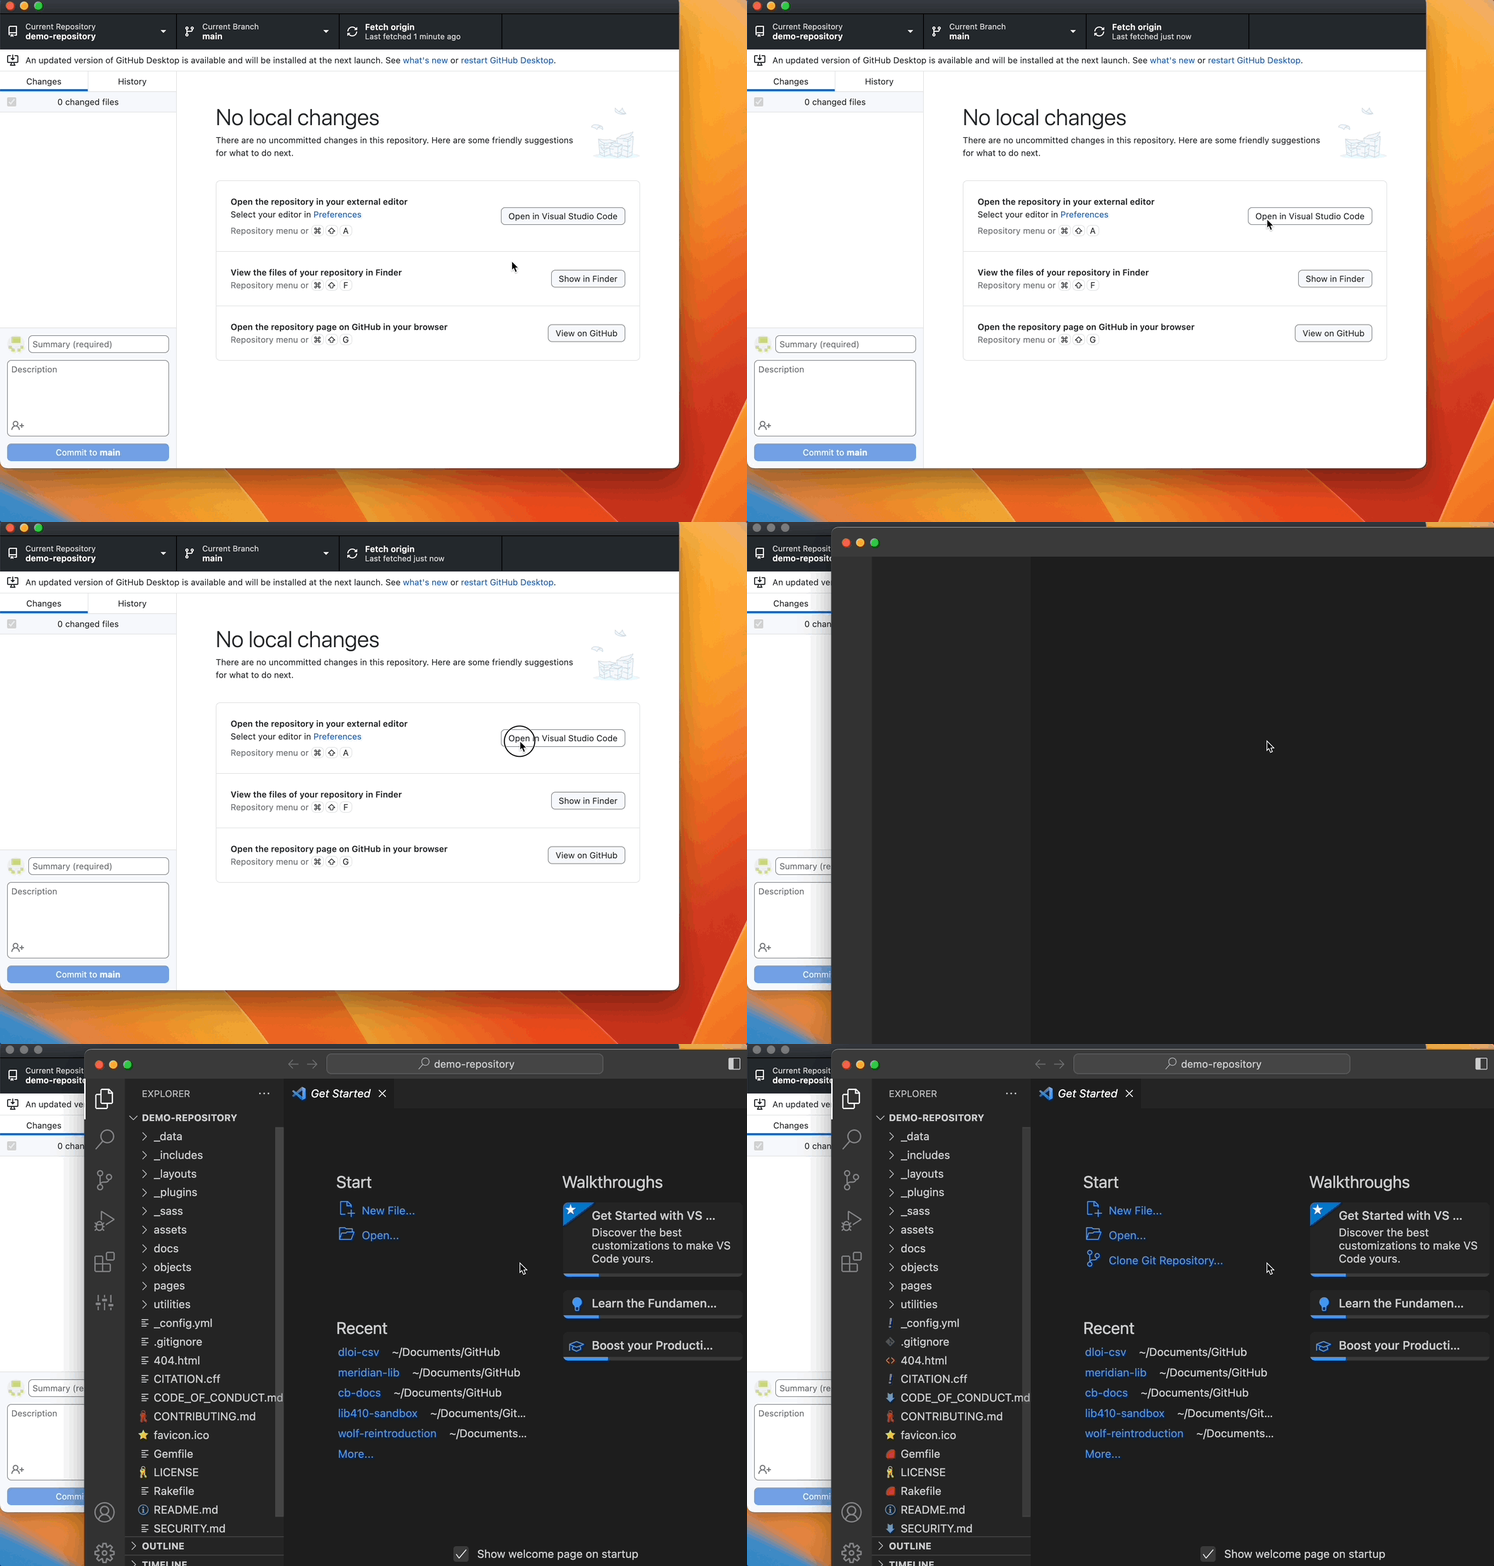
Check to make sure you are in the correct repository by viewing the top left section of GitHub Desktop. To switch between repositories, locate the Current Repository dropdown, and select the repository you’d like to open.
In the top menu, locate and click on Repository, and select the option, Open in Visual Studio Code.

- Alternatively, in the box that says Open the repository in your external editor, you can click the button that says Open in Visual Studio Code.
6. Add your objects to your repository directly (if necessary) (Video Version)
Important! The demo metadata for this walkthrough already contains links to external objects (e.g., image files, PDFs, mp3s, etc.) in the object_location, image_small, and image_thumb fields, so you do not need to add any object files directly to the repository in VS Code.
If you want to get started right away with building a collection site using the demo metadata, continue to Step 7 of this walkthrough.
Interested in learning how to add object files directly to your repository? If so, you can check out our Object Derivatives Walkthrough. This walkthrough also reviews how to generate thumb and small object derivatives using CollectionBuilder-CSV’s built-in rake tasks and how to update your metadata spreadsheet to include these derivatives.
For more information on the object_location field, visit our Object Location Fields documentation which covers how to use the correct file paths or URLs for your objects.
7. Prepare your metadata for upload (Video Version)
Make a copy of this Google Sheet of pre-made demo metadata: Psychiana Digital Collection Metadata
Download the spreadsheet as a .csv file by clicking File → Download → Comma Separated Values (.csv)
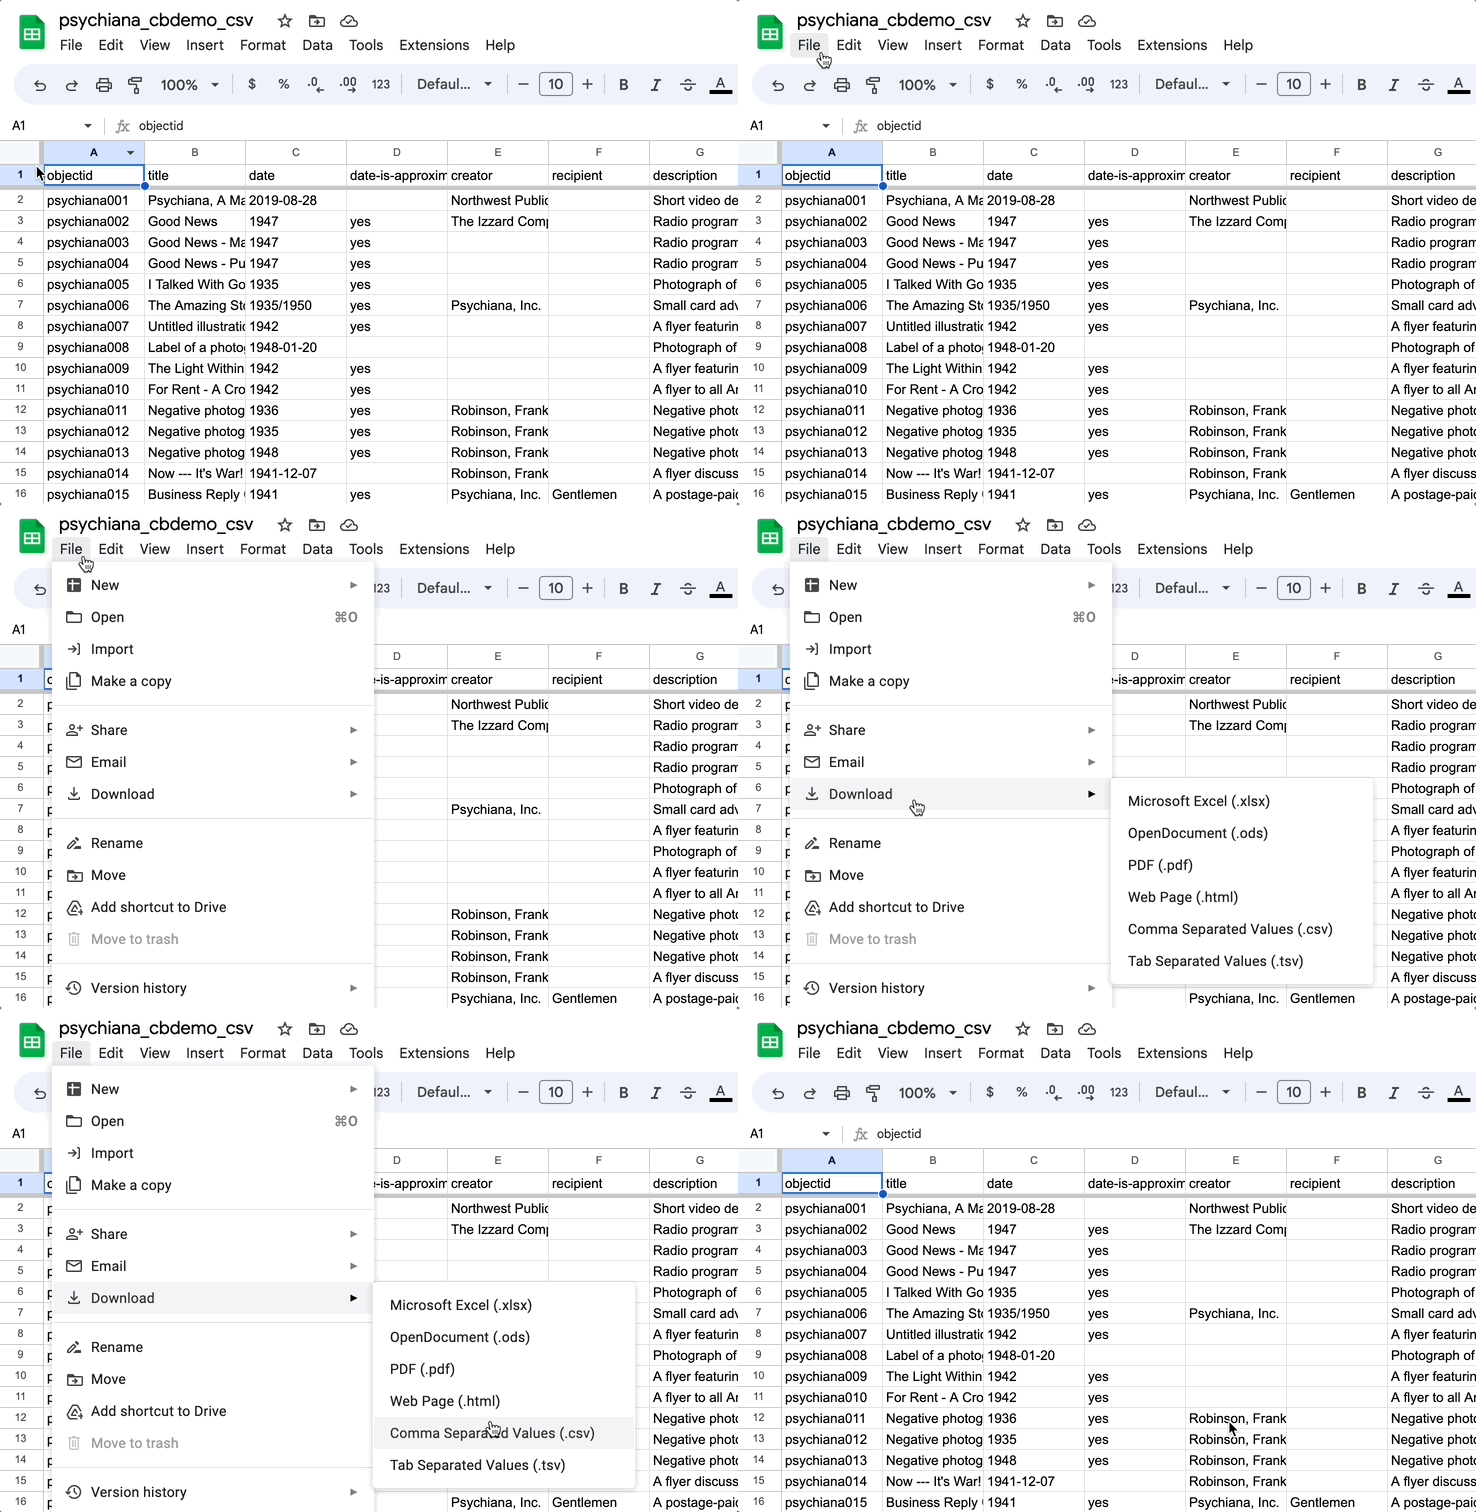
- Locate the file in the Downloads folder on your computer.
Warning: Do not open the CSV file to avoid issues with Microsoft Excel scrambling your UTF-8 encoding. Excel cannot correctly export a CSV for use with CollectionBuilder. It’s super annoying! We know!
- Without opening the file, rename it using all lowercase letters, no spaces, and no special characters. For example: “demo-repository.csv”
8. Upload your metadata file (Video Version)
- In VS Code, click on the “_data” folder.

Navigate to the location of your saved metadata CSV (probably in your Downloads folder or on the Desktop), and select the file.
Drag the file into the “_data” folder on VS Code.
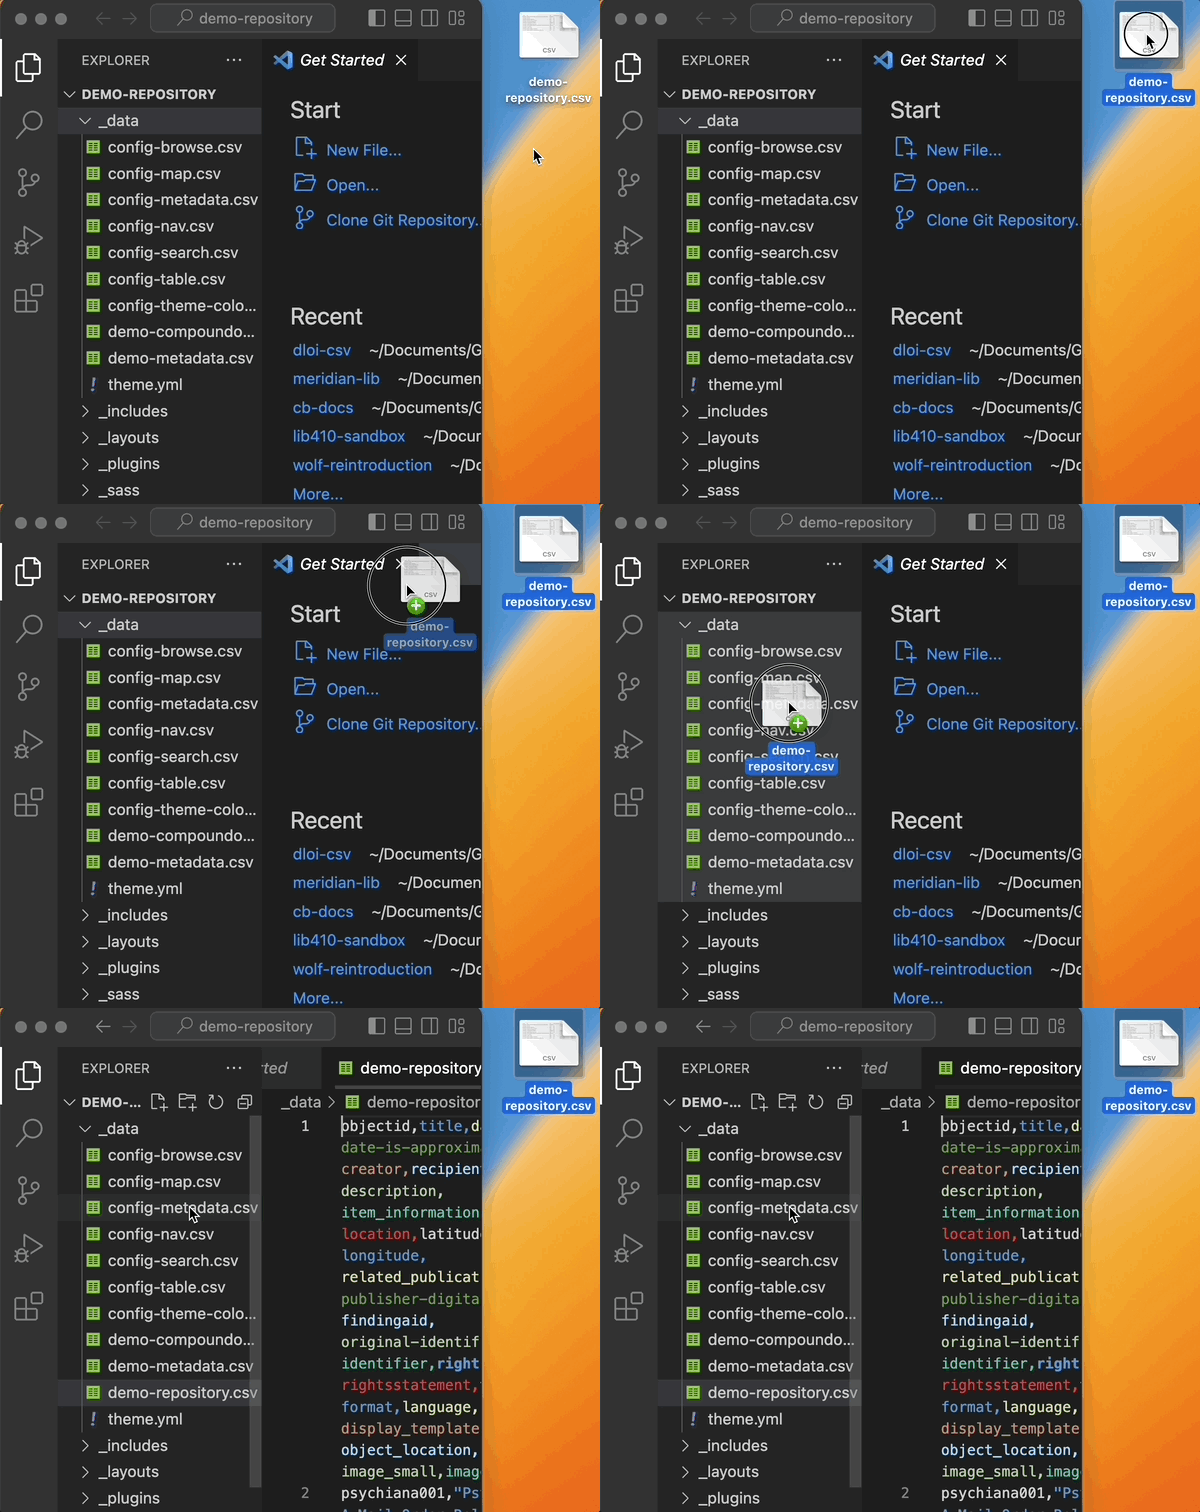
- Note: The folders and files in the left side of the VS Code interface work like any other folder and file on your computer – you can drag things in there as you’d like.
9. Commit your changes using VS Code (Video Version)
- In VS Code, click on the Source Control icon, i.e. the network icon on the left side, or press Ctrl + Shift + G.
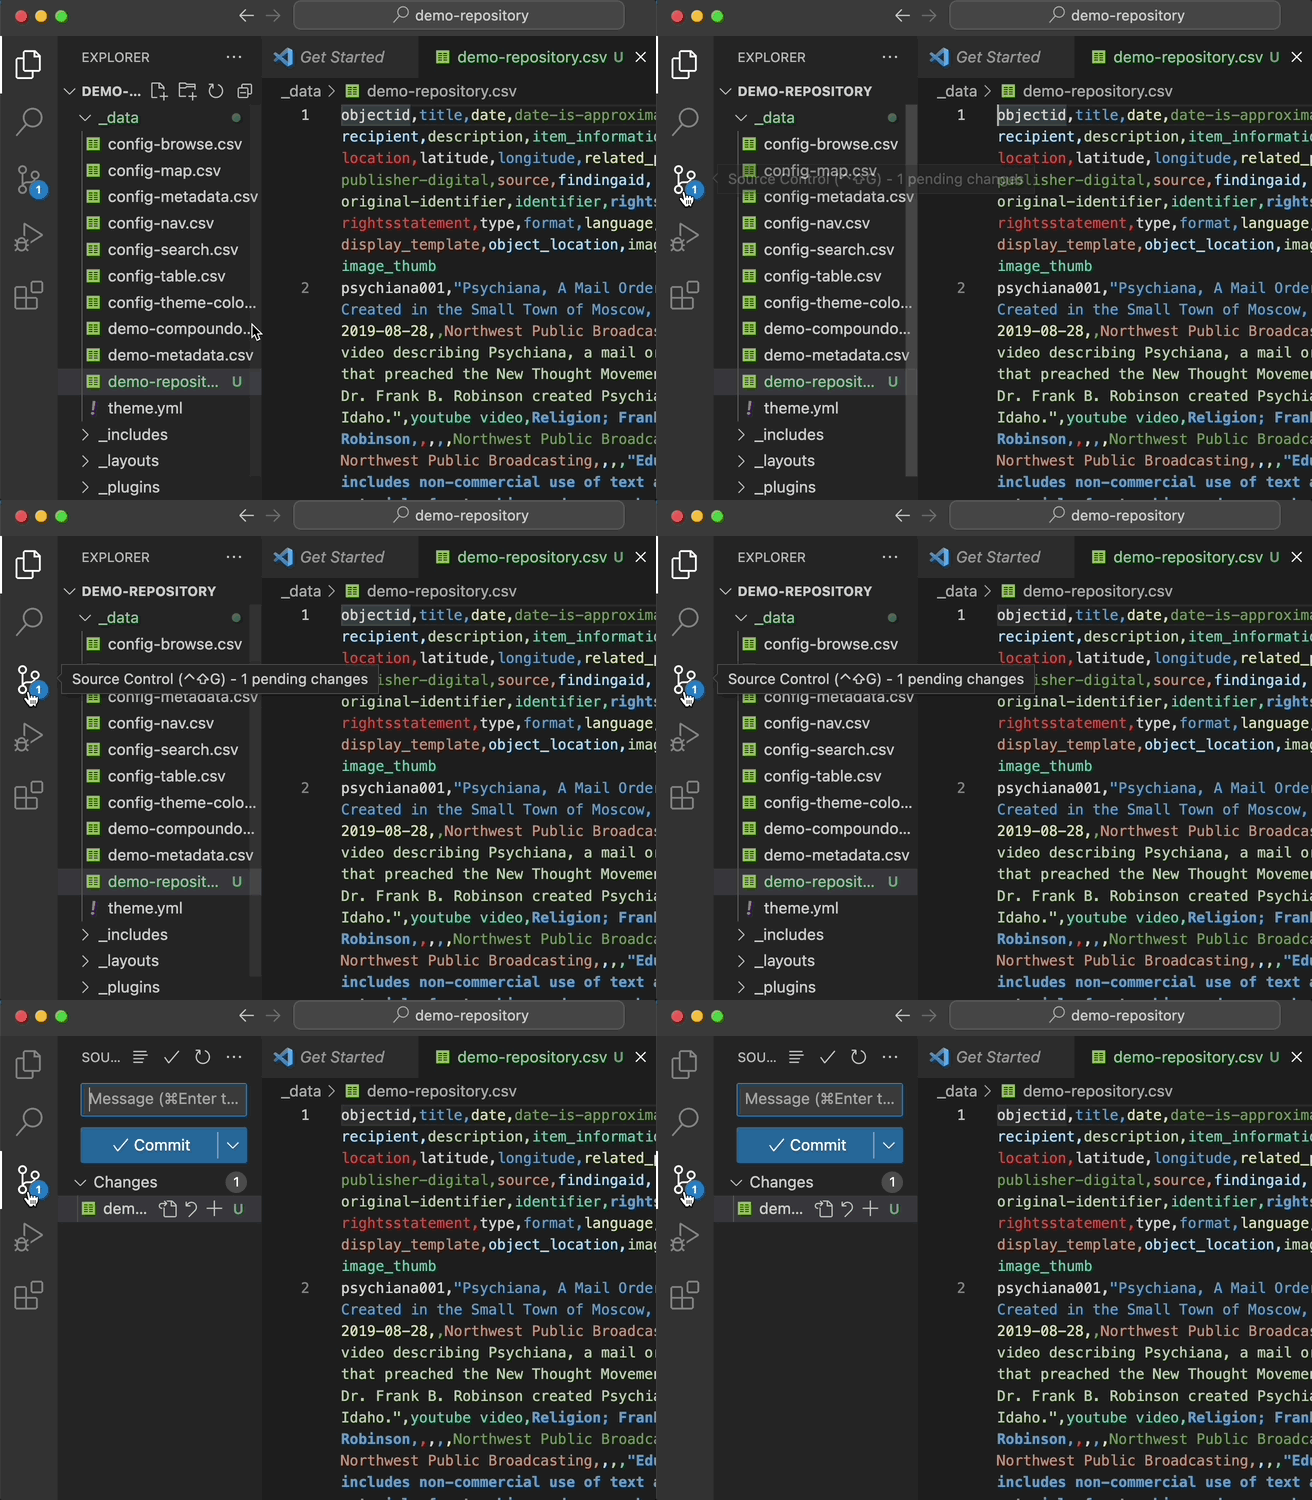
- Changed files will be listed under Changes. Hover over the file name and click on the plus icon to add individual files, or hover next to Changes and click on the plus icon to add all. Once added, the files will move to a new list called Staged Changes which are ready to commit.
Tip: Hovering over icons on VS Code will pop up more information about what they represent.
Click in the text box at the top labeled Message. Type your commit message into the box (e.g. Add metadata).
Click the blue Commit button below the message box to commit the change.

10. Configure your site settings in the _config.yml file (Video Version)
In VS Code, click on the “_config.yml” file.
Under the COLLECTION SETTINGS section, replace the
metadataplaceholder text with the filename of your uploaded metadata file without the CSV extension.
For example:
metadata: demo-repository
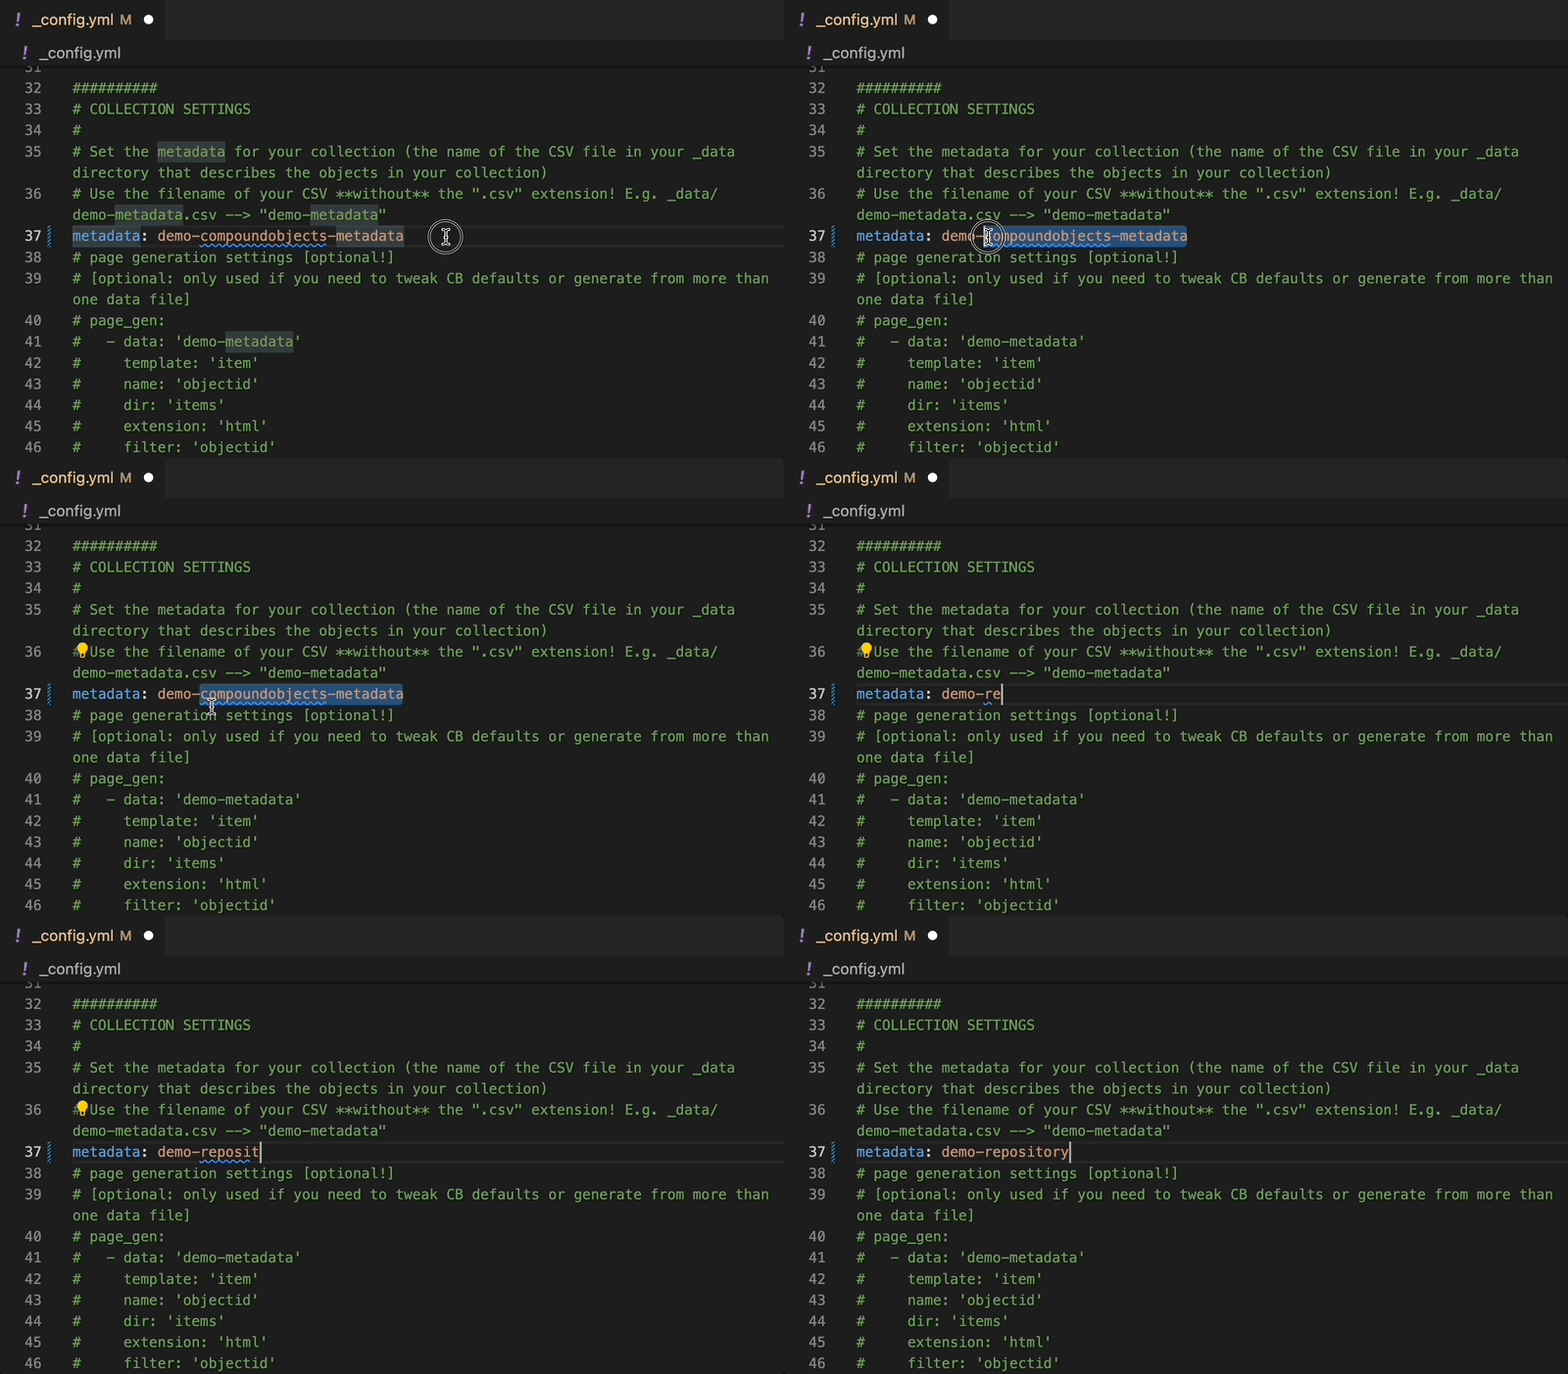
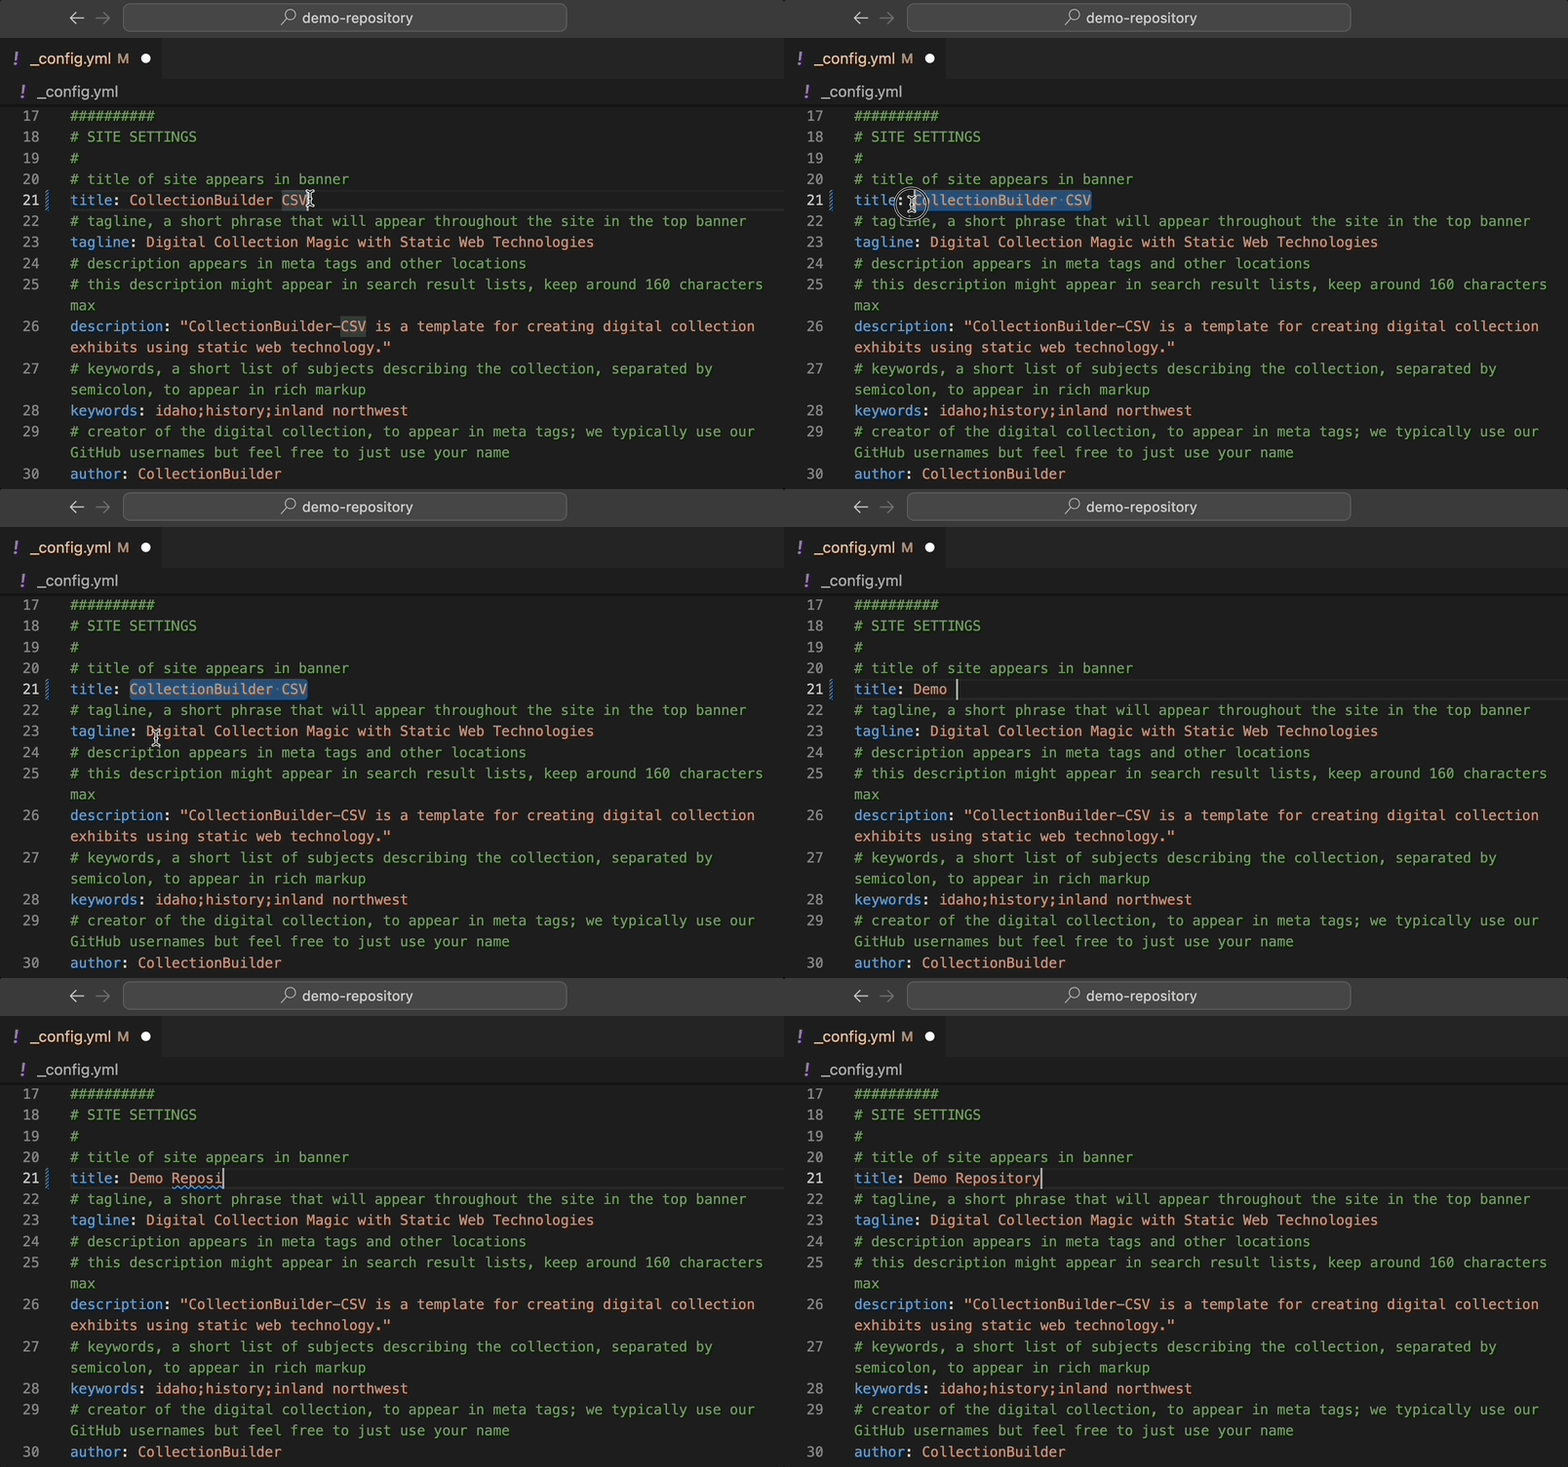
- Under the SITE SETTINGS section, replace the
titleplaceholder text with a title of your choice.
For example:
title: Demo Repository
- Optional: Write a new
tagline,description, andauthor.
Note: To view more information about the _config.yml file and what it can change in your site, check out our Site Config documentation.
Save your changes with Ctrl + S or by clicking File → Save.
Follow the same instructions (from Step 9) to commit your changes in VS Code. Your commit message might be something like, “Update site settings.”
11. Open the terminal in VS Code (Video Version)
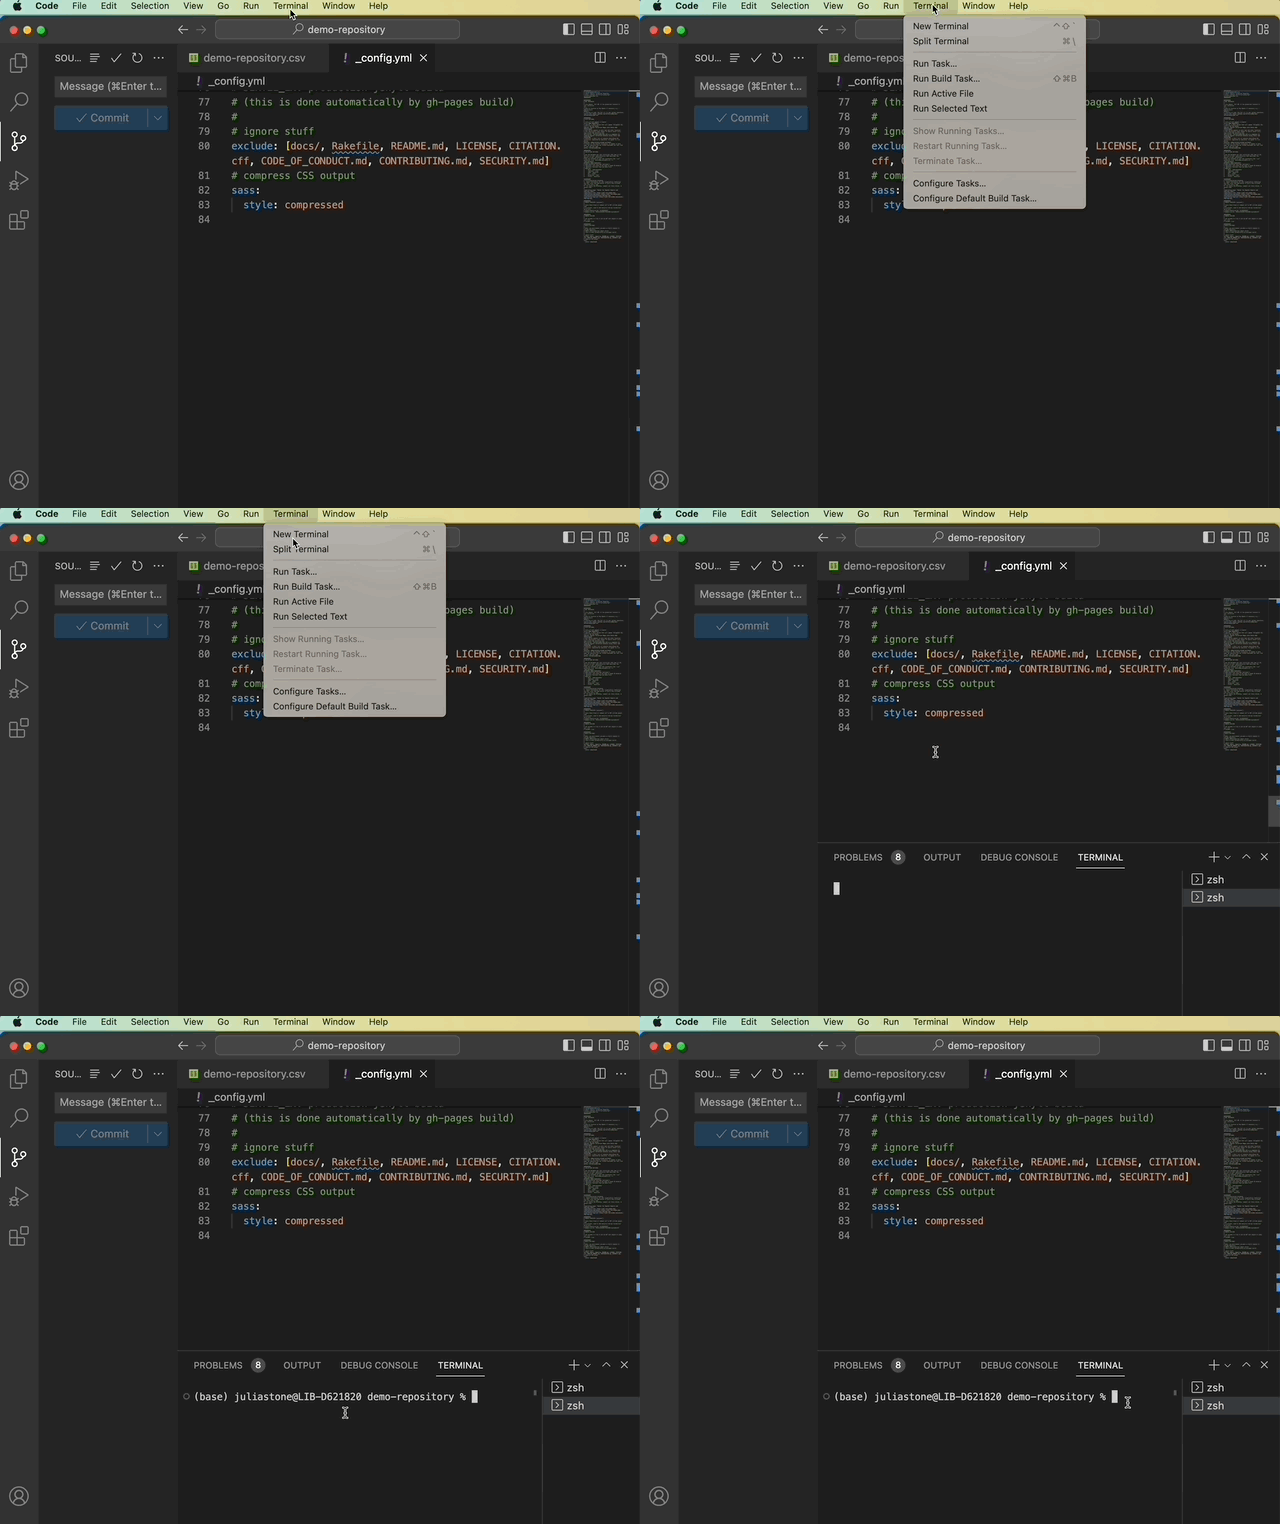
- In VS Code, open the terminal by clicking on Terminal in the top menu bar and then New Terminal.
12. Run the “bundle install” command (only necessary for your first time working on a project) (Video Version)
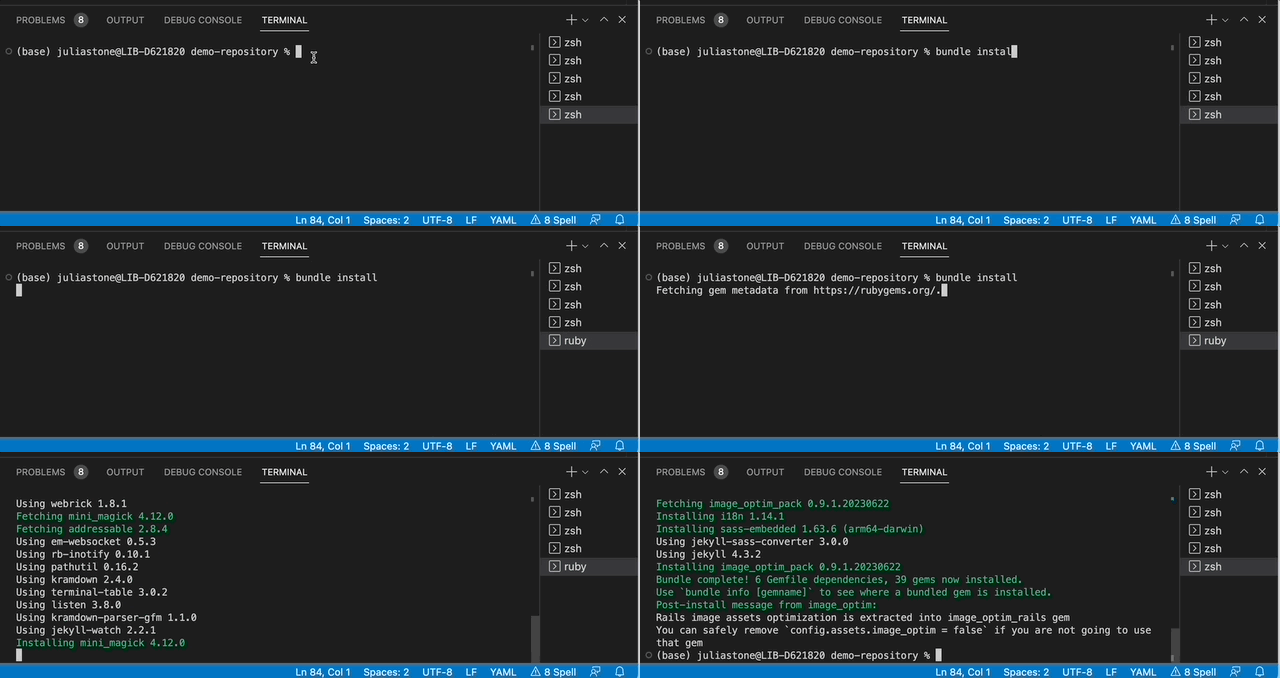
The first time you work on a project in VS Code on a computer, type the command bundle install into the terminal and then press enter. This will enable you to generate your site on your computer.
You will see a bunch of output in your terminal window. Once the Bundler installation is complete, your terminal prompt will return (which ends in a percentage sign %).
13. Run the “bundle exec jekyll serve” command to generate your site (Video Version)
- The bundle exec jekyll serve command starts a development server on your local computer and “serves” (i.e. makes available) the HTML, CSS, and JavaScript files that comprise your website. These files are built (and rebuilt) in the “_site” folder.
Note: After the development server is started, Jekyll will rebuild the website each time you save a change to a file in the project folder. Learn more about the jekyll serve command in our Generate Your Site documentation.
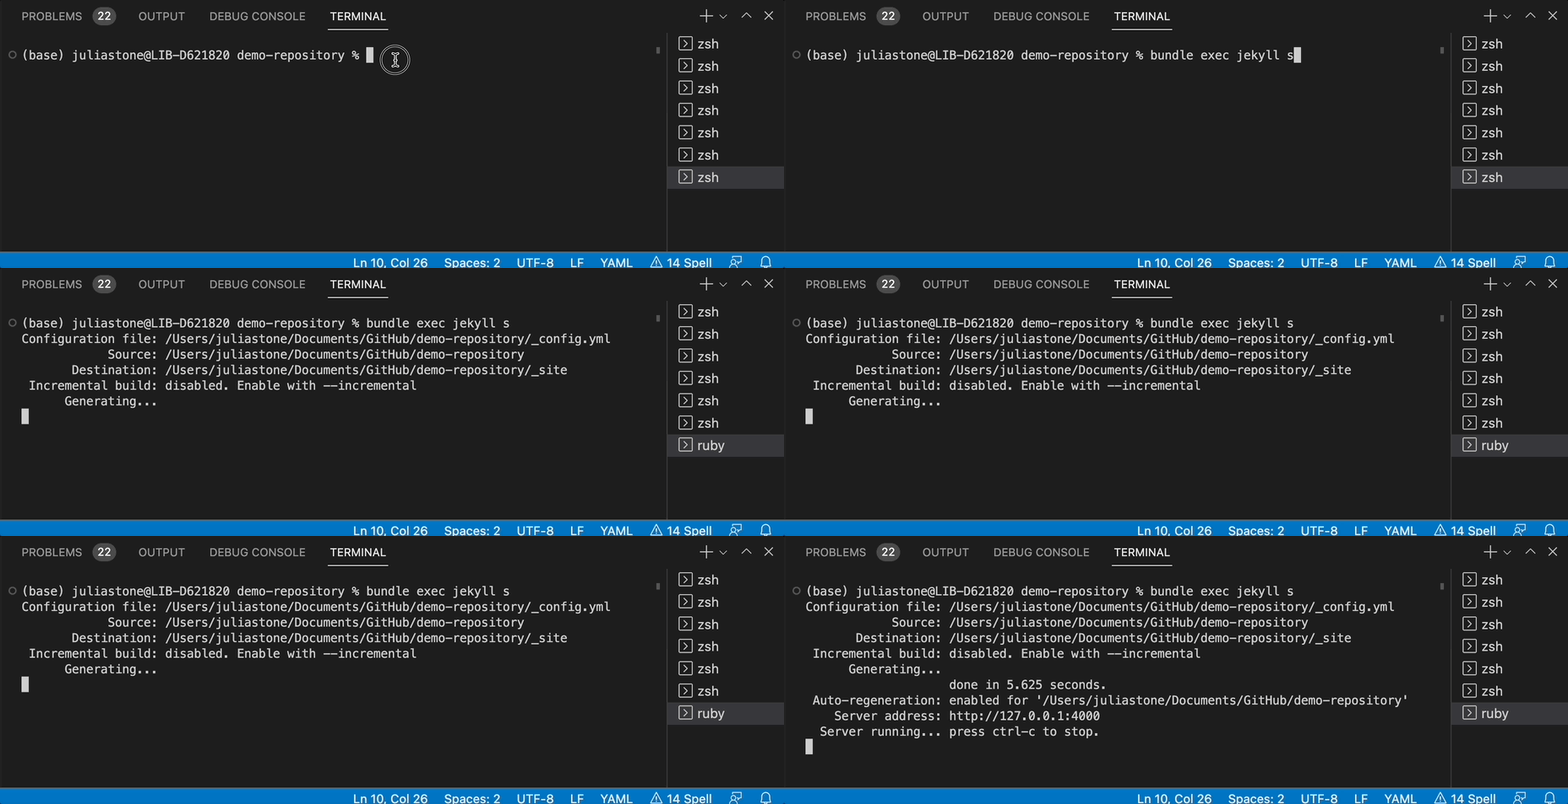
In the terminal in VS Code, type the command bundle exec jekyll s and press enter.
You’ll see some text appear (messages from Jekyll), including a URL that appears after the title Server address:. The server address will typically start with: http://127.0.0.1:4000/.
- Hold down Ctrl / Command and click the server address link to open the site in your browser, or copy the URL and paste it into a browser.’
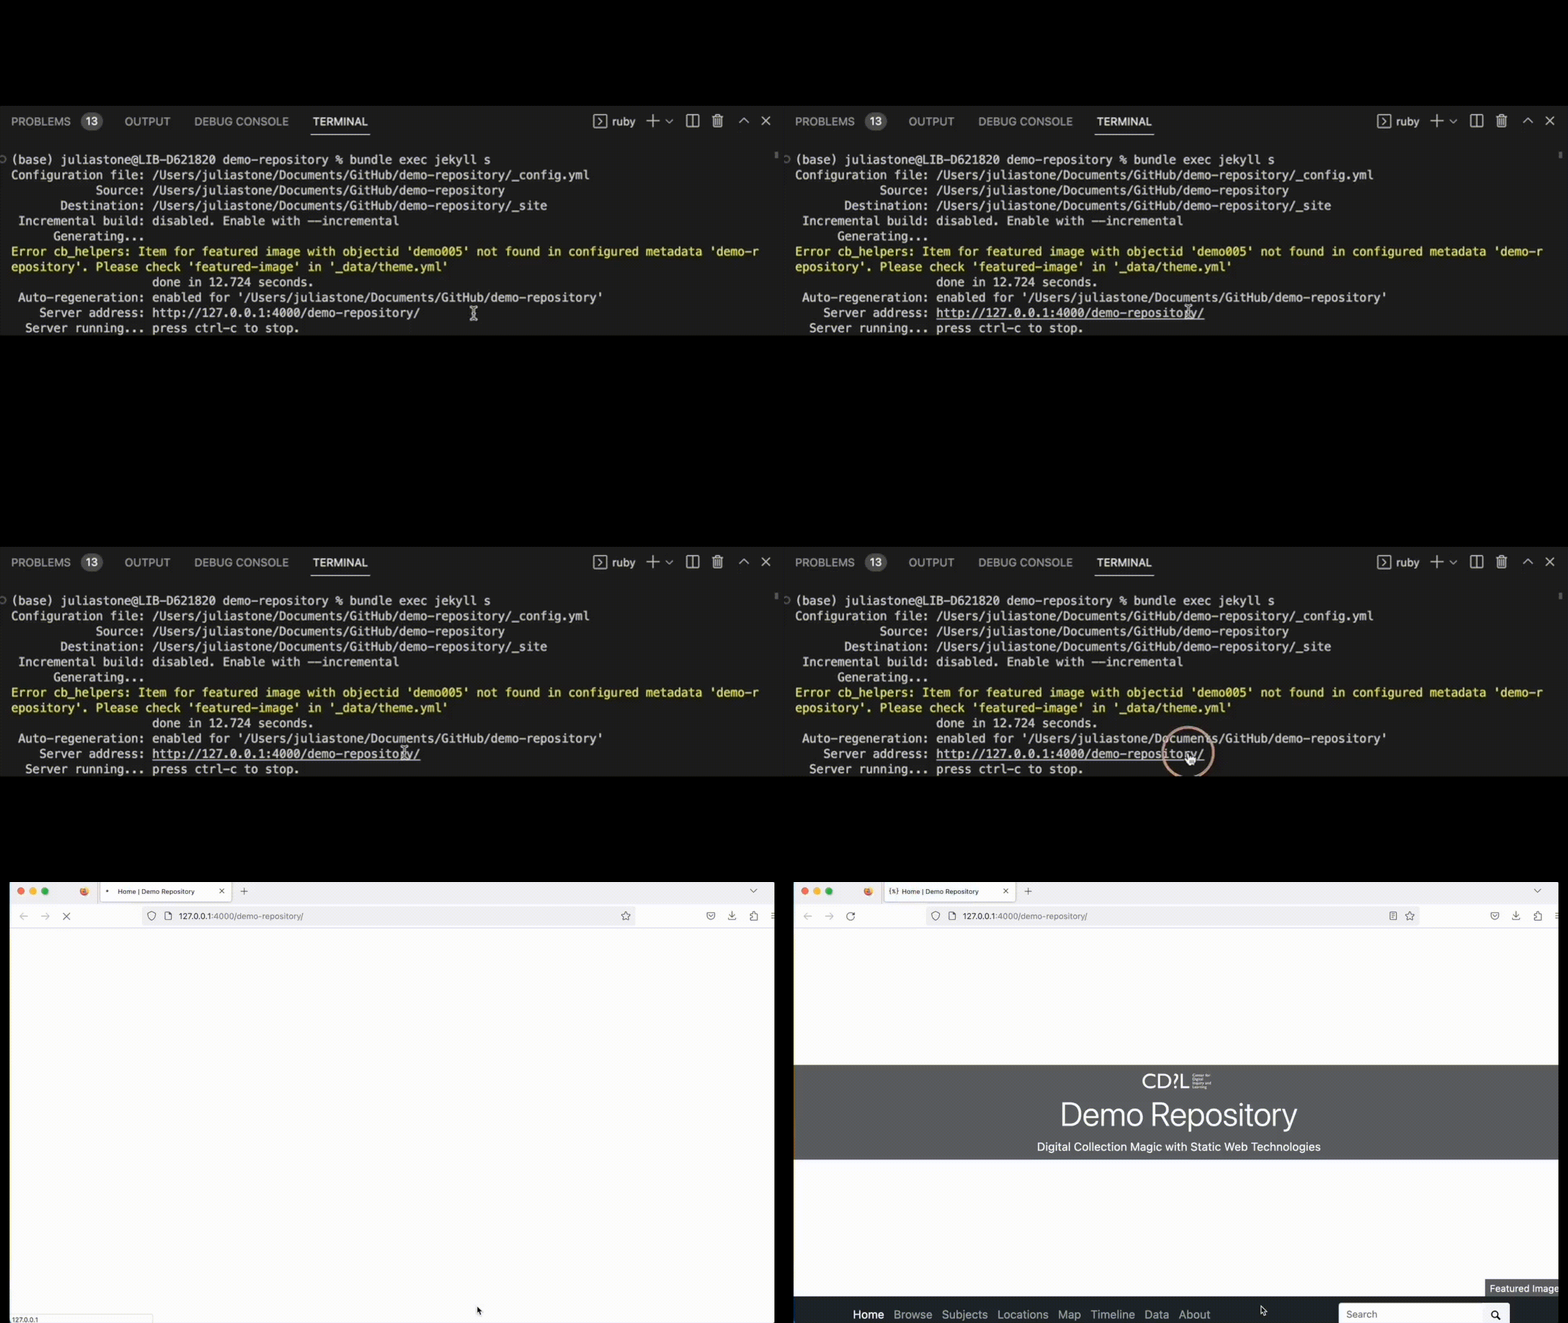
After you start the server, note that whenever you make a change to a file and save it, the terminal will note that it rebuilt the site in a certain amount of seconds.
Important note: If you make a change to the “_config.yml” file, that change won’t be reflected until you restart the server because that file is only referenced when the development site is first built.
To restart the build, end the current session with Ctrl + C, and then run the bundle exec jekyll s command in the terminal again. (Pro Tip: Push the up arrow key in your terminal to automatically retype the last command you entered). Click on the server address once it is ready and the changes should be live.
When you’re ready to end your Jekyll session, type Ctrl + C into the terminal. This stops the server from running.
14. Add a featured homepage image (Video Version)
- Visit your site and use the Browse page to view potential featured images.

- To find the
objectidfor an image, click on the image title and then check the end of the URL of the item page. The URL will include theobjectidafter /items/.
For example:
For the URL, http://127.0.0.1:4000/items/psychiana005.html, the objectid is psychiana005.
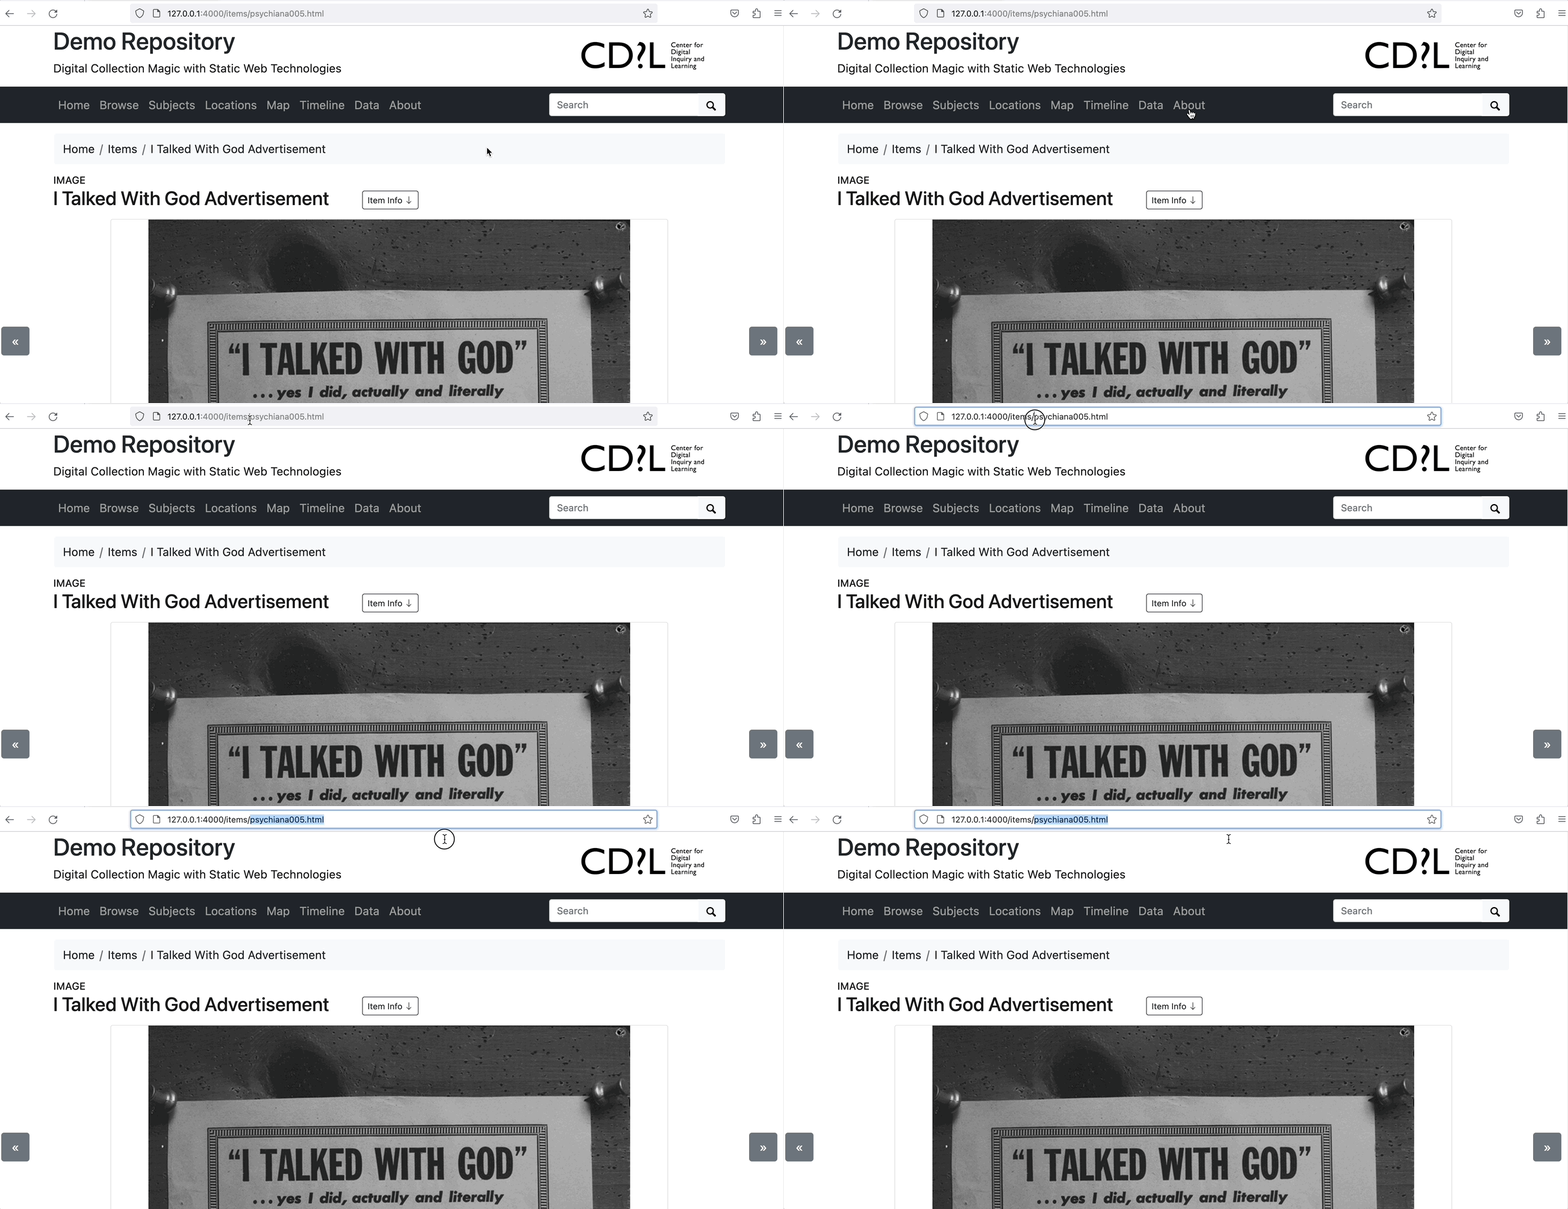
Tip: It is best to choose a large horizontal image if possible.
In VS Code, click on the “_data” folder. Then click on the “theme.yml” file.
Under the HOME PAGE section, replace the
objectidplaceholder text with theobjectidof an image in the collection that you want to be the top image on the homepage.
For example:
featured-image: psychiana005

Save your changes with Ctrl + S or by clicking File → Save.
After you have updated the featured image, write your commit message (e.g. Add featured image) and follow the instructions (from Step 9) to commit your changes.
View your changes by refreshing your site in your browser window.
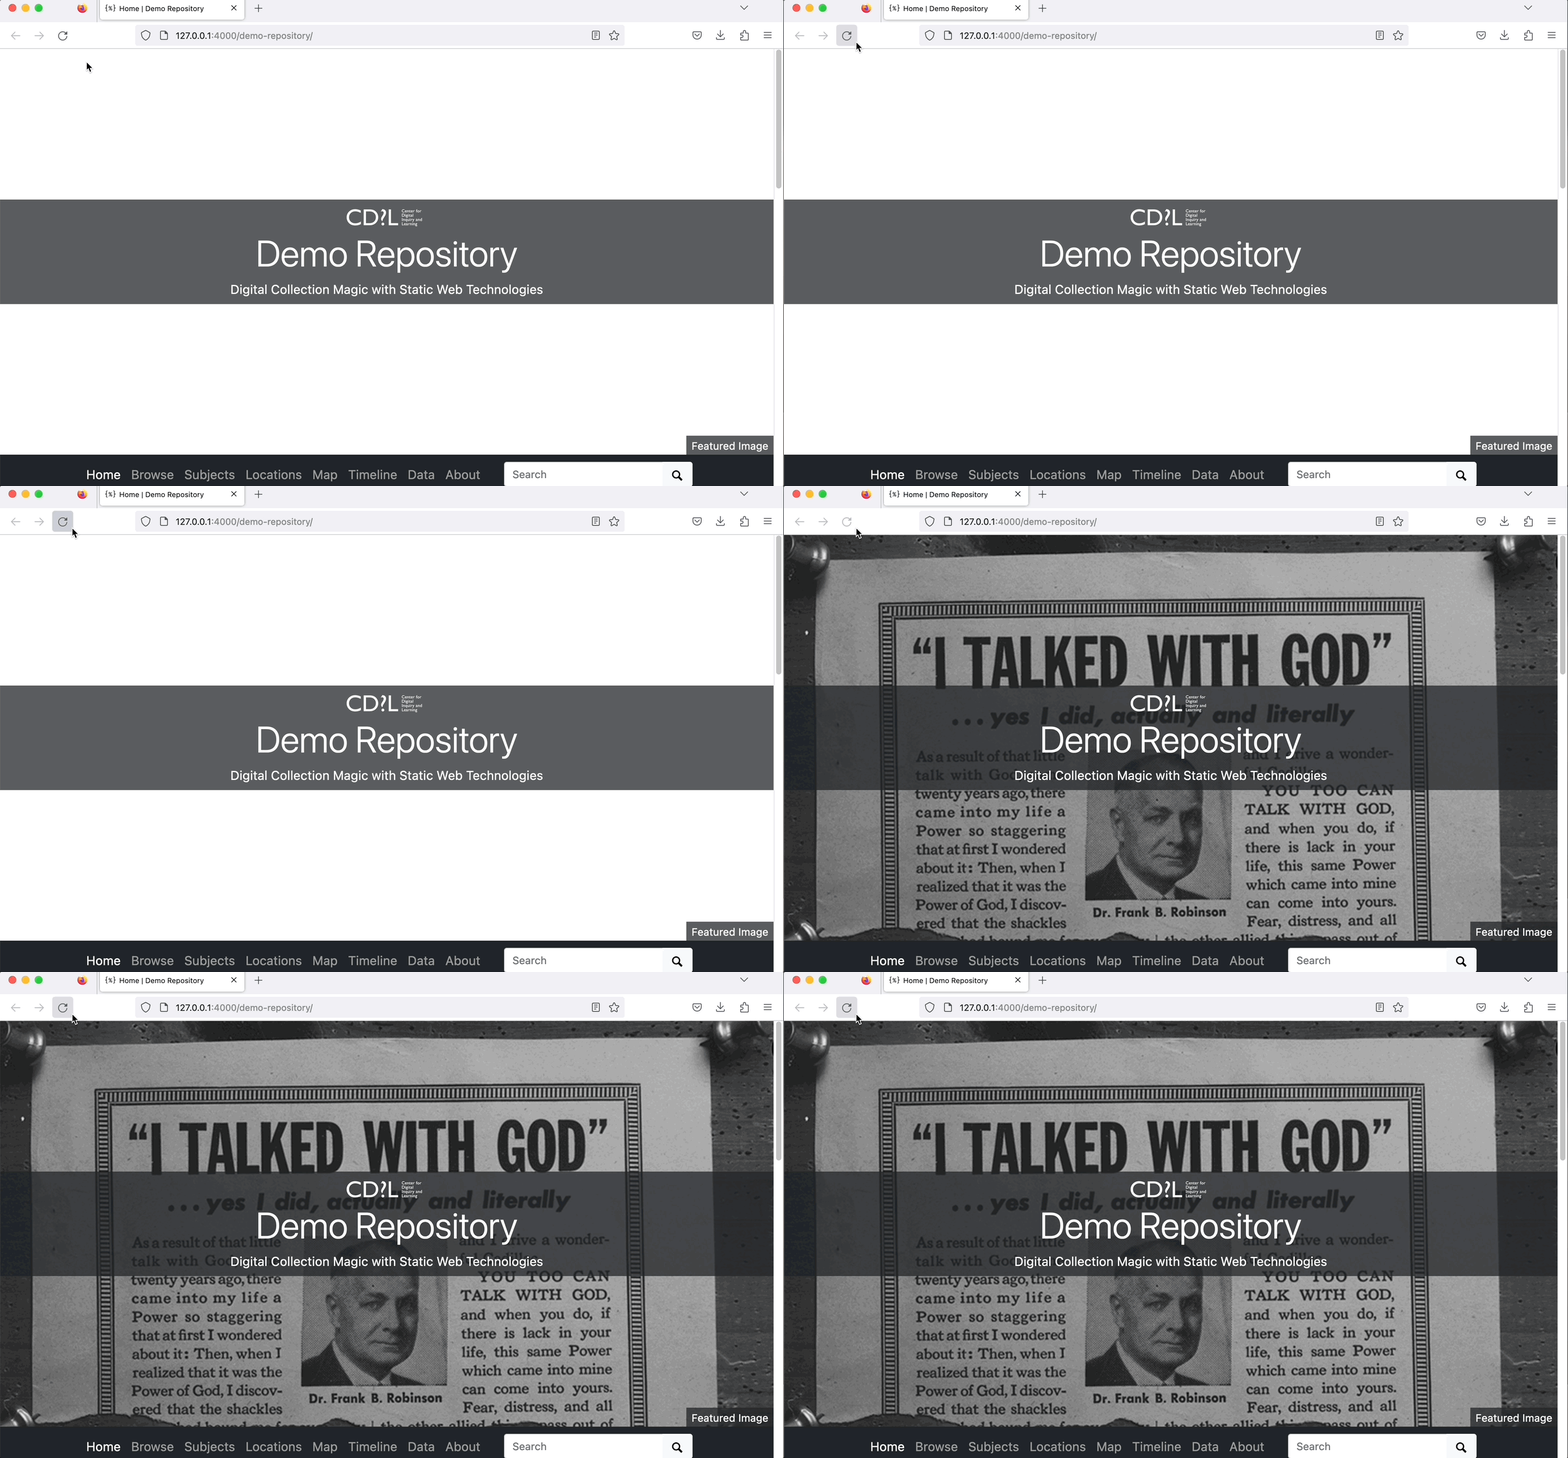
Want to learn more about customization options? Check out our Theme Configuration documentation to find out how to customize other site display options by editing the theme.yml file. For further info on customizations, see: Configuring and Customizing Pages, Theme Color Configuration, and Adding Custom CSS.
15. Optional: Edit the About Page (Video Version)
In VS Code, click on the “pages” folder. Then click on the “about.md” file.
Try writing some text in this file using Markdown.
New to Markdown? Learn about what Markdown is and check out some learning resources on our Markdown glossary page.
Practice using example code from our Feature Includes Bonanza page.
Save your changes with Ctrl + S or by clicking File → Save.
Follow the same instructions (from Step 9) to commit your changes in VS Code. Your commit message might be something like, “Update the About page.”
View your changes by refreshing your site in your browser window.
16. Prep your repository for publishing with GitHub Actions (Video Version)
In this walkthrough, you will be hosting your site on GitHub Pages by setting up an alternative build using the GitHub Actions feature. Before using GitHub Actions, you have to prepare your repository for this build process.
In VS Code, open your “_config.yml” file. In the URL VARIABLES section, update the
urlandbaseurlvalues following this pattern:
URL: https://username.github.io
baseurl: /repository-name
For example:
URL: https://juliastone0729.github.io
baseurl: /demo-repository

Save your changes with Ctrl + S or by clicking File → Save.
Follow the same instructions (from Step 9) to commit your changes in VS Code. Your commit message might be something like, “Update URL variables.”
Another option for deploying your site: If you have your own server for hosting your site, you can build the site with Jekyll and then move the files to your web server. This allows for the publishing of CollectionBuilder sites on your own or your organization’s web servers. Read our Building Your Site documentation for more info.
17. Push your changes to GitHub using VS Code (Video Version)
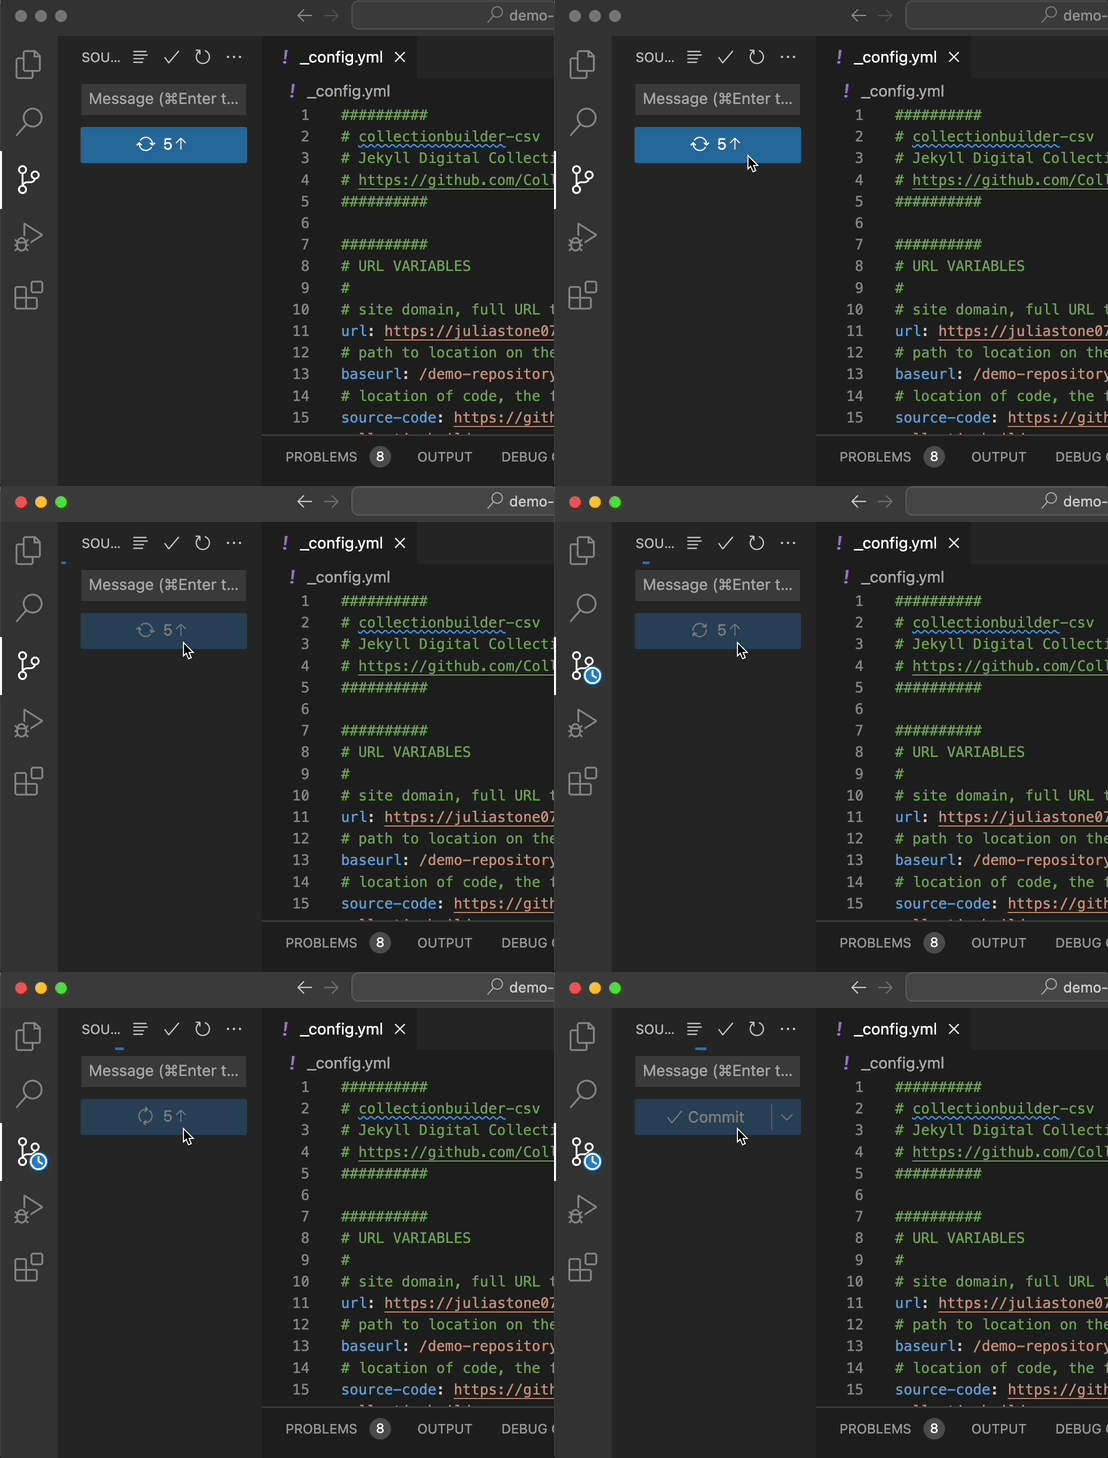
To Push all your committed local changes up to GitHub, click on the Source Control icon, i.e. the network icon on the left side, or press Ctrl + Shift + G.
Then click the blue Sync Changes button. This will sync your local changes with the GitHub repository.
18. Publish your site using GitHub Actions (Video Version)
Visit github.com and log into your account.
Navigate to your repository. Click the Settings tab in the top right and then click Pages in the left side menu.

- On the Pages page, under Source, click the dropdown and select GitHub Actions.
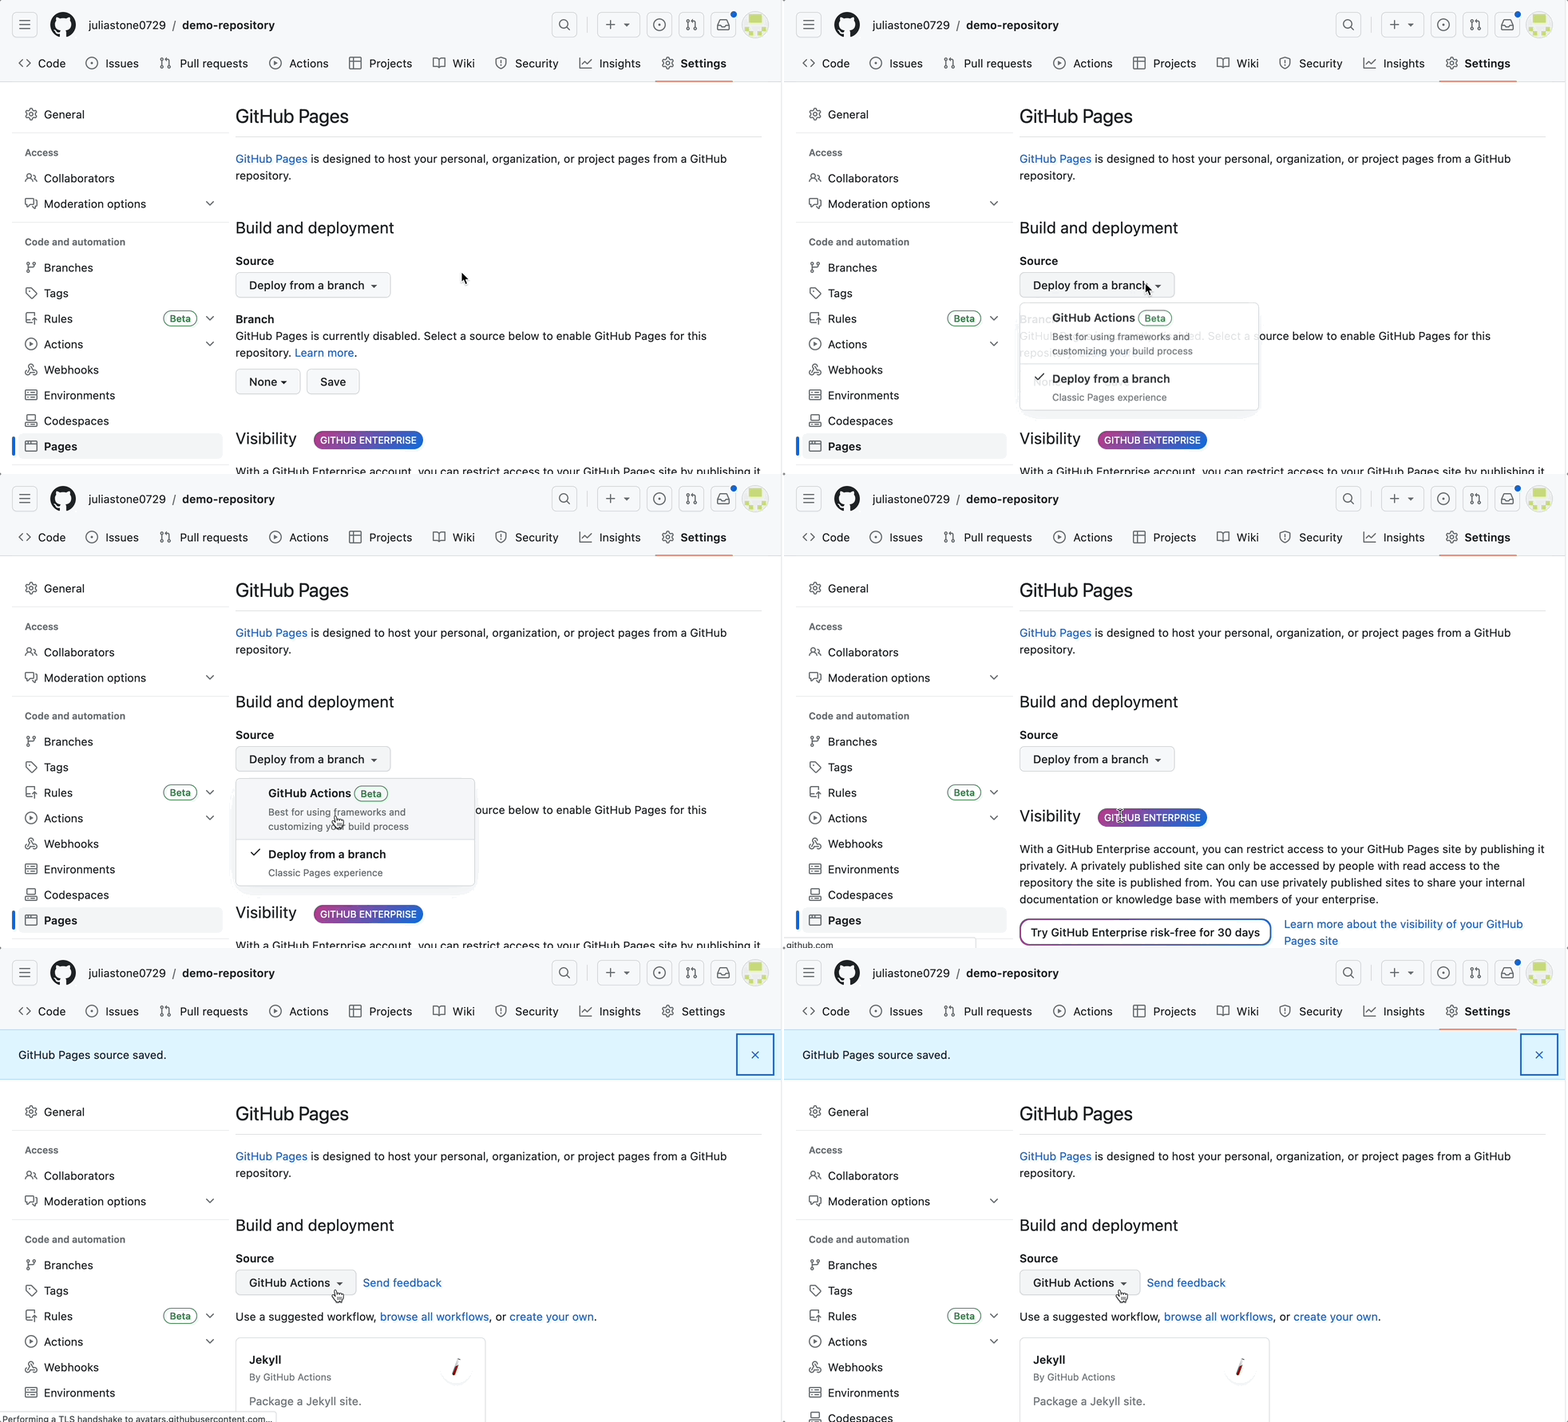
Warning: Some accounts may have GitHub Actions disabled by default. If you do not see the Actions tab in your repository’s navigation (in between Discussions and Projects), it will need to be turned on first. Visit the repository’s Settings, click on Actions in the left side nav menu, select Allow all actions, and click Save.
- Below the Source dropdown, a box will appear under Use a suggested workflow titled Jekyll. Click the Configure button.
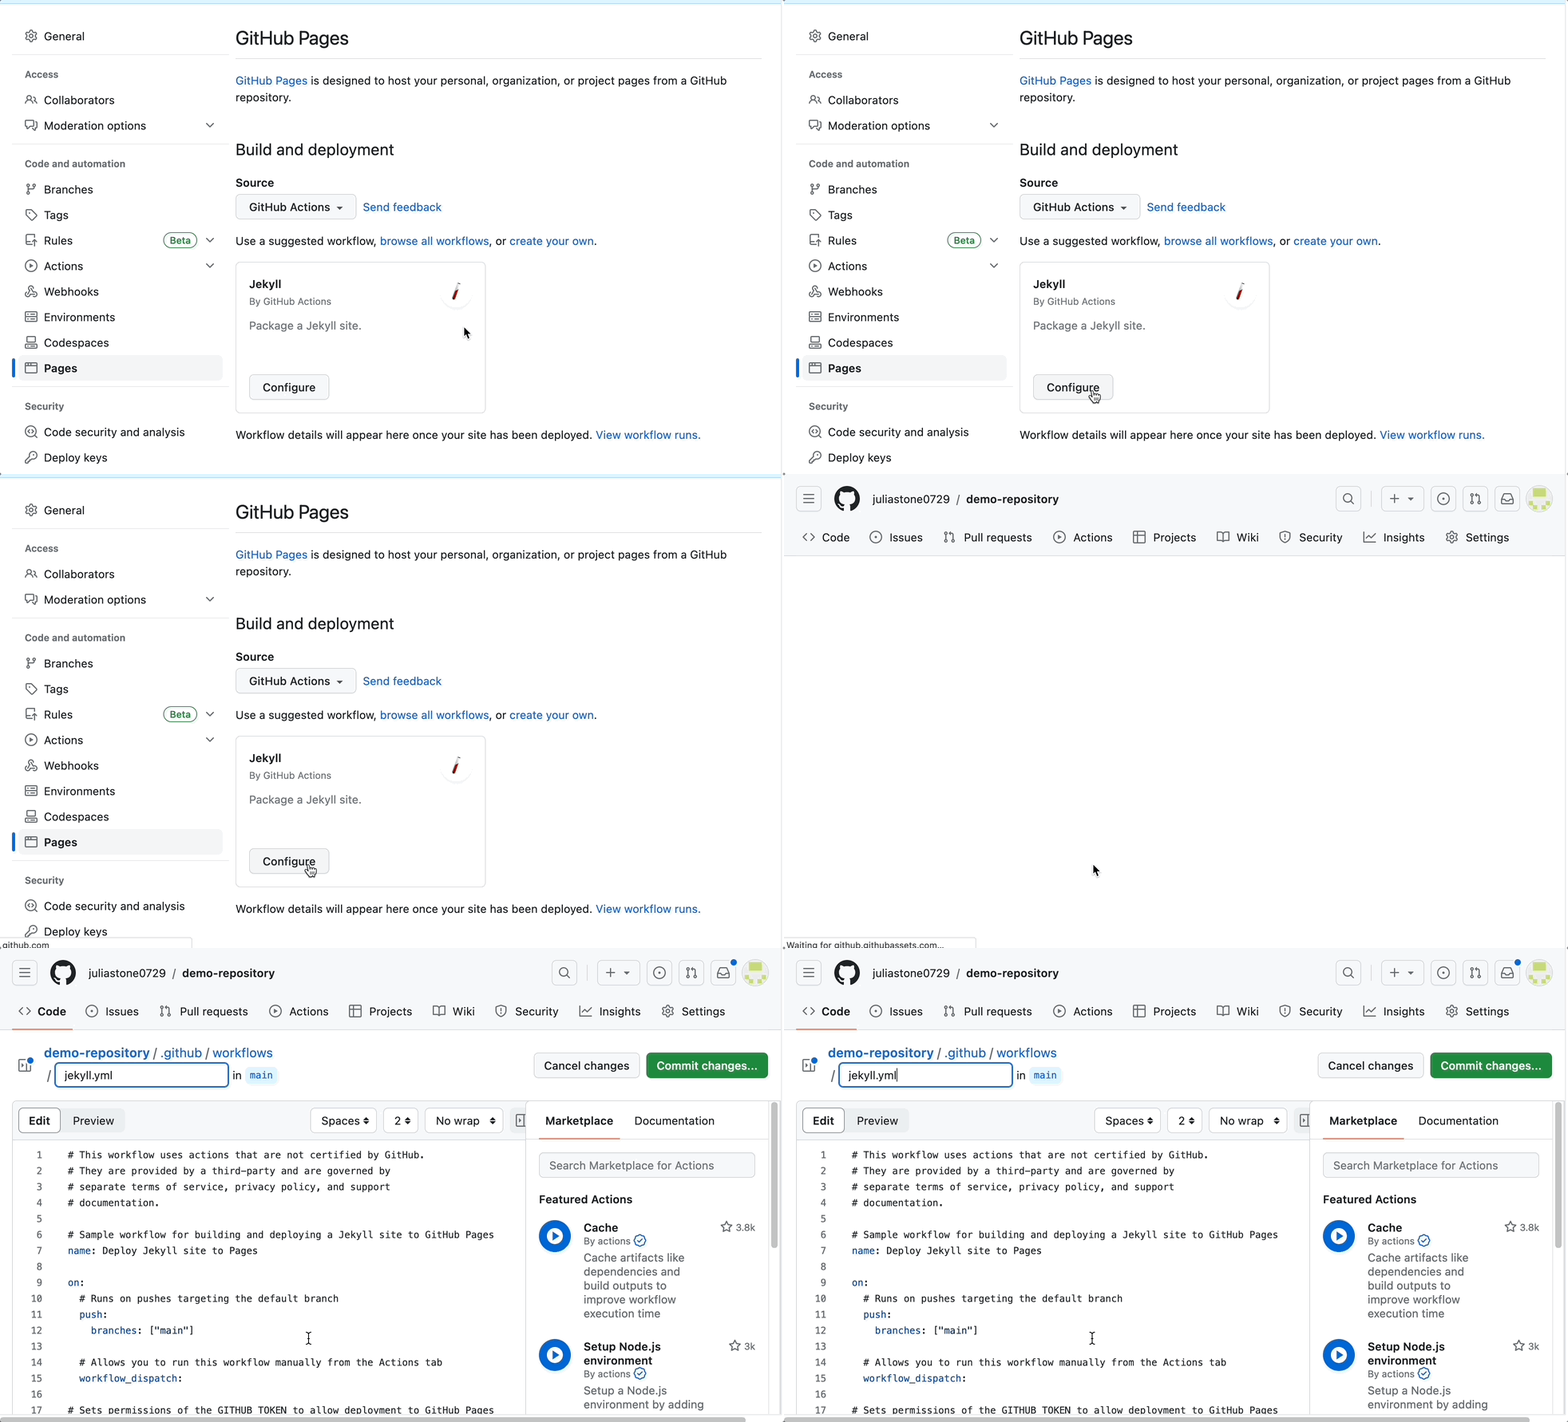
This will open an editor page creating a new file named “.github/workflows/jekyll.yml” populated with GitHub’s starter Jekyll workflow.
You can ignore the file and other options displayed on the right side, and just click the green Commit changes… button.
Write a commit message (e.g., Deploy site) and click the green Commit changes button.
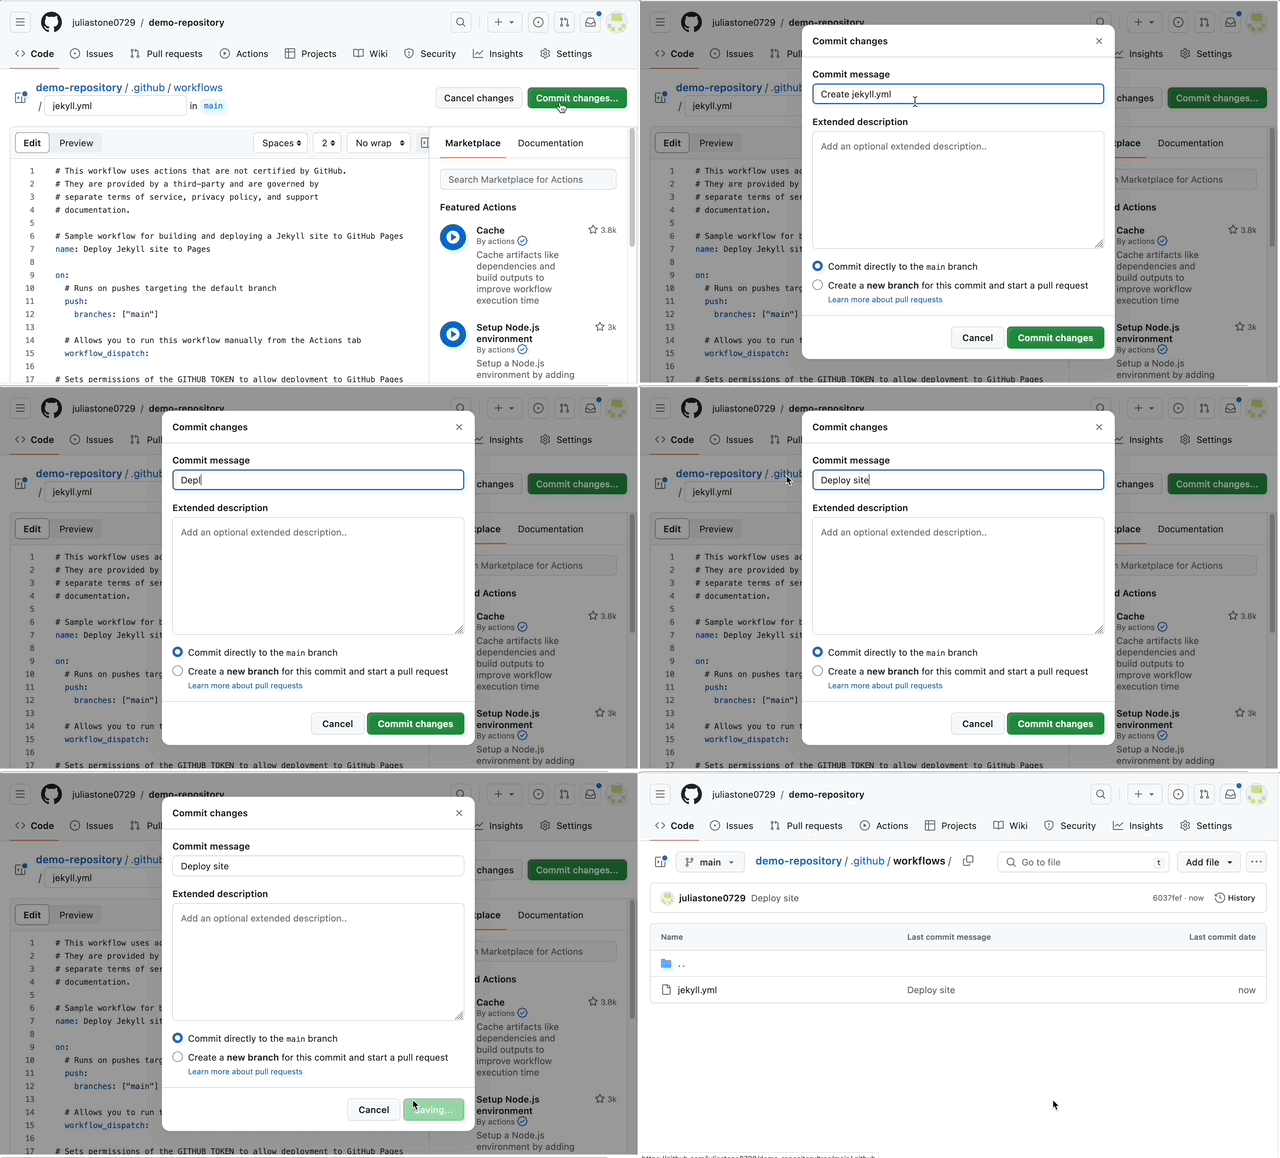
- Committing the action file to your repository will start the build process. It may take a few minutes for it to complete.
Troubleshooting: If a red “X” appears next to your commit, the build failed, and your updates will not be deployed – the last working version of the site will still be live. Visit the Actions tab to see detailed information about the error to help debug the issue. If the site was building fine on your local computer, this will be unlikely to occur!
- Once the action successfully completes, your site will be live. To find the URL you can visit Settings and then Pages.
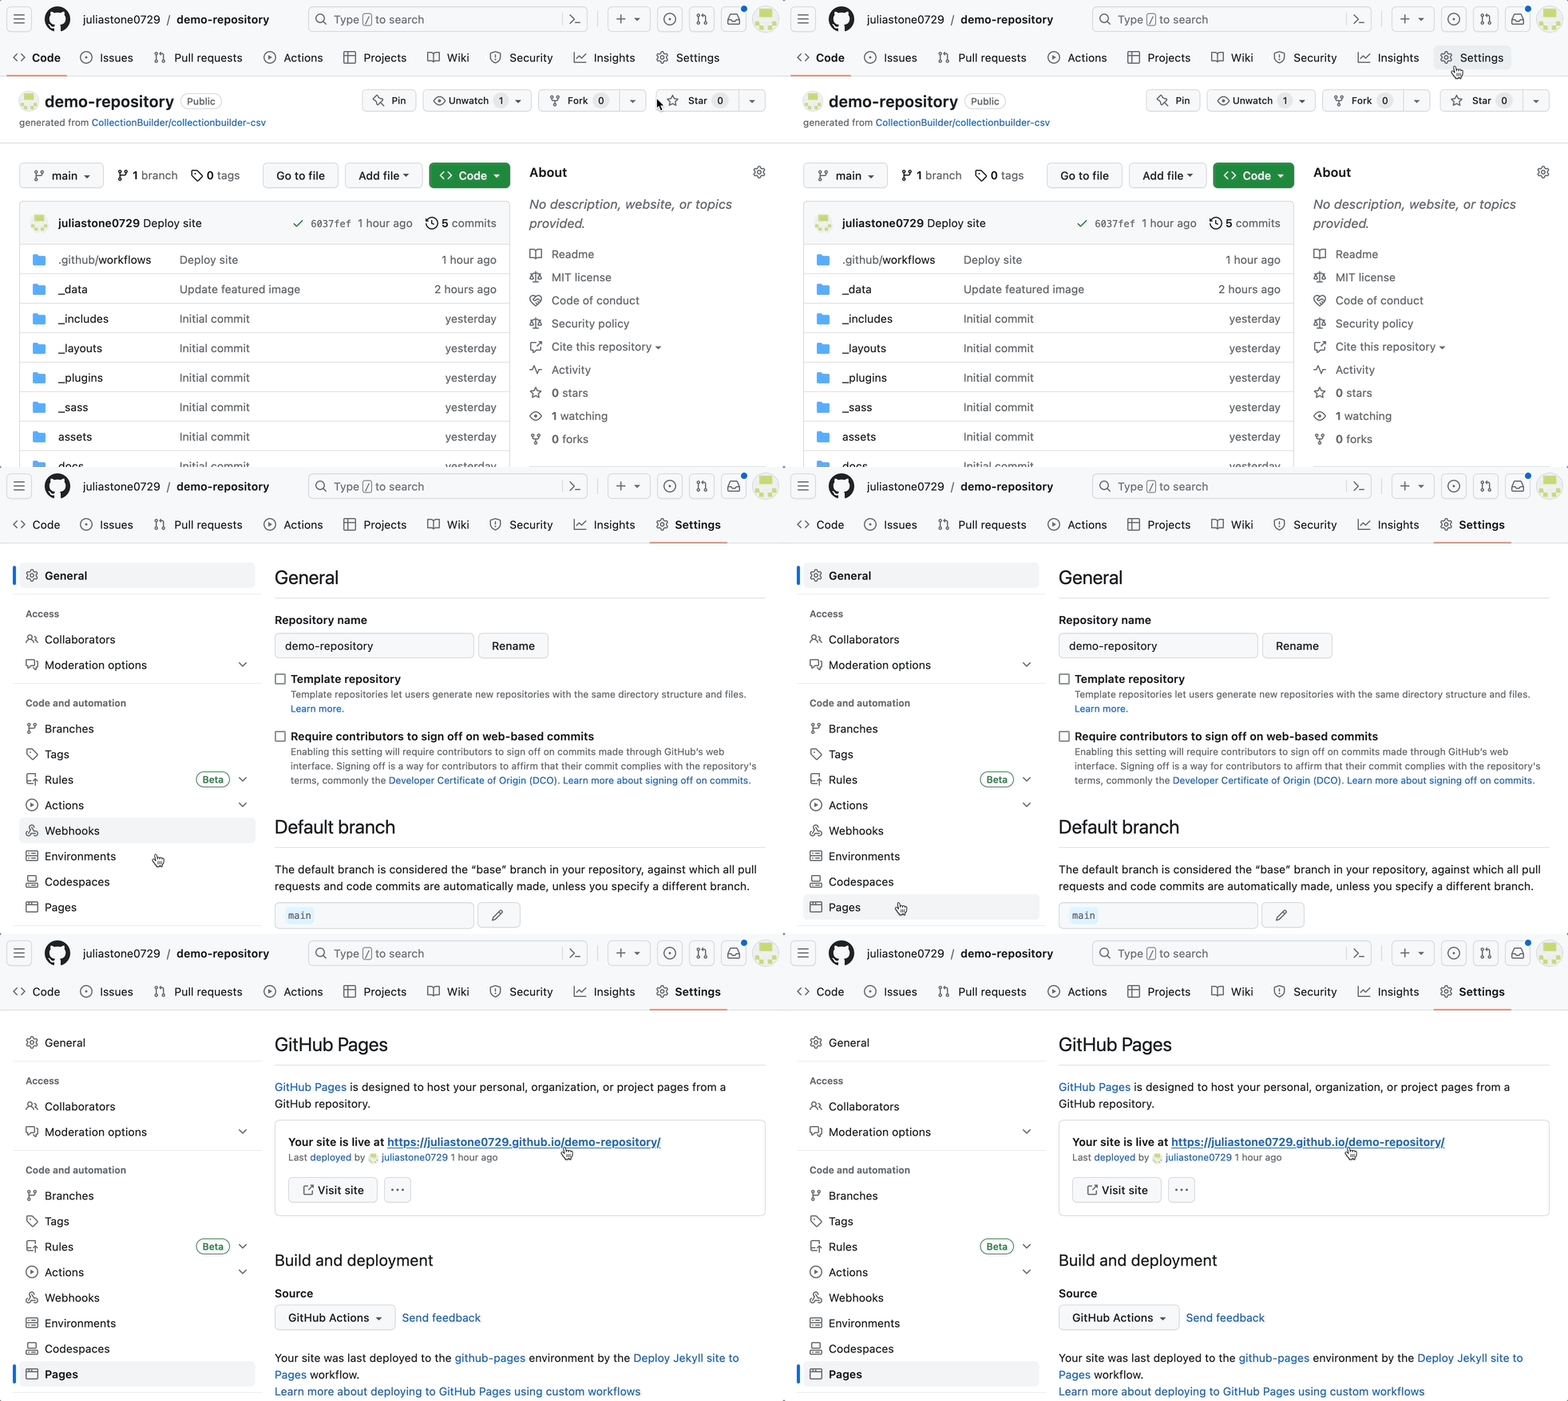
Click on the link to see your published site.
Going forward, each time you push or directly commit to the repository, GitHub Actions will rebuild the live site.
19. Explore potential next steps
Your collection website is complete! To implement additional customization options, your next steps could be:
If you want to get into more Advanced Options, you could explore:
