Updating Metadata
This two-part walkthrough provides steps for updating your CollectionBuilder site’s metadata using the GitHub web interface and Visual Studio Code (VS Code). You can repeat these steps whenever you make a change to your metadata that you would like to see reflected in your live site.
This walkthrough assumes you have already set up a CollectionBuilder site and need to update your metadata file. If you need help setting up a CollectionBuilder site, please visit our CollectionBuilder-GH Walkthrough, CollectionBuilder-SHEETS Walkthrough, or CollectionBuilder-CSV Walkthrough depending on which CollectionBuilder template you are interested in using.
Are you a VS Code user? If you are using VS Code for your CollectionBuilder project, feel free to jump to Part 2 of this walkthrough.
Auto convert issues: the method of opening a CSV file in Sheets described in this Walkthrough is quick, however, may result in issues for some metadata spreadsheets as Sheets will auto convert some value types. If you have “true” / “false” they will be converted to “TRUE” / “FALSE”, and some numbers may be rounded off. Check the main docs for a slower, but more sure way to import metadata CSVs into Sheets.
Part 1: Updating Metadata Using the GitHub Web Interface
This part of the walkthrough is recommended for when you are using the GitHub web interface for editing your site, which is most often used for the CollectionBuilder-GH and CollectionBuilder-SHEETS templates.
1. Download your metadata CSV file from GitHub (optional)
- If you do not know where your metadata spreadsheet is in your Google Drive or you want to ensure you have the most up-to-date version of your site metadata to edit, it is a good idea to download your metadata CSV file directly from the GitHub web interface and then transfer it to Google Sheets for editing.
Note: If you already have your metadata spreadsheet in Google Sheets ready to edit, please skip to Step 3.
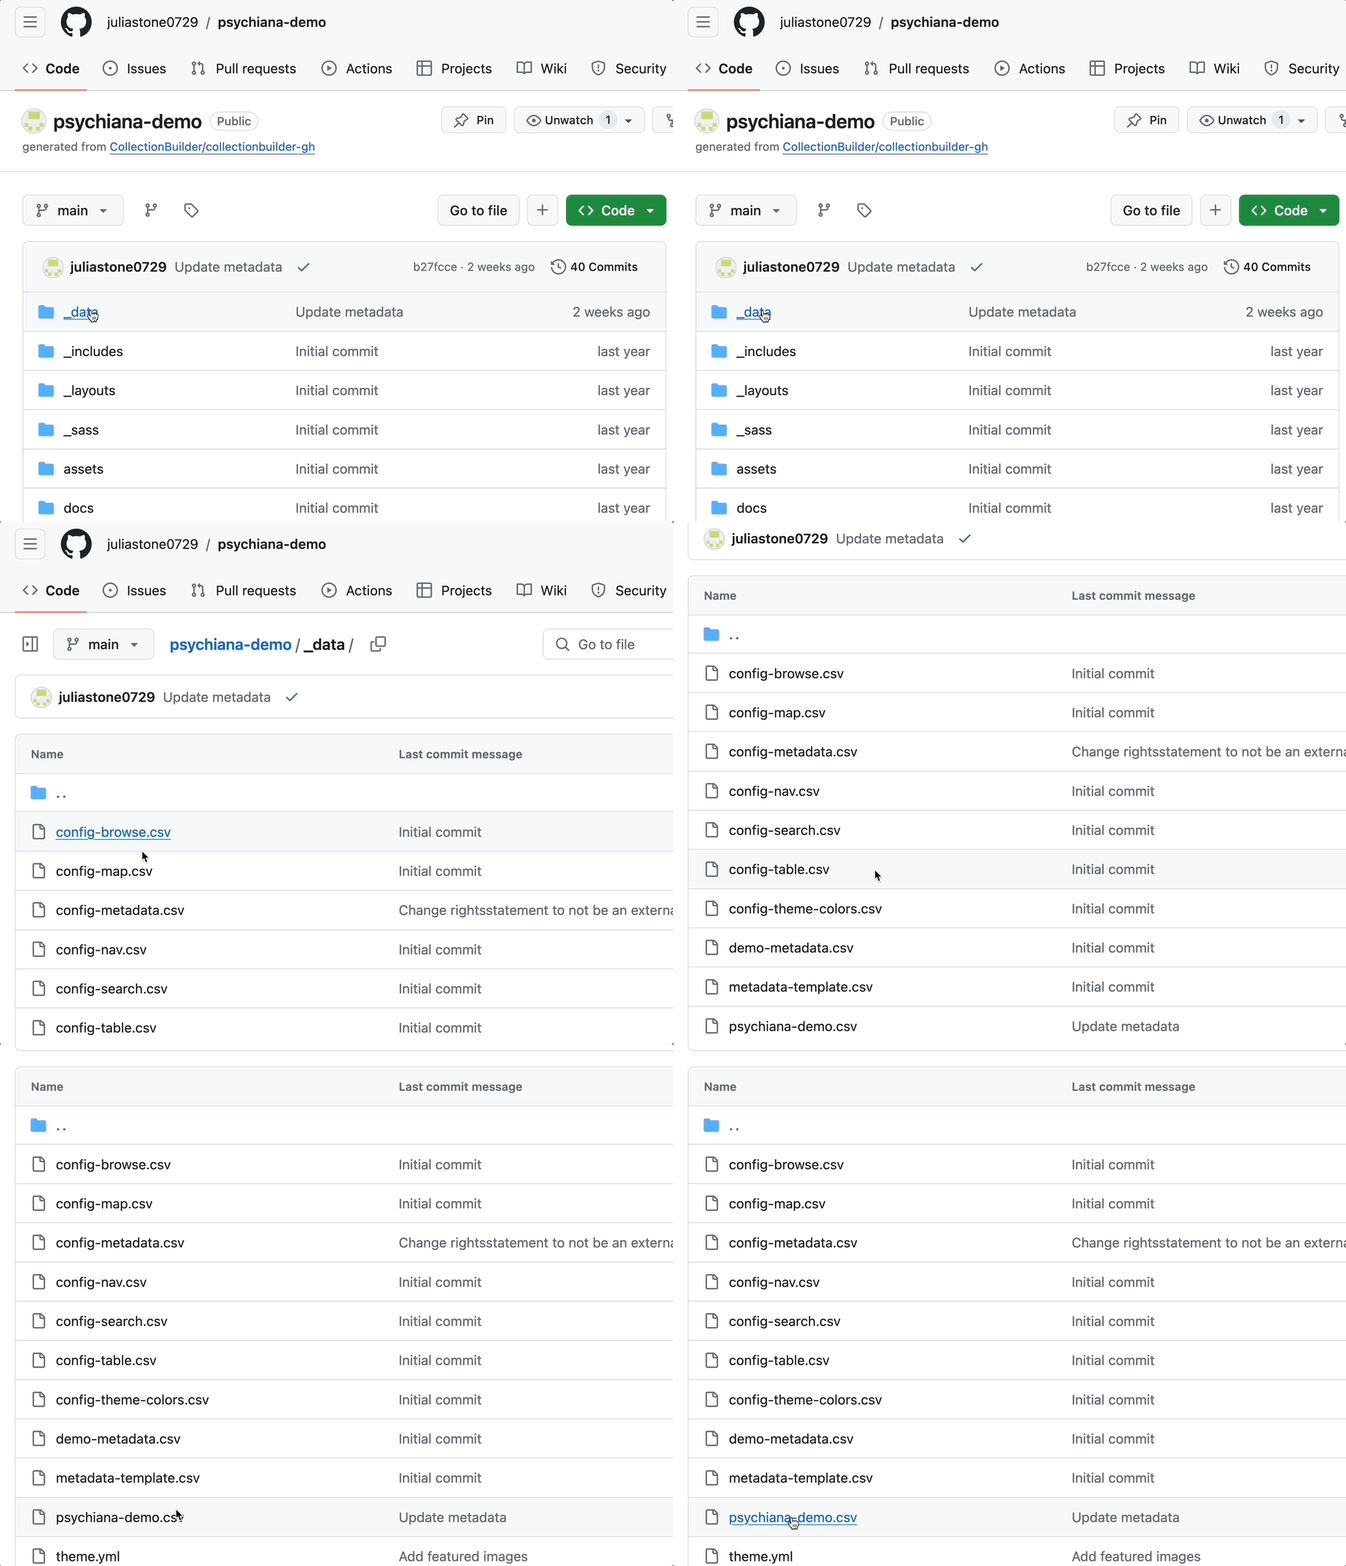
- Navigate to your “_data” folder and click on your metadata CSV file.
- On the right, click the “Download raw file” button.
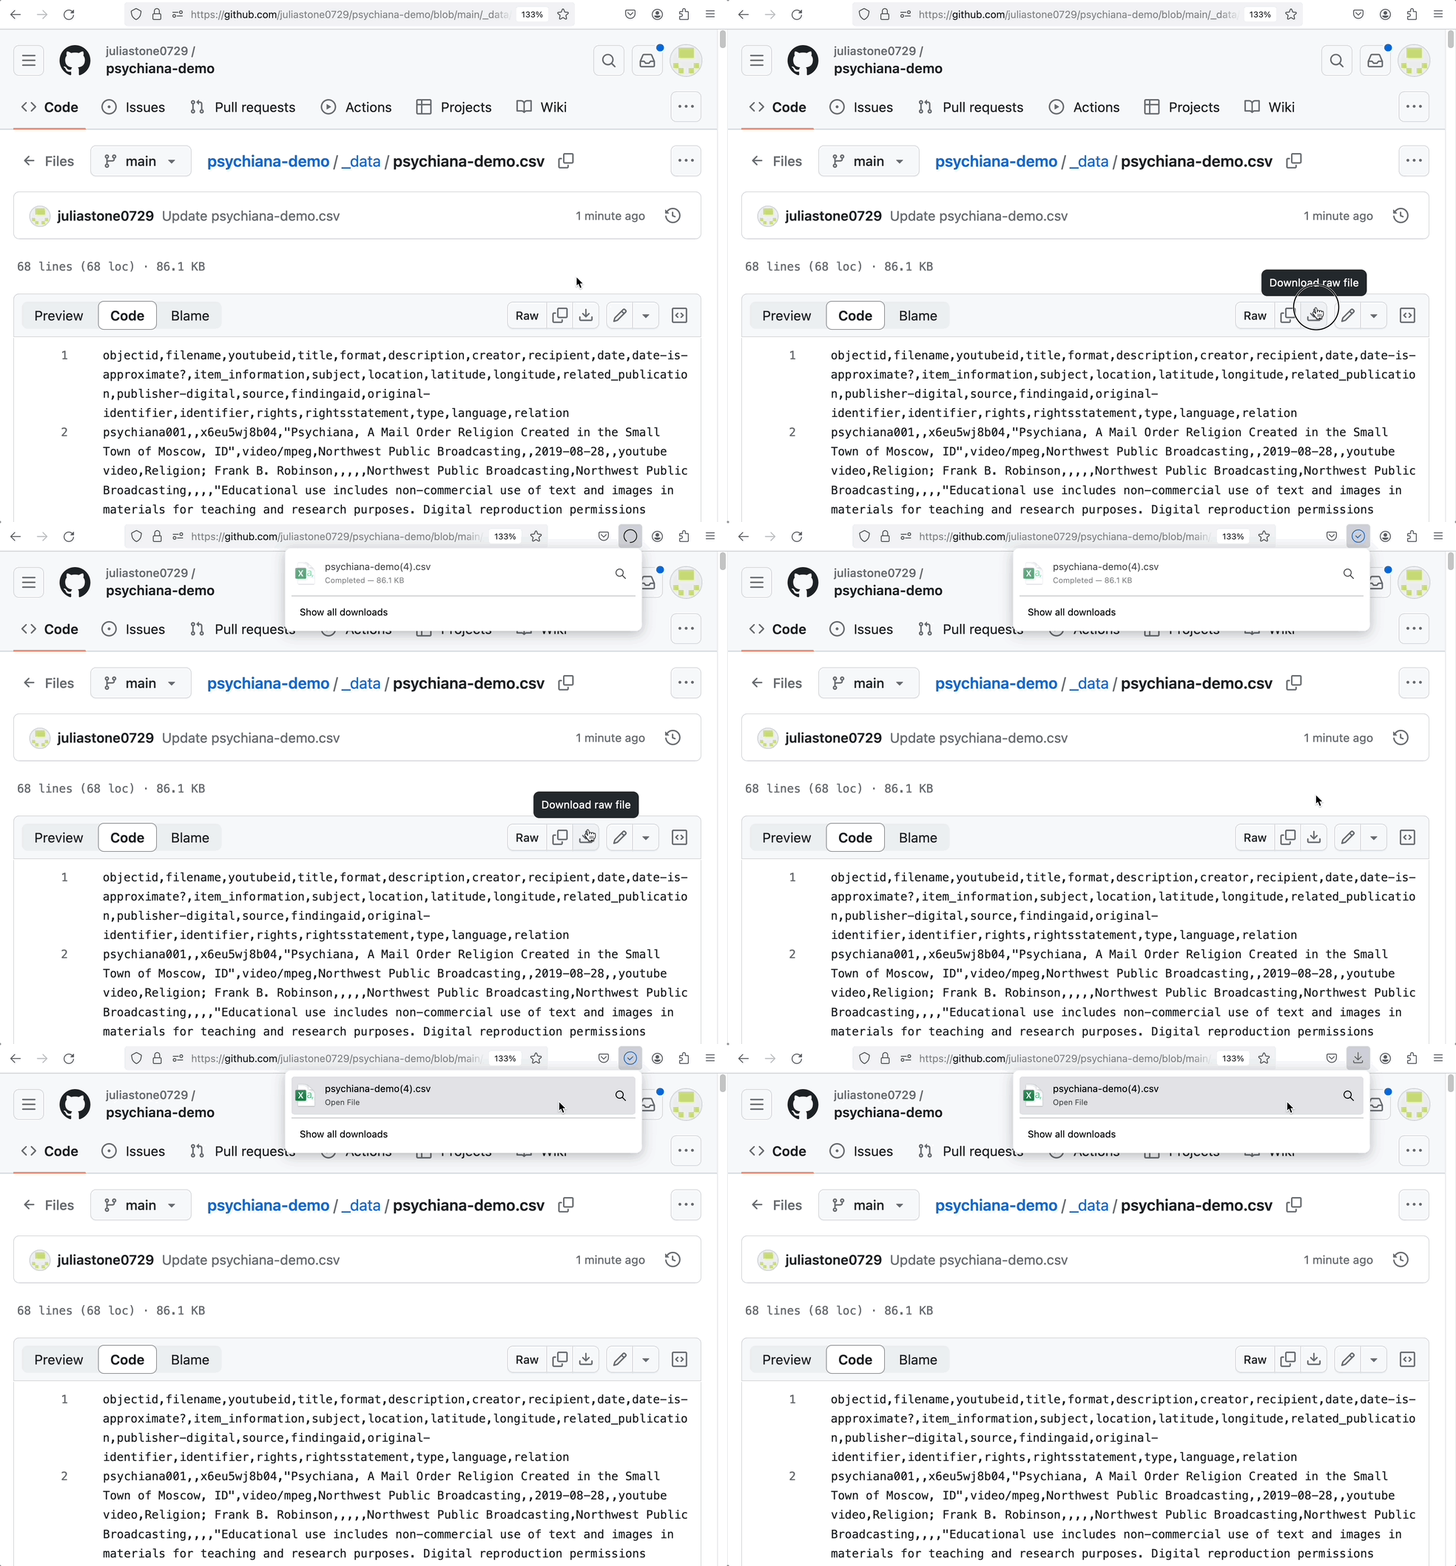
- Locate the CSV file in Finder or File Explorer.
2. Transfer the downloaded CSV file to Google Drive and open it with Google Sheets
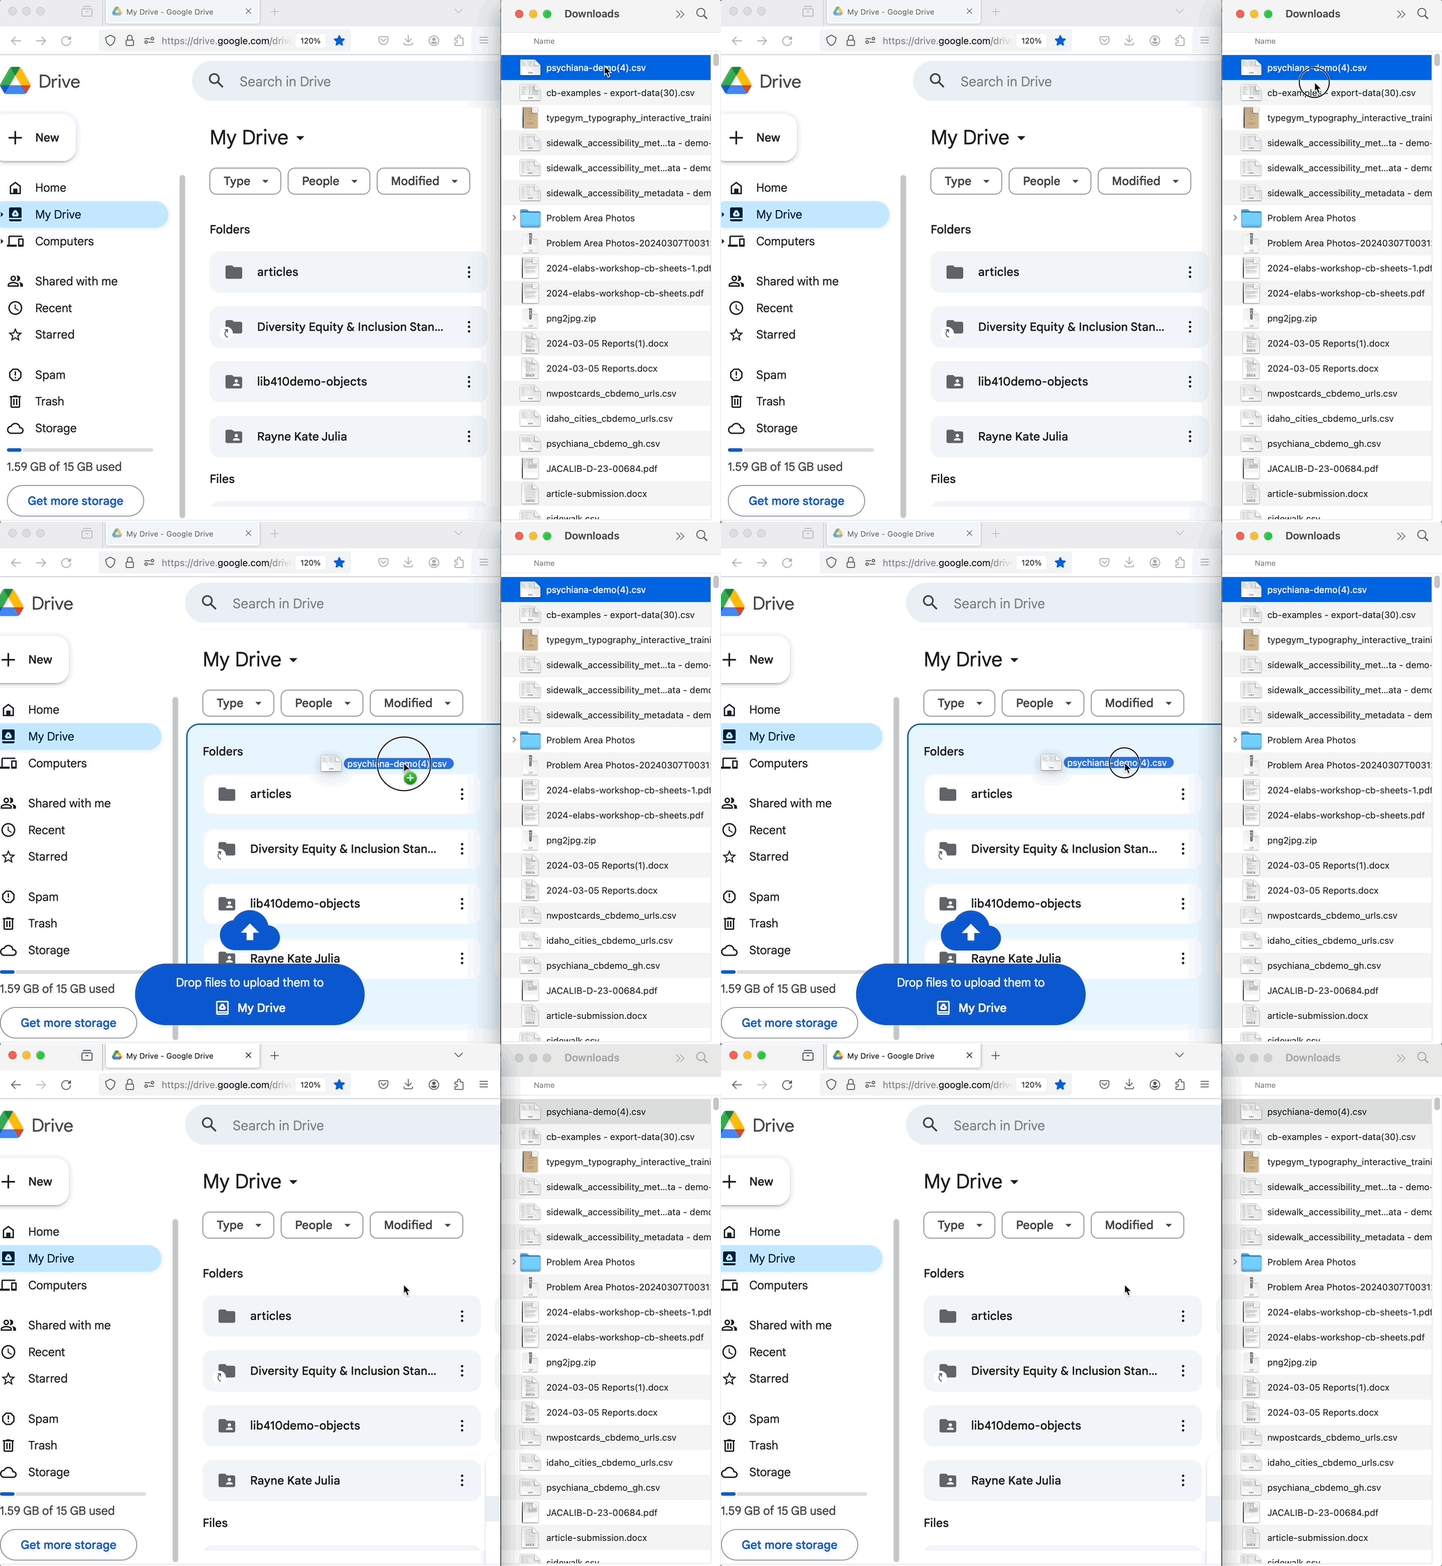
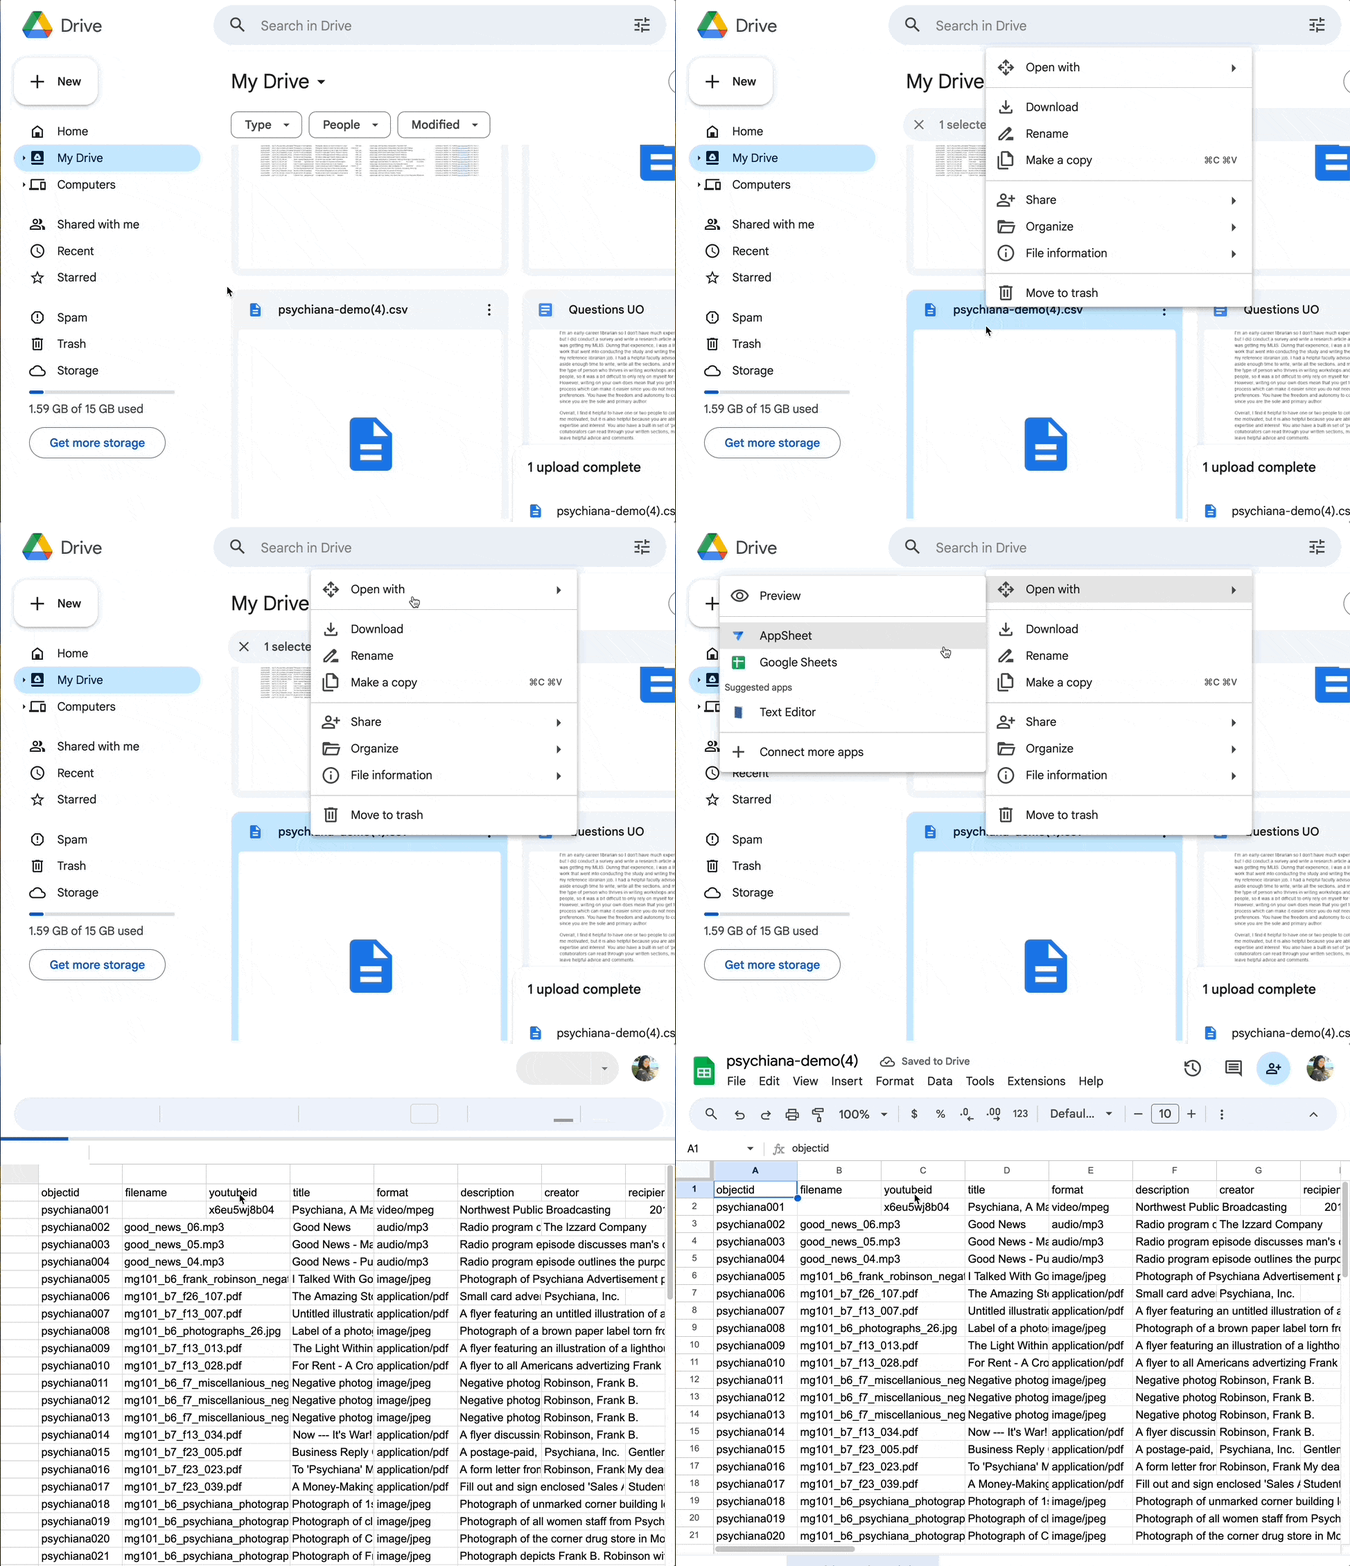
- Drag the CSV file into your Google Drive.
- Once the file is done uploading, click the folder in the bottom right to “Show file location.”
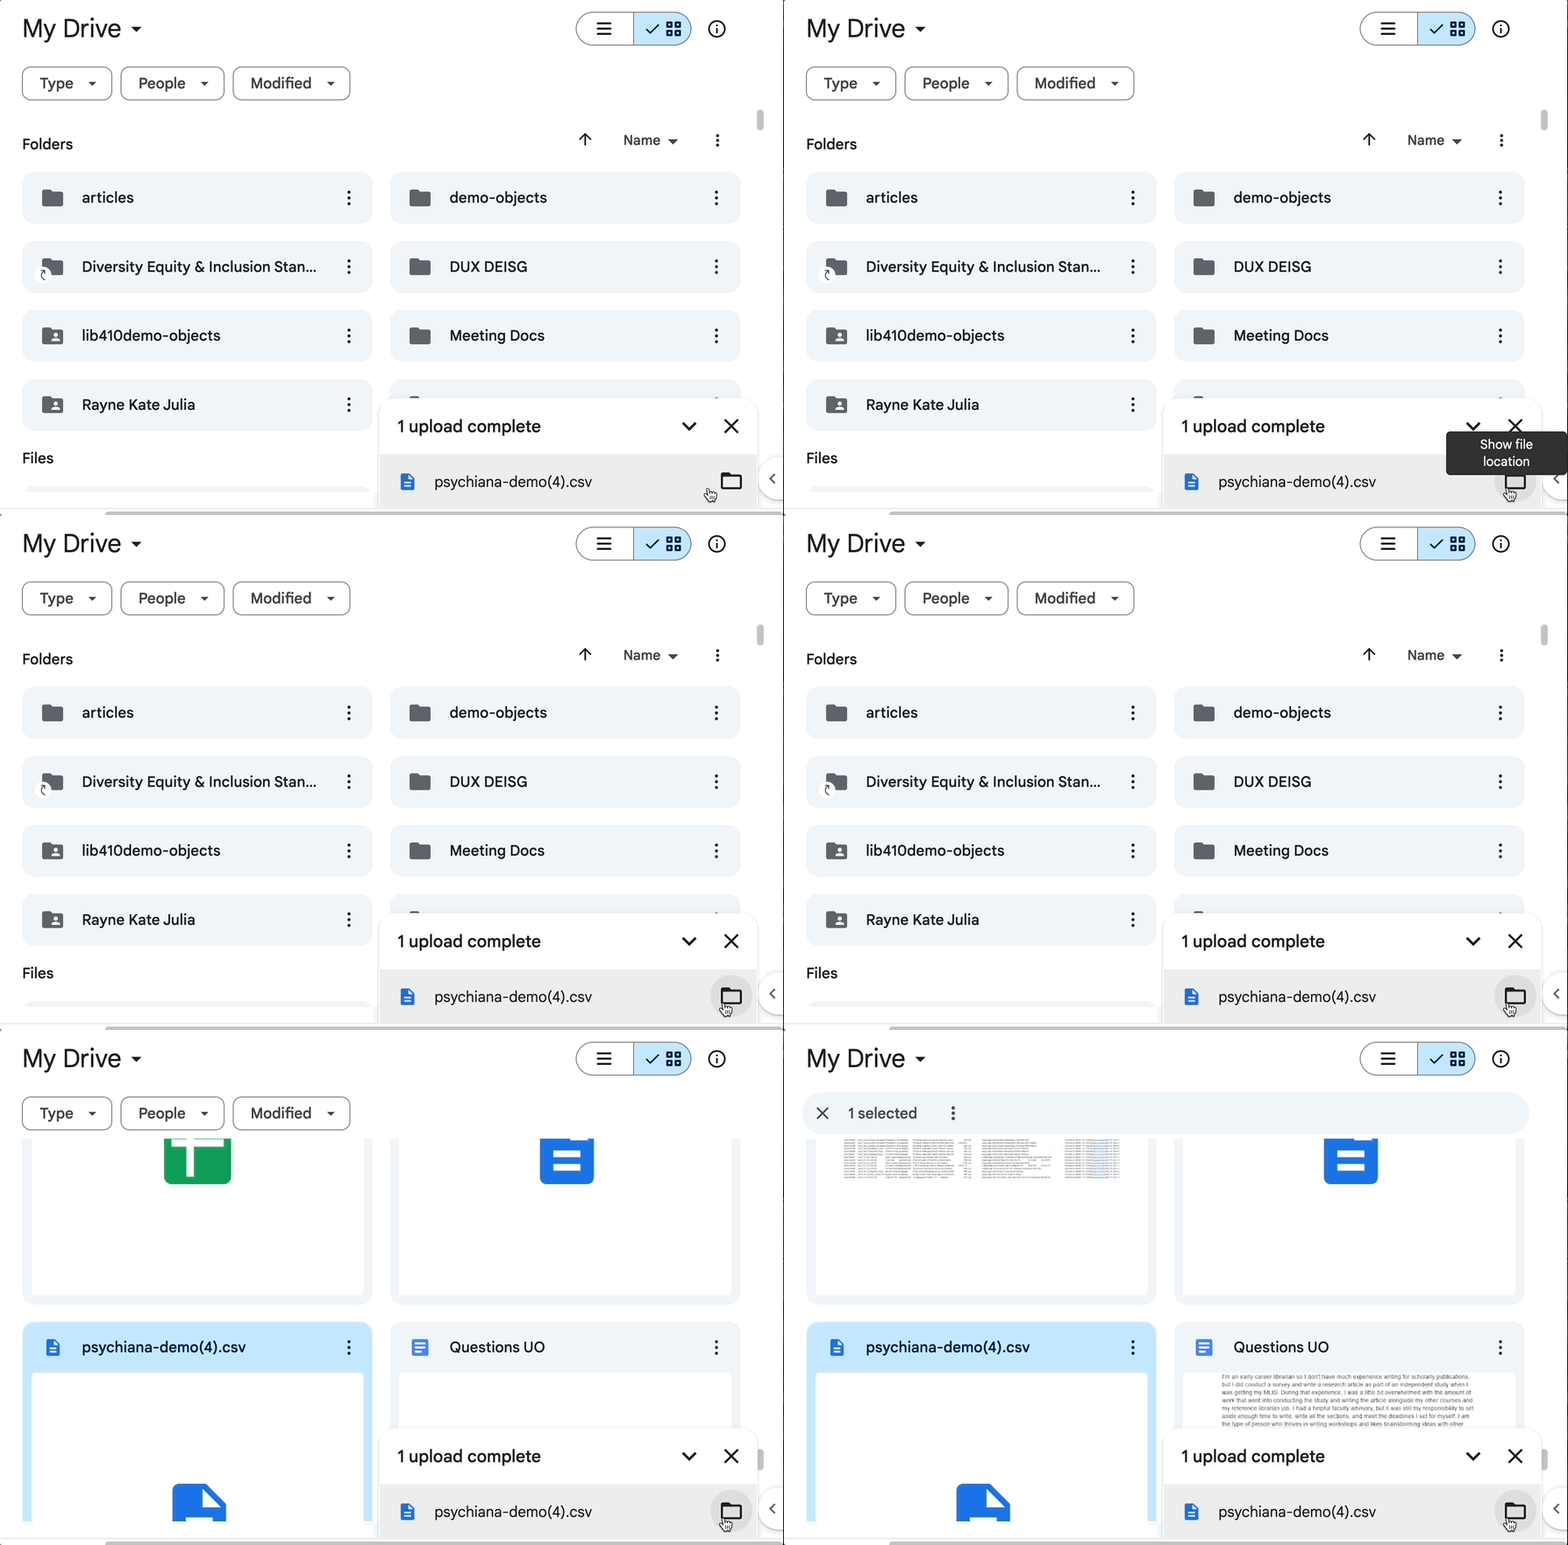
- Right click the file and then click Open with → Google Sheets.
3. Update your metadata spreadsheet
- Edit your metadata file in Google Sheets (e.g., adding additional items to your metadata, removing items, updating metadata fields, etc.).
Note: When updating your metadata, it is easiest to edit the Google Sheet as opposed to editing the CSV file in your repository.
4. Download the updated metadata spreadsheet as a CSV file
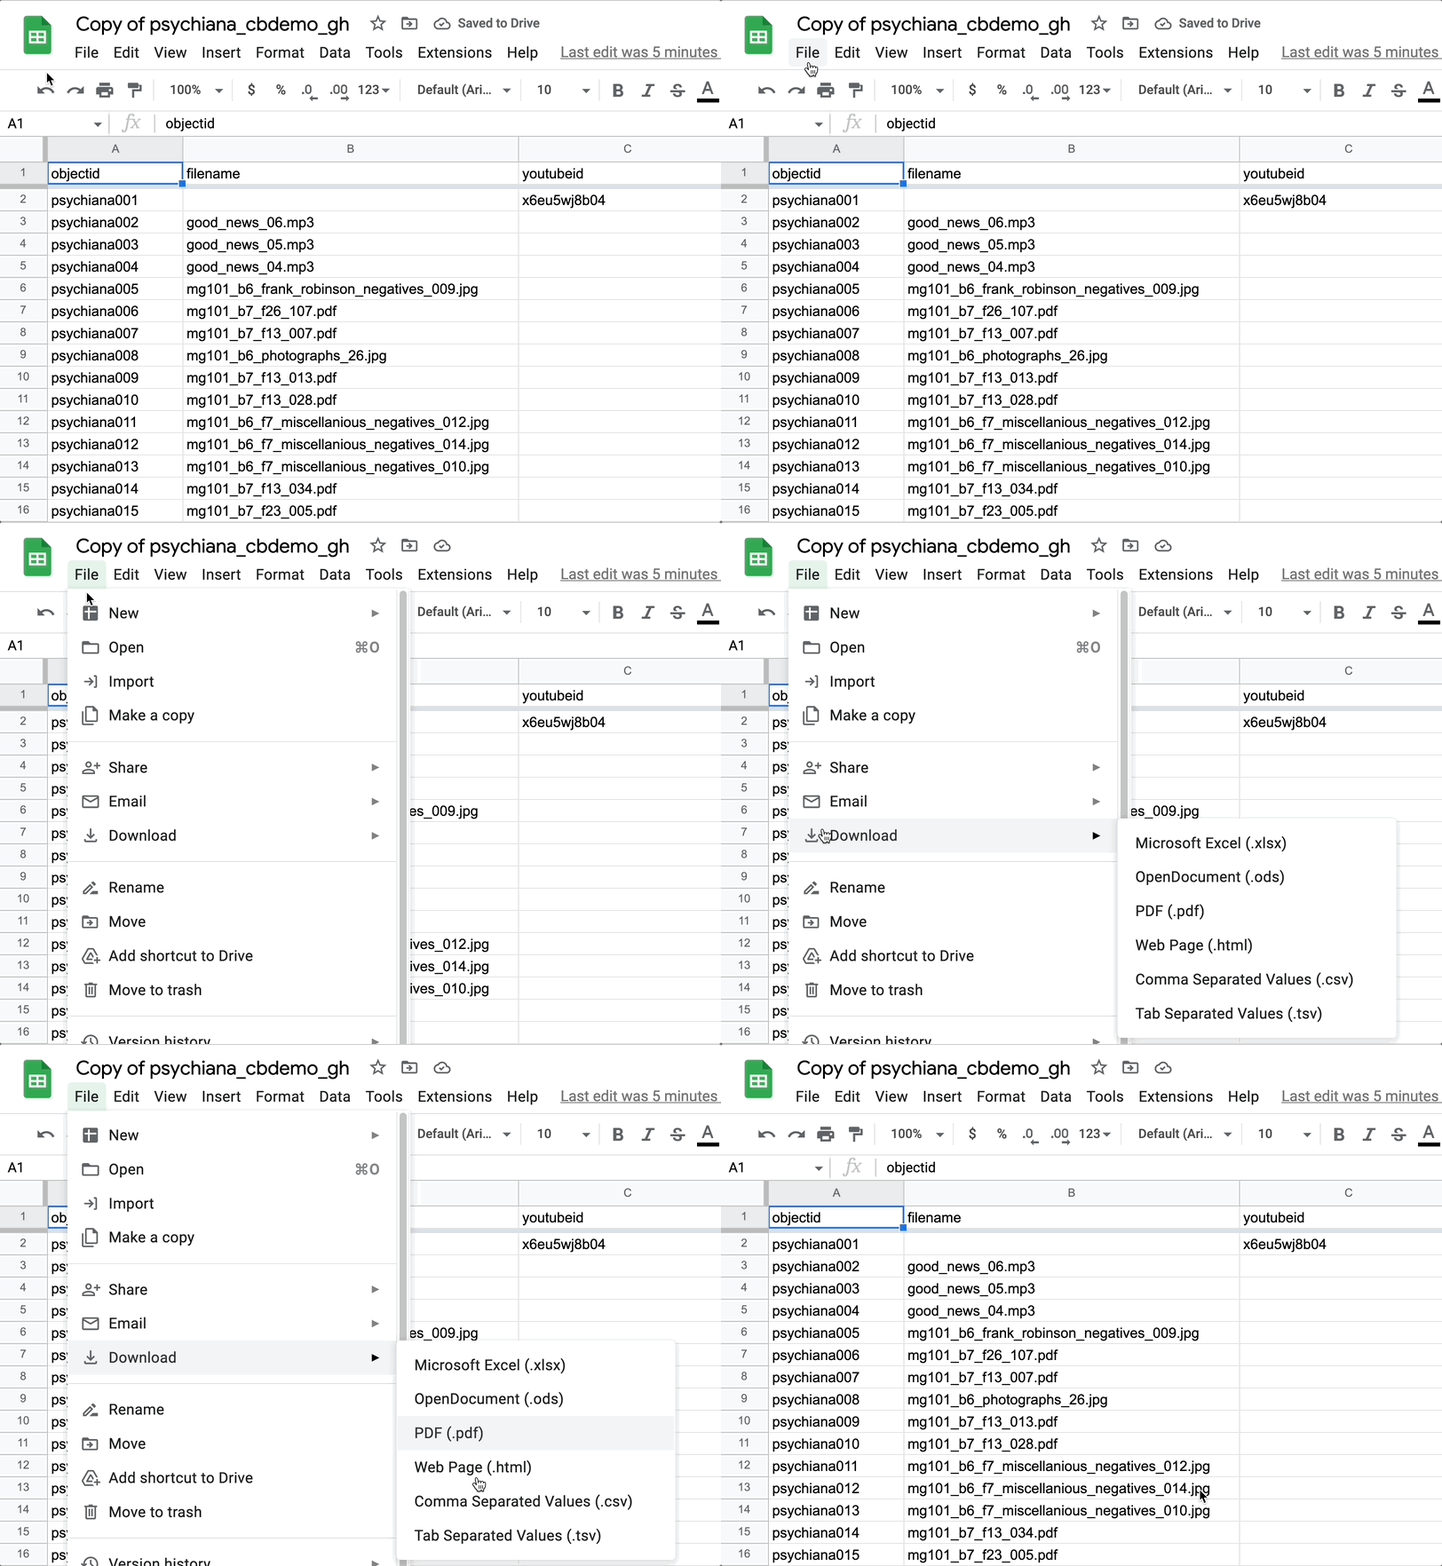
- Download the updated metadata spreadsheet as a .csv file by clicking File → Download → Comma Separated Values (.csv)
5. Rename the CSV file as the exact same file name as the CSV file already in your repository
- Locate the updated CSV file you just downloaded in the Downloads folder on your computer.
Warning: Do not open the CSV file in Microsoft Excel If you do, Excel often scrambles your UTF-8 encoding and/or your data (if you see weird dates, Excel might be the culprit). Excel cannot correctly export a CSV for use with CollectionBuilder, which is why we recommend Google Sheets or Office Libre.
Without opening the CSV file, rename the file to be exactly the same file name as the CSV file already in your repository.
If you forget what you named the file previously, you can check the COLLECTION SETTINGS section of your
_config.ymlfile.For CollectionBuilder-SHEETS, your metadata file name will be included after
metadata-csv:and for CollectionBuilder-GH, your metadata file name will be included aftermetadata:without the .csv extension.
For example, in CollectionBuilder-SHEETS:
metadata-csv: /assets/watkins.csv
In CollectionBuilder-GH:
metadata: psychiana-demo
6. Reupload your new metadata file
Visit the homepage of your repository on github.com.
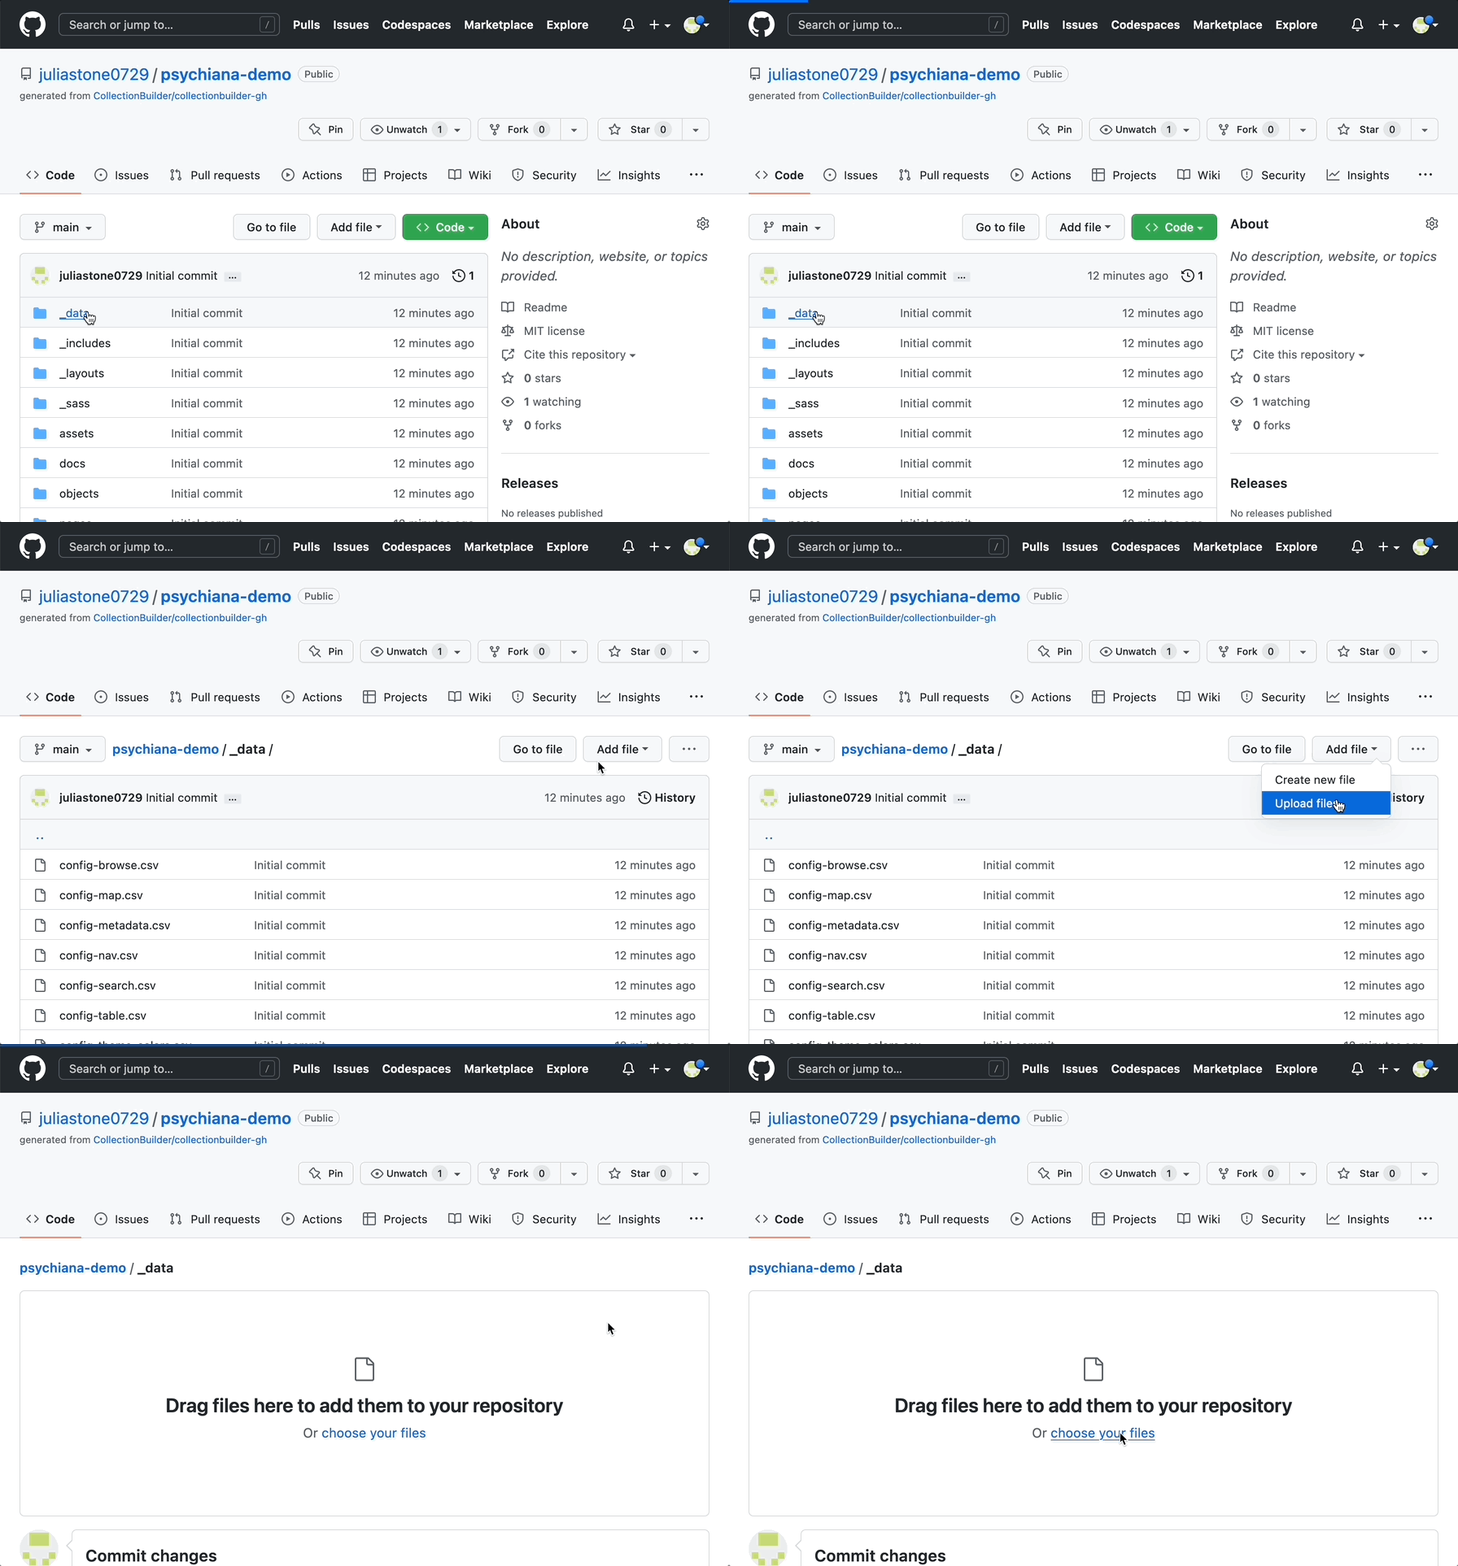
If you are using CollectionBuilder-GH, click on the “_data” folder. (If you are using CollectionBuilder-SHEETS, click on the “assets” folder).
On the folder page, click the “Add file” button and select “Upload files.”
Click “Choose your files” and navigate to the location of your renamed metadata CSV (probably in “Downloads”).
- Ensure the file name is exactly the same as your previous version of the metadata CSV and select the file.
7. Commit your changes
Scroll down to the “Commit changes” box, write a short commit message describing what you did (e.g., “Update metadata”), and then click the green “Commit changes” button
This will replace your old metadata file with the new metadata file. Your GitHub Pages site will automatically rebuild to reflect the changes you made.
Part 2: Updating Metadata Using Visual Studio Code
This part of the walkthrough is recommended for when you are using VS Code for editing your site, which is most often used for the CollectionBuilder-CSV template.
1. Transfer your metadata CSV file from your computer to Google Sheets (if necessary)
- If you do not know where your metadata spreadsheet is in your Google Drive or you want to ensure you have the most up-to-date version of your site metadata to edit, it is a good idea to transfer your metadata CSV file from your computer to Google Sheets for editing.
Note: If you already have your metadata spreadsheet in Google Sheets ready to edit, please skip to Step 4.
2. Locate your metadata CSV file on your computer
Navigate to your your “Documents” folder on your computer.
Open the “GitHub” folder and then open the folder matching your repository’s title.
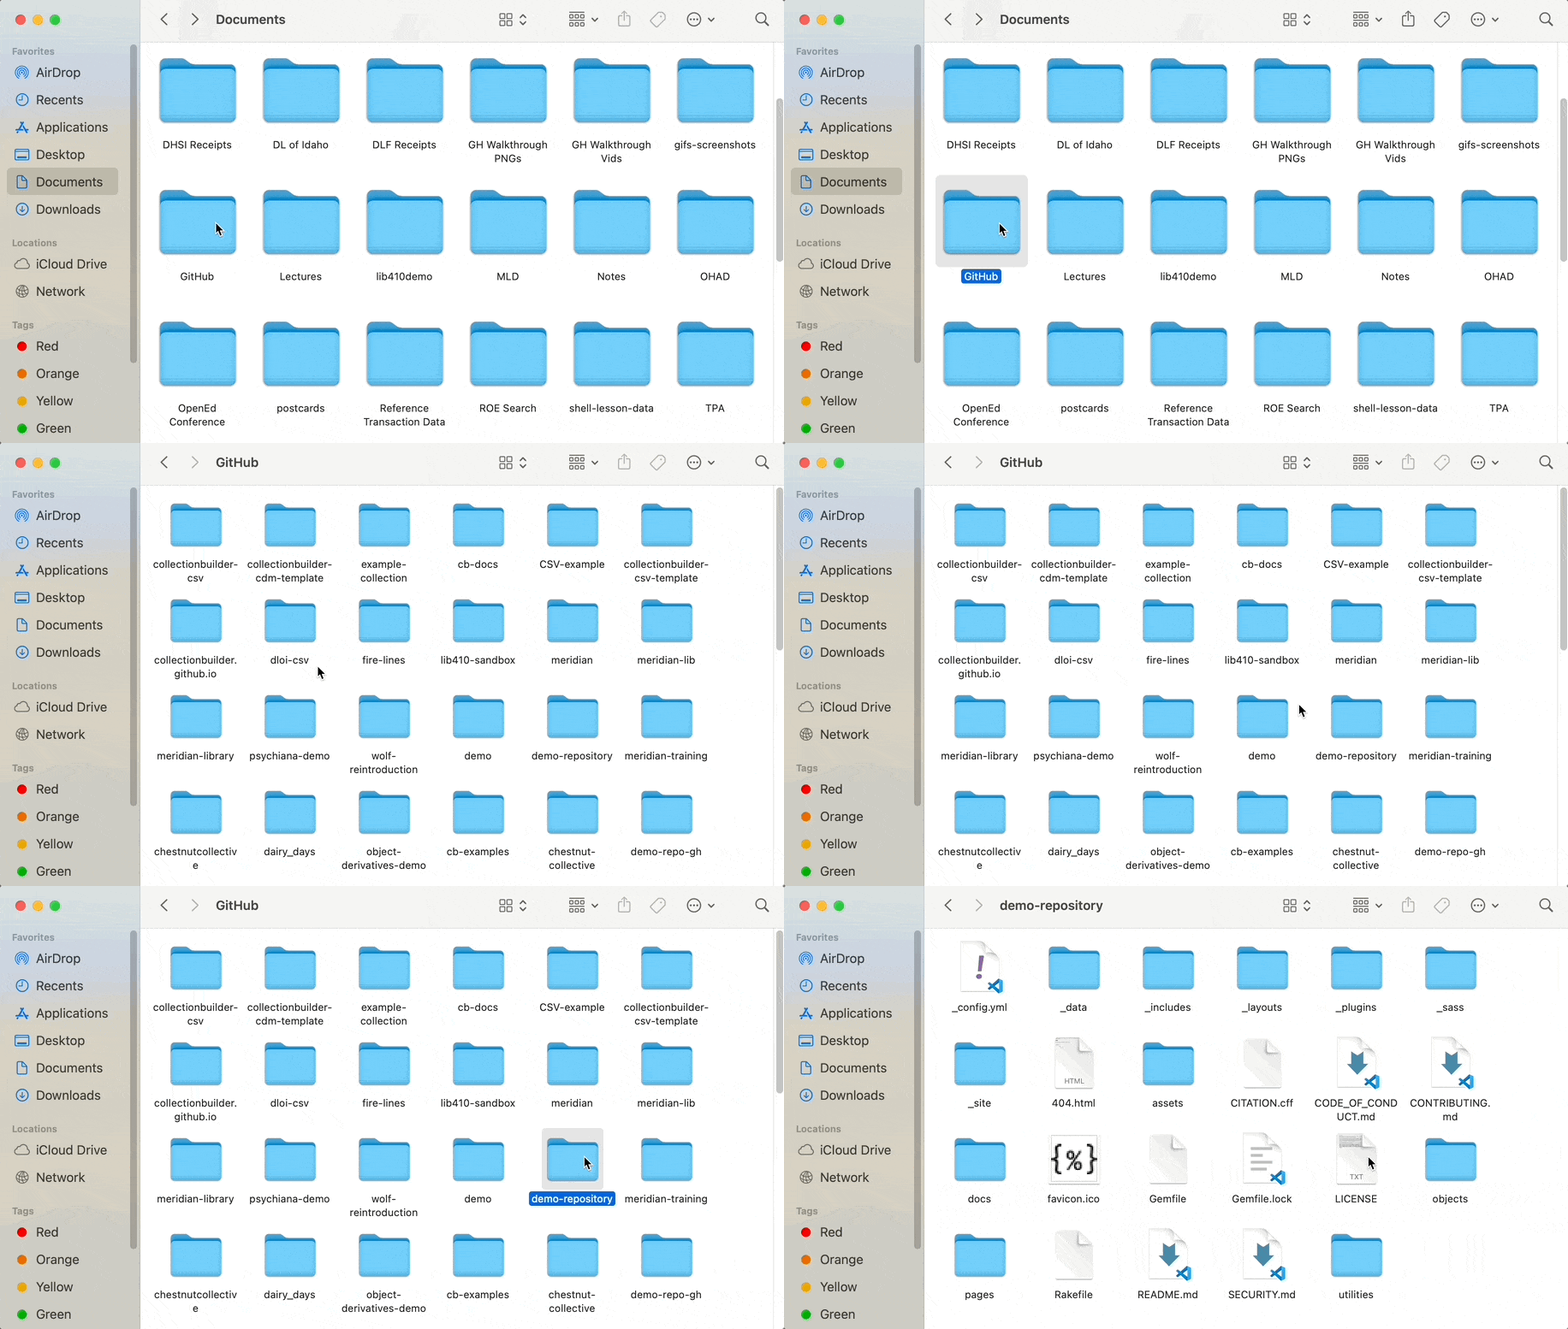
- Open the “_data” folder and then locate your metadata CSV file.
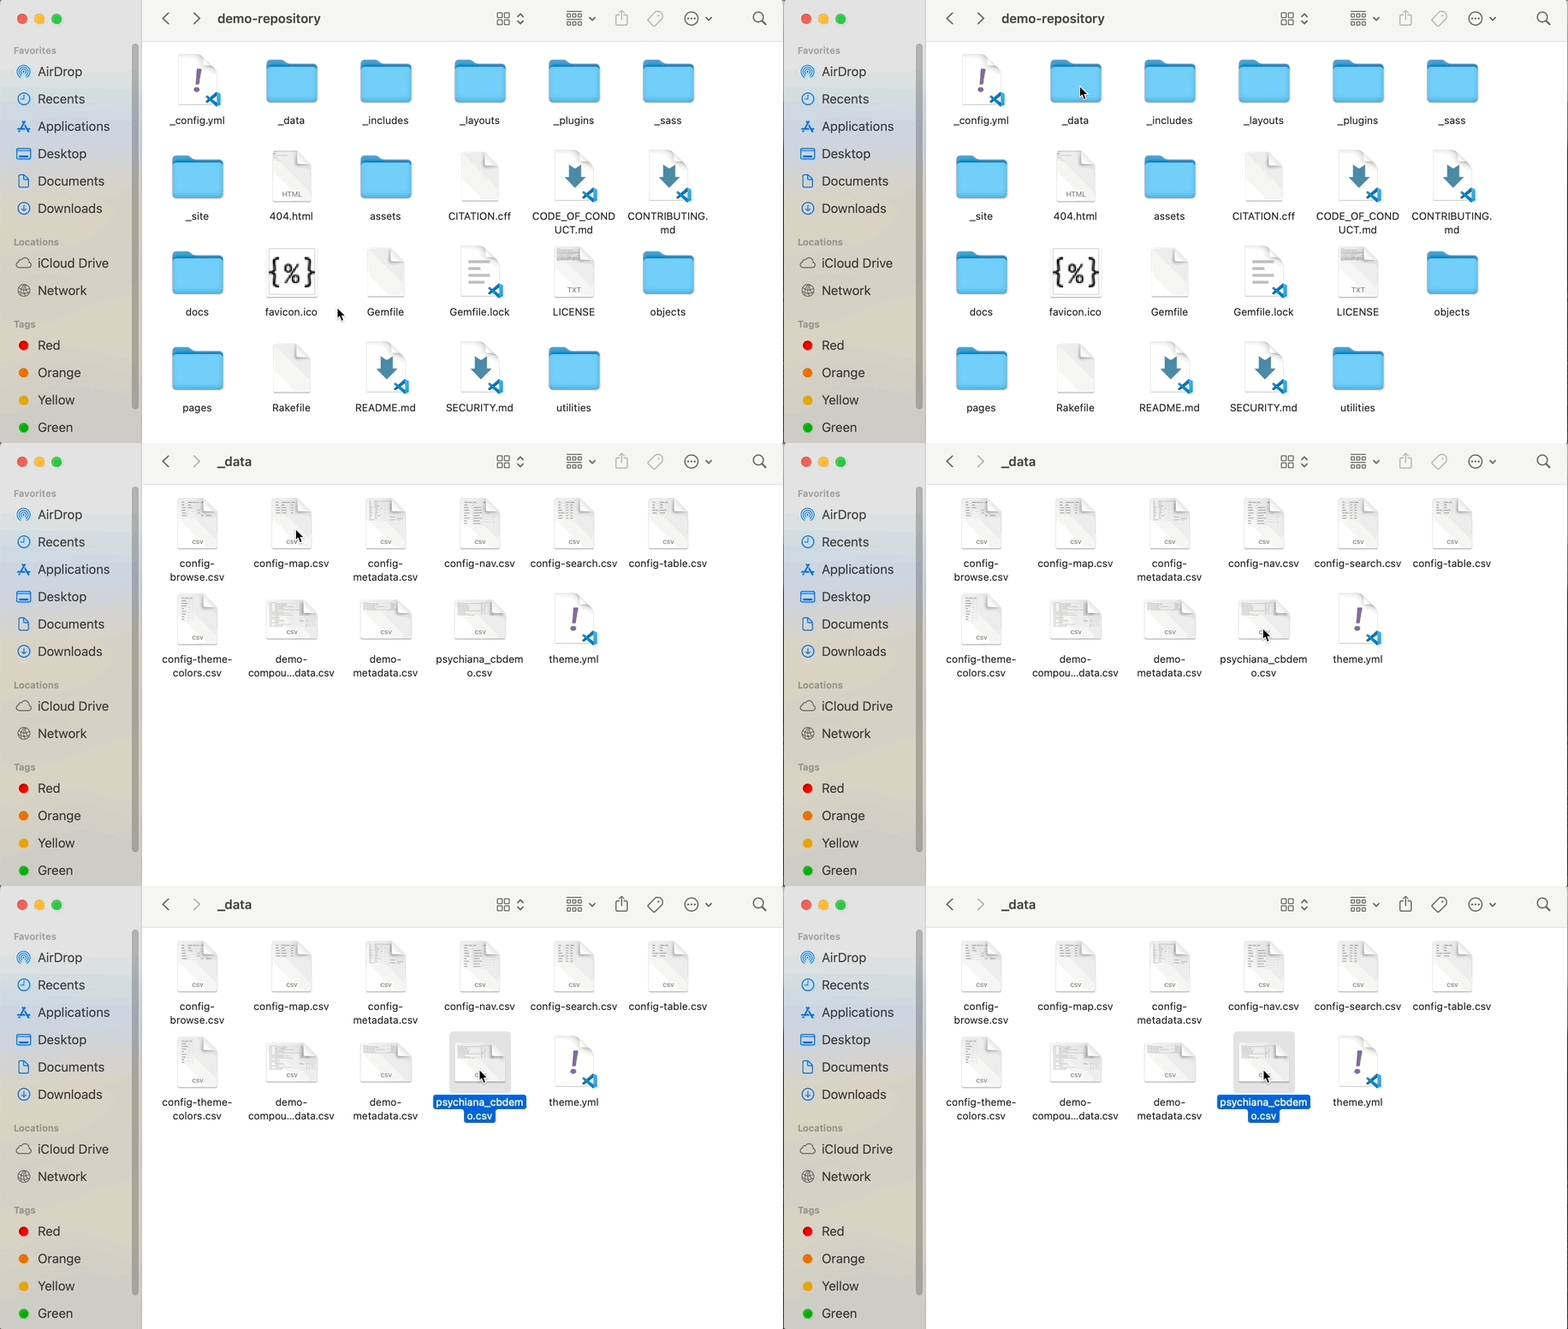
3. Transfer your CSV file to Google Drive and open it with Google Sheets
- Drag the CSV file into your Google Drive.
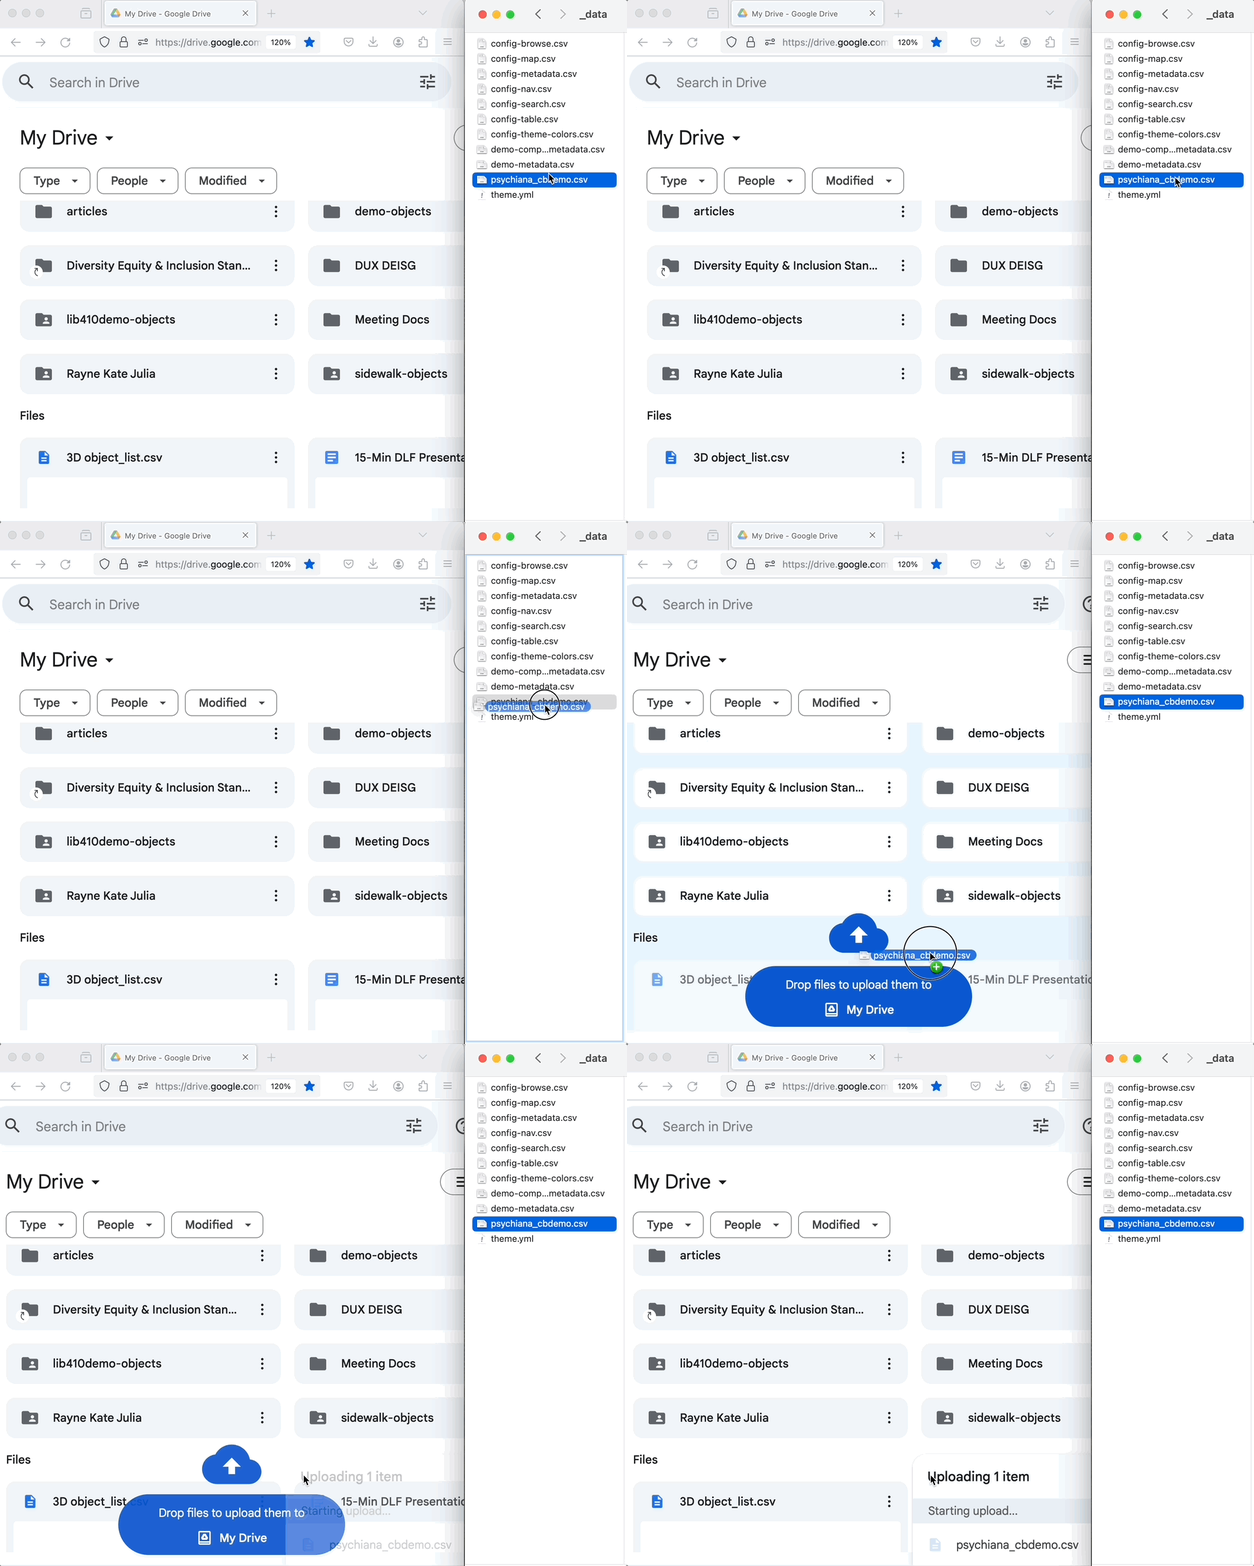
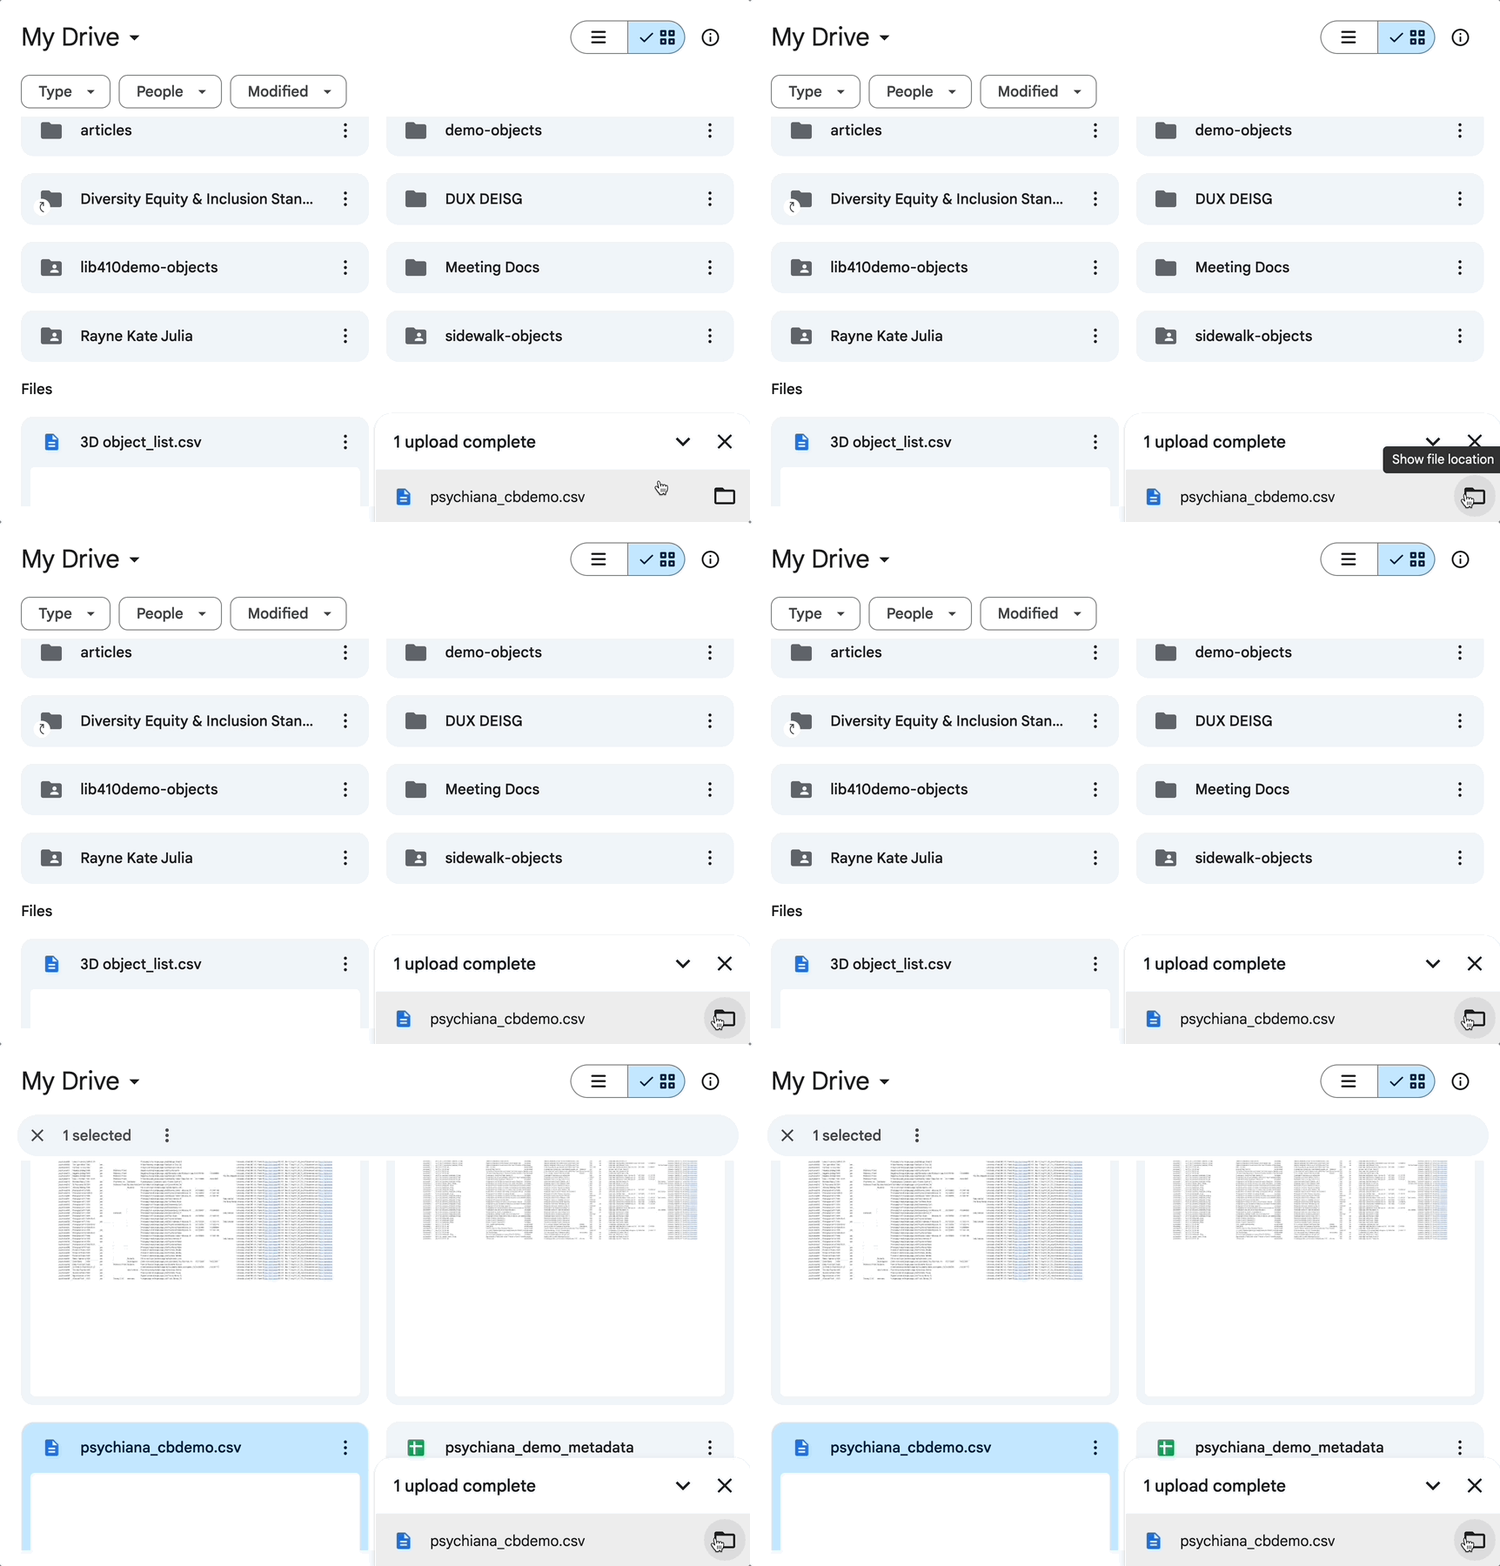
- Once the file is done uploading, click the folder in the bottom right to “Show file location.”
- Right click the file and then click Open with → Google Sheets.
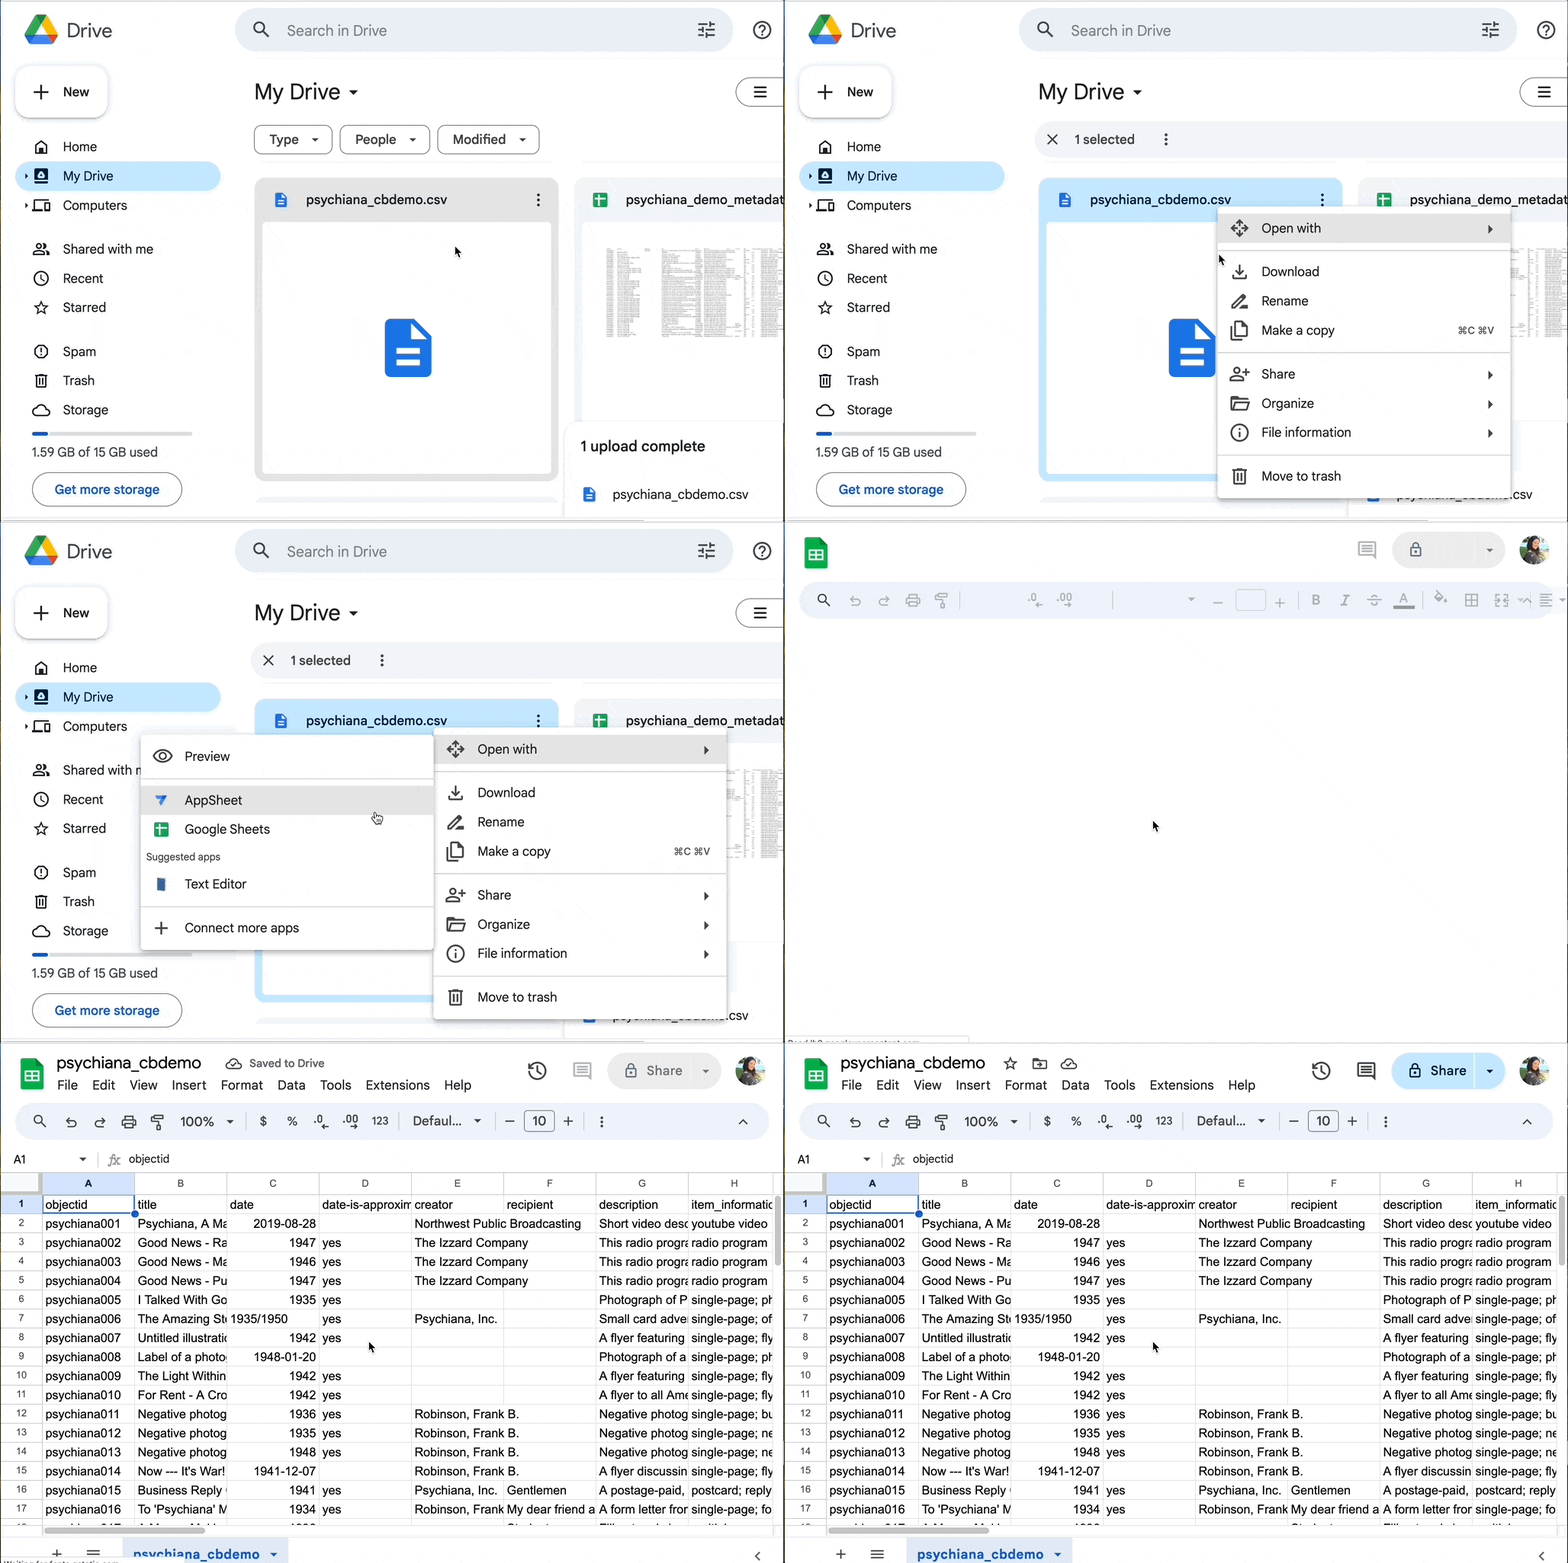
4. Update your metadata spreadsheet
- Edit your metadata file in Google Sheets (e.g., adding additional items to your metadata, removing items, editing metadata fields, etc.).
5. Download the updated metadata spreadsheet
- Download the updated metadata spreadsheet as a .csv file by clicking File → Download → Comma Separated Values (.csv)
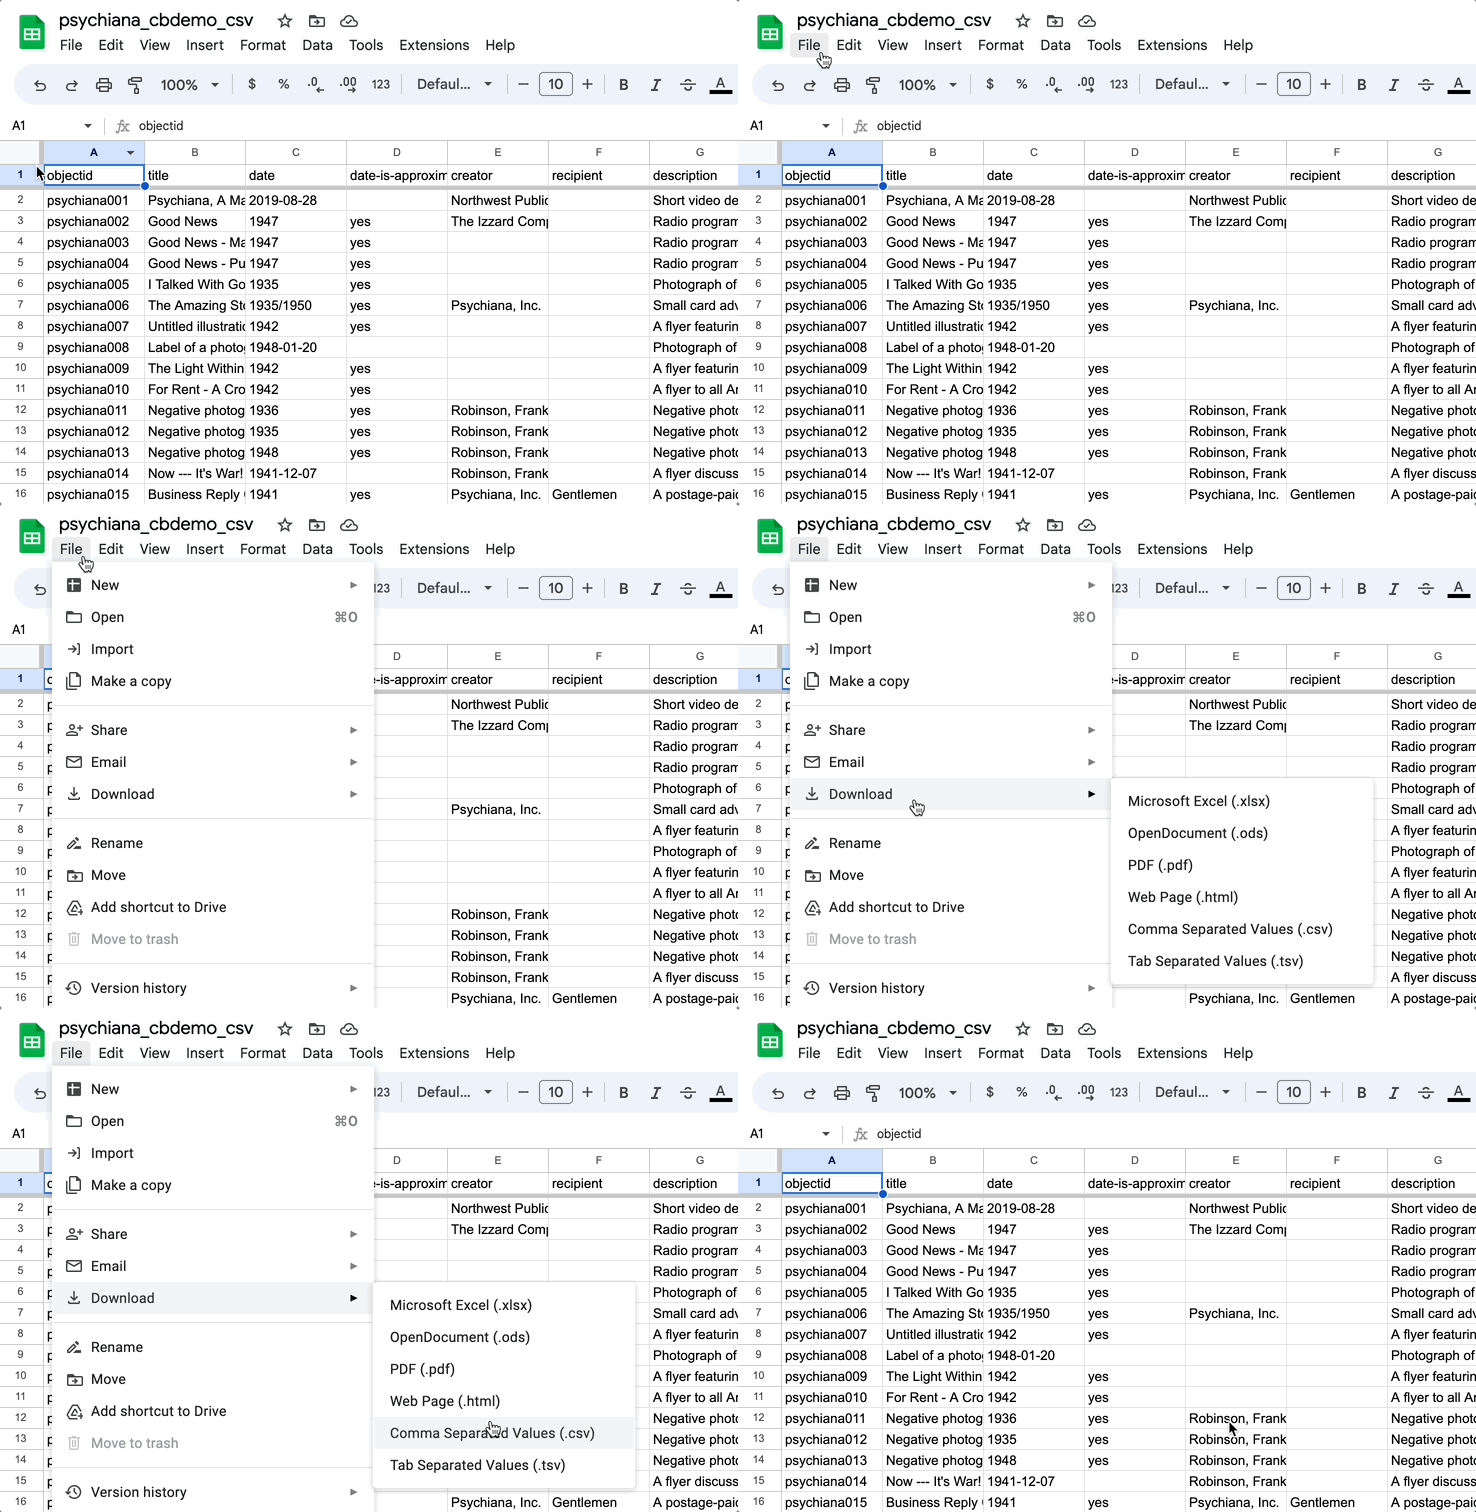
6. Rename the CSV file as the exact same file name as the CSV file already in your repository
- Locate the updated CSV file you just downloaded in the Downloads folder on your computer.
Warning: Do not open the CSV file in Microsoft Excel If you do, Excel often scrambles your UTF-8 encoding and/or your data (if you see weird dates, Excel might be the culprit). Excel cannot correctly export a CSV for use with CollectionBuilder, which is why we recommend Google Sheets or Office Libre.
Without opening the CSV file, rename the file to be exactly the same file name as the CSV file already in your repository.
If you forget what you named the file previously, you can check the COLLECTION SETTINGS section of your
_config.ymlfile.For CollectionBuilder-CSV, your metadata file name will be included after
metadata:without the .csv extension.
For example, in CollectionBuilder-CSV:
metadata: psychiana_cbdemo
7. Use GitHub Desktop to open your repository in VS Code
Check to make sure you are in the correct repository by viewing the top left section of GitHub Desktop. To switch between repositories, locate the Current Repository dropdown, and select the repository you’d like to open.
In the box that says Open the repository in your external editor, click the button that says Open in Visual Studio Code.
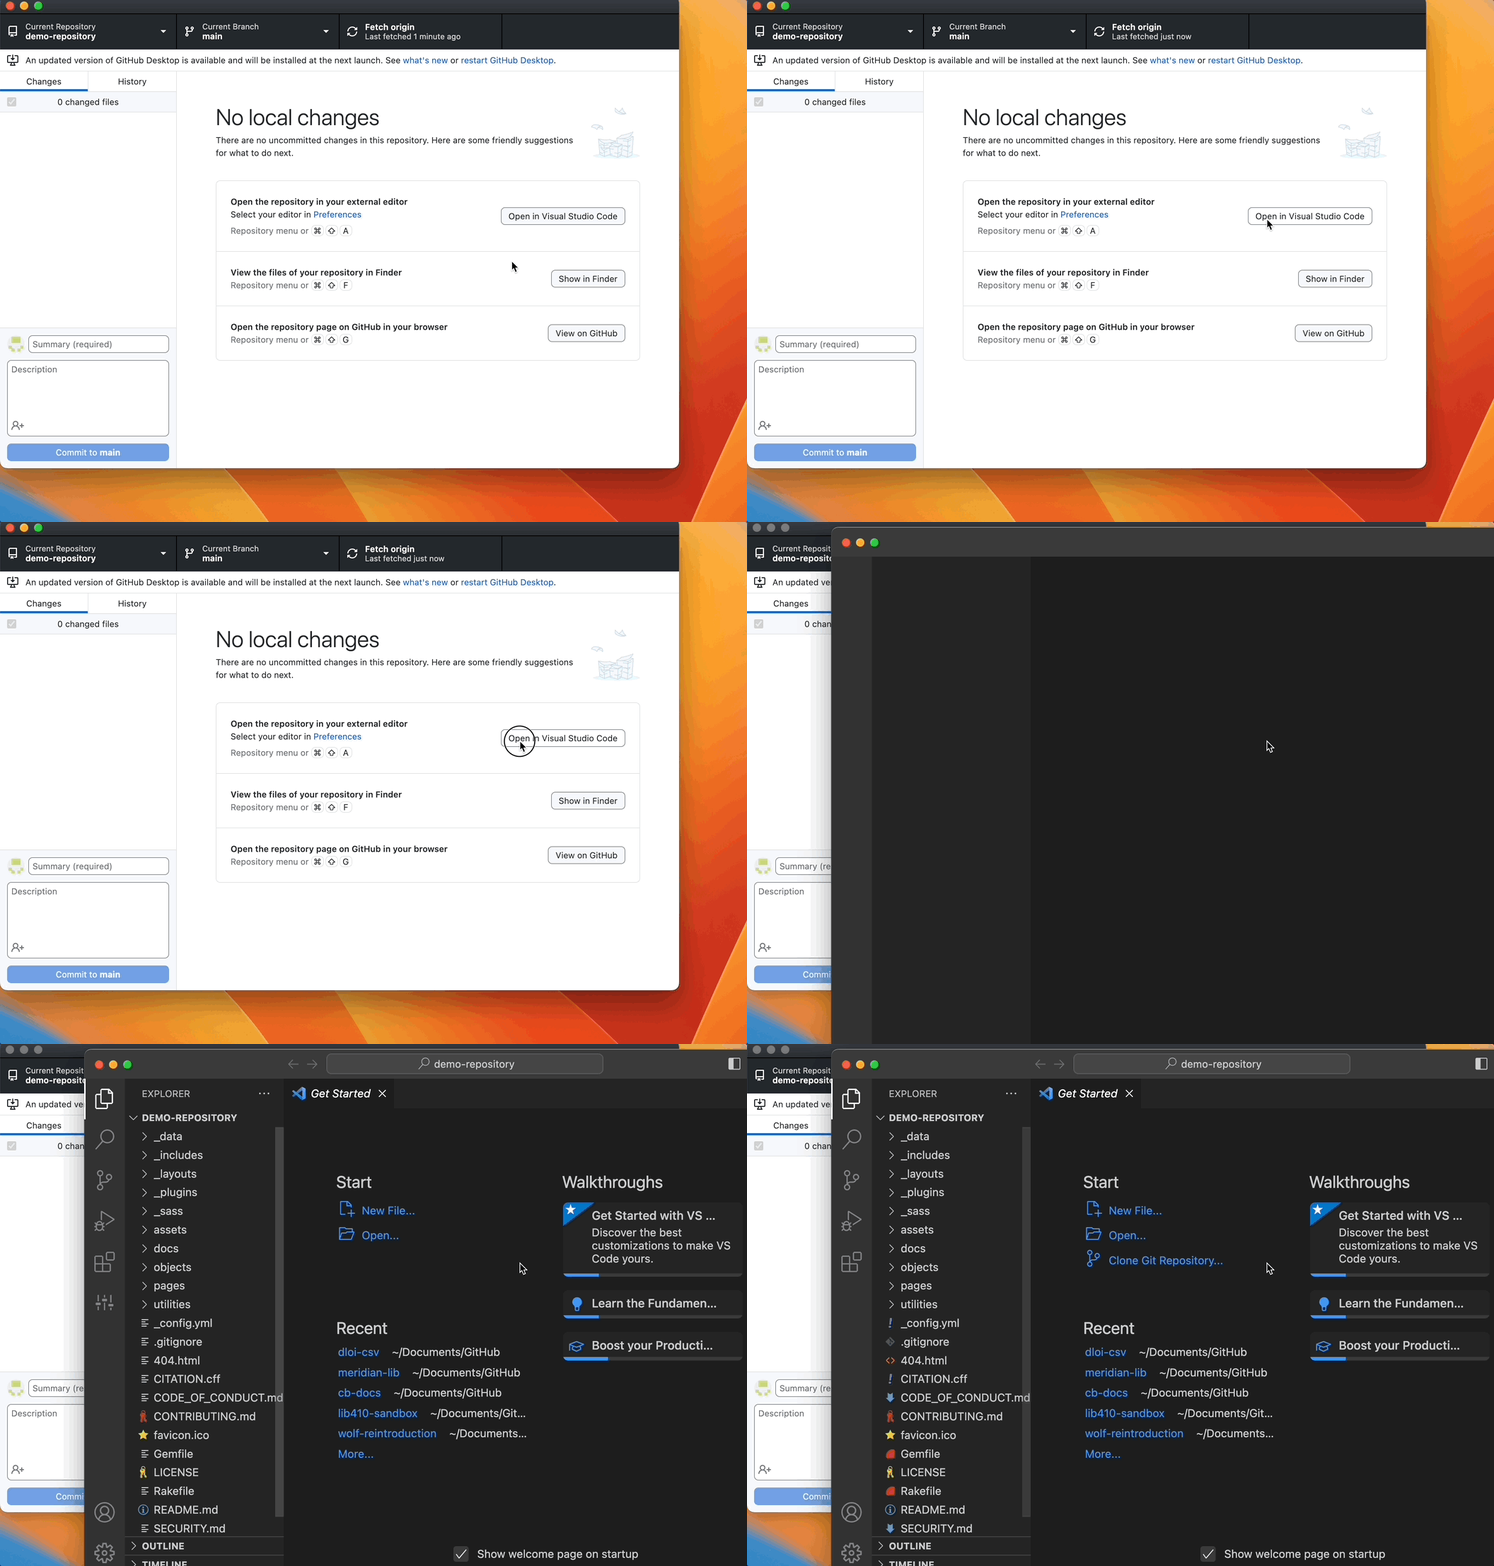
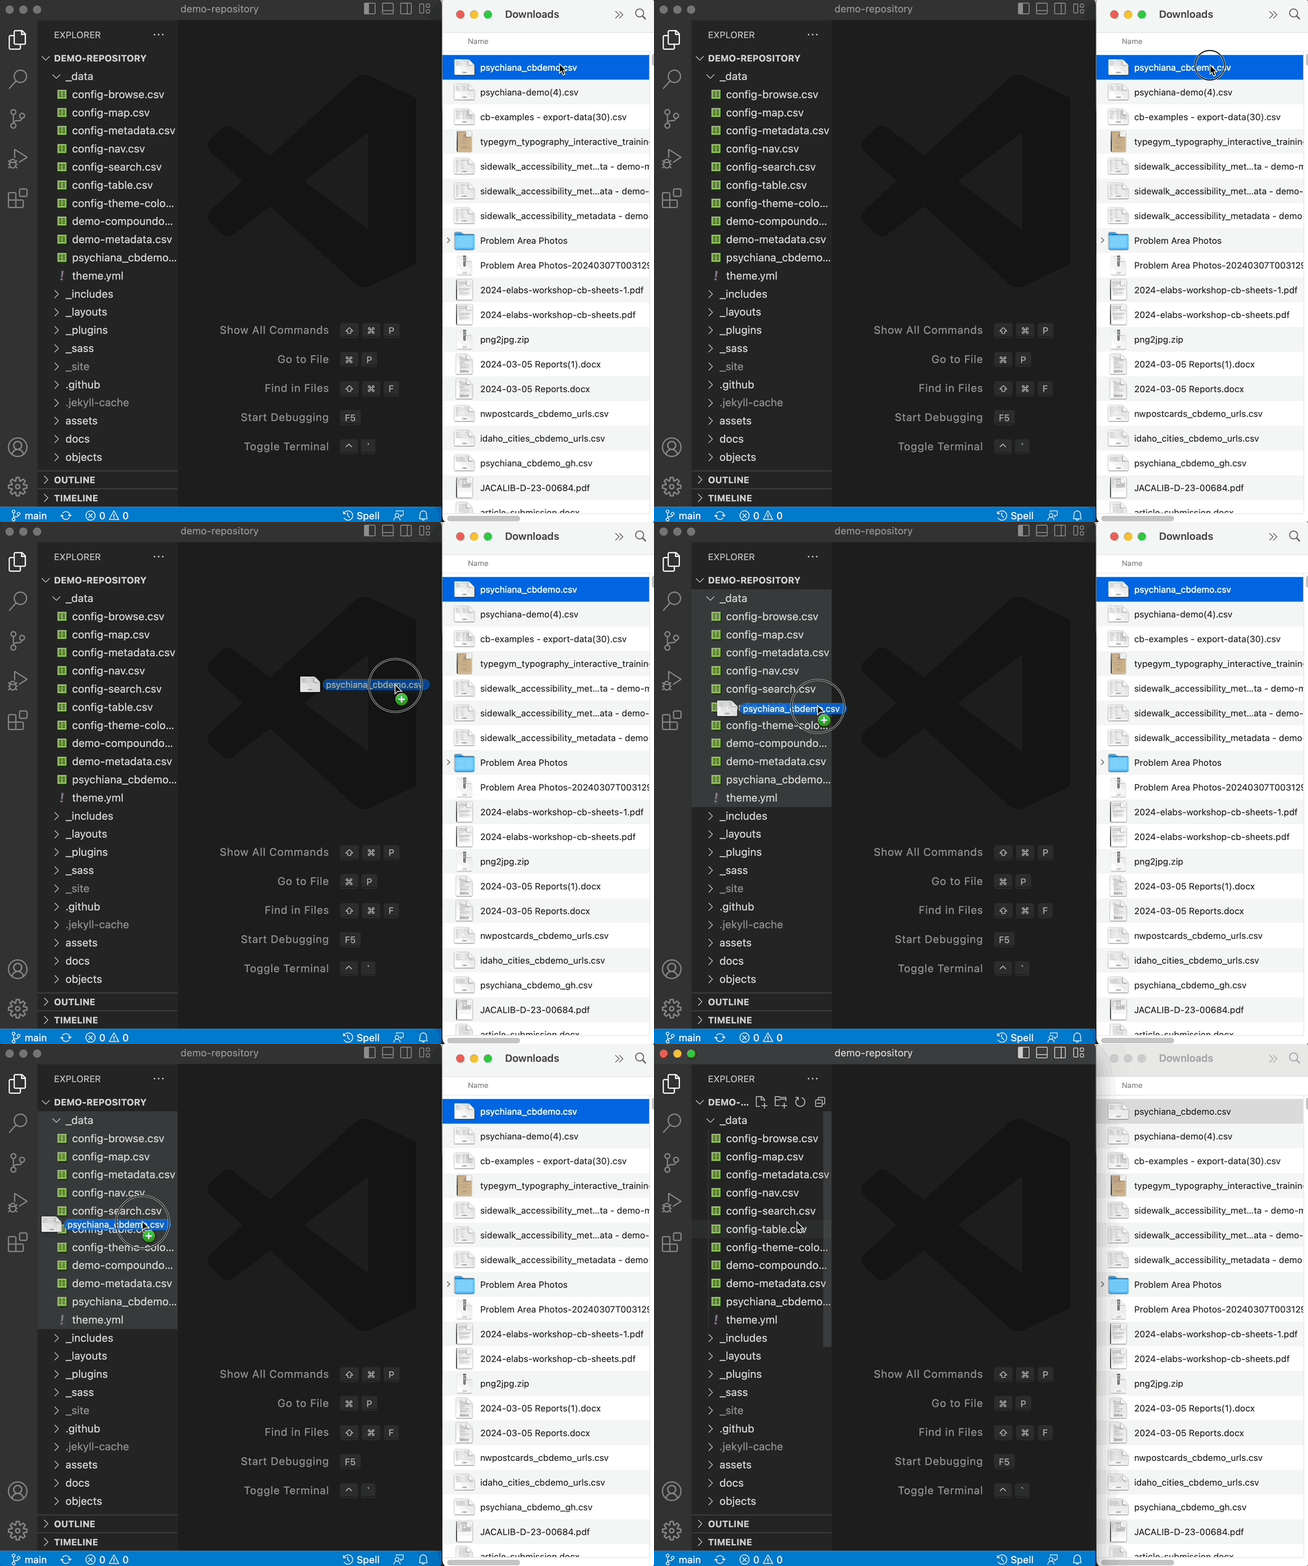
8. Drag the csv from your Downloads folder into the “_data” folder on VS Code
Expand the “_data” folder on the left pane of VS Code by clicking on it.
Ensure the file name is exactly the same as your previous version of the metadata CSV and select the file.
Drag the renamed csv file from your Downloads folder into the “_data” folder
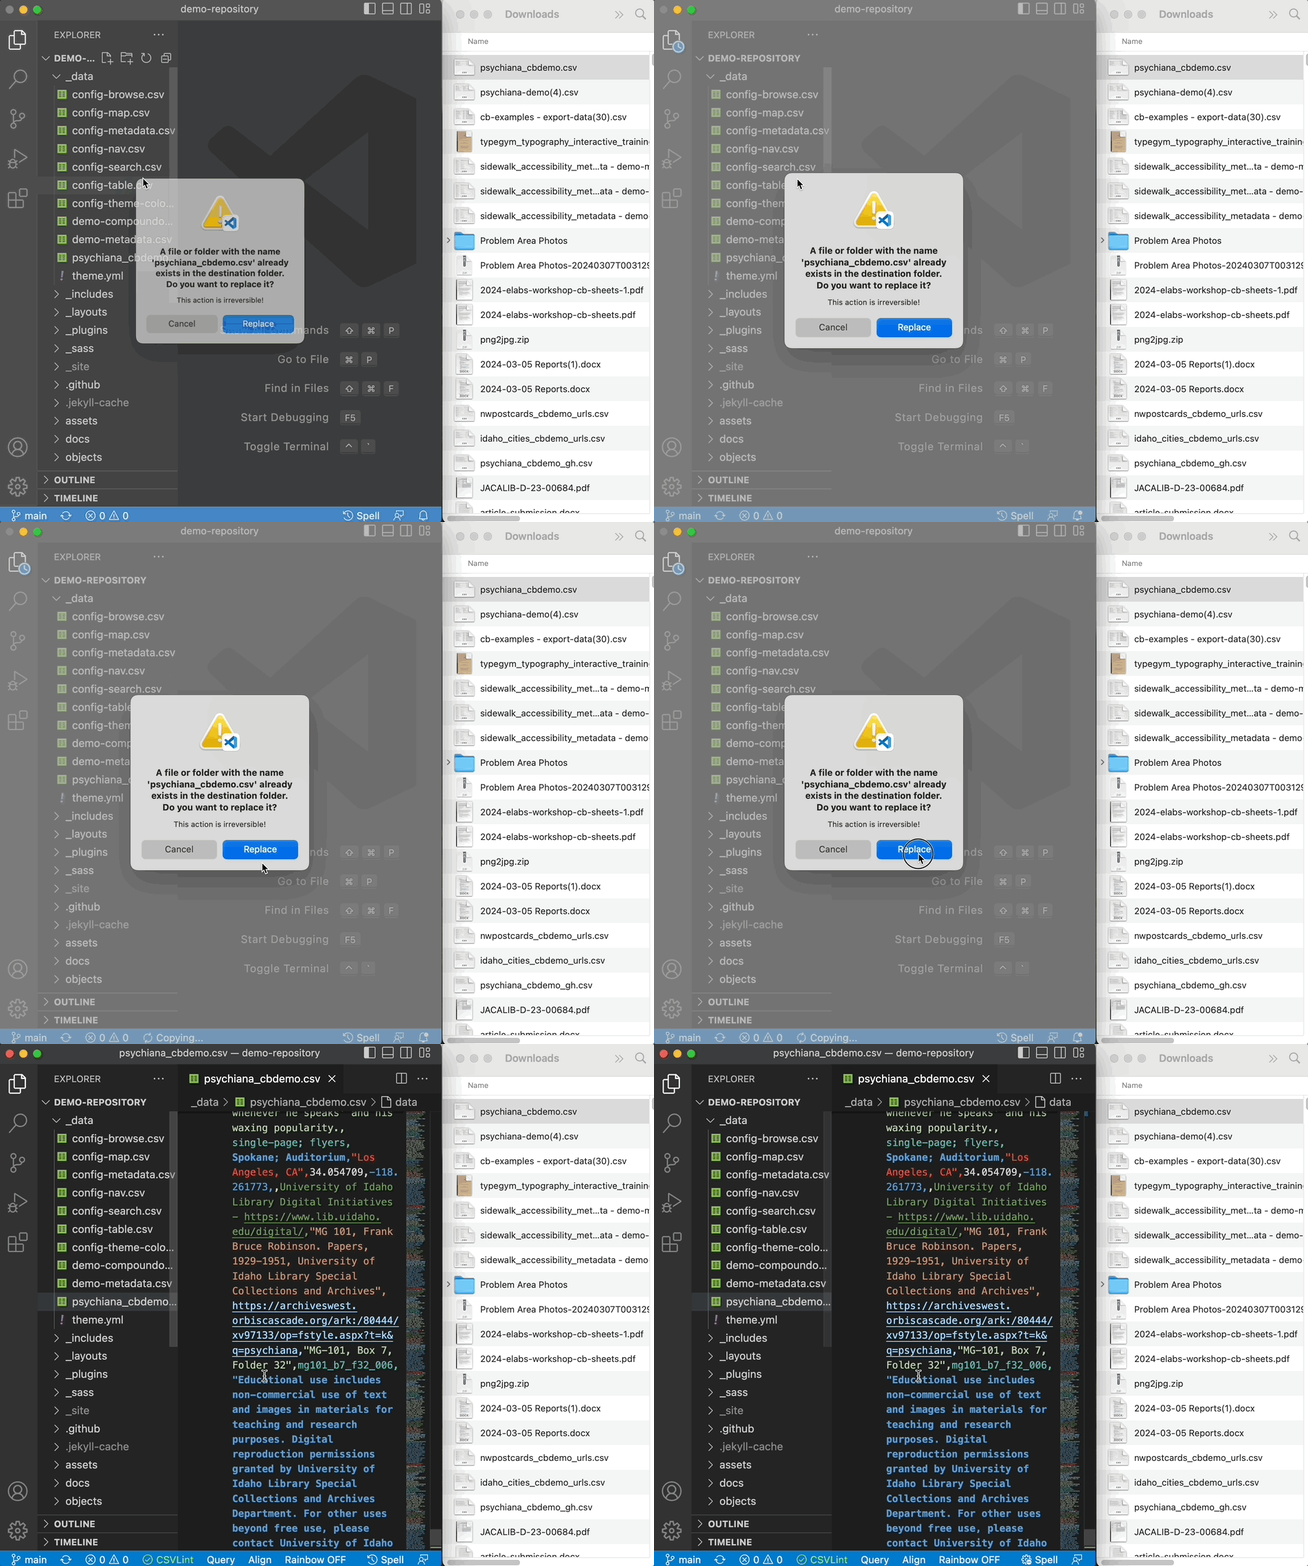
- When prompted, click the blue “Replace” button to replace the old metadata csv file with the updated metadata csv file.
9. Commit and push your changes
In VS Code, click on the “Source Control” icon, i.e. the network icon on the left side.
Changed files will be listed under “Changes.” Hover over the CSV file name and click on the plus icon to stage the change. Once added, the file will move to a new list “Staged Changes” and it is ready to commit.
Click in the text box at the top labeled “Message.” Type your “commit message” into the box (in this case something like, “Update metadata”).
Click the blue “Commit” button below the message box to commit the change.
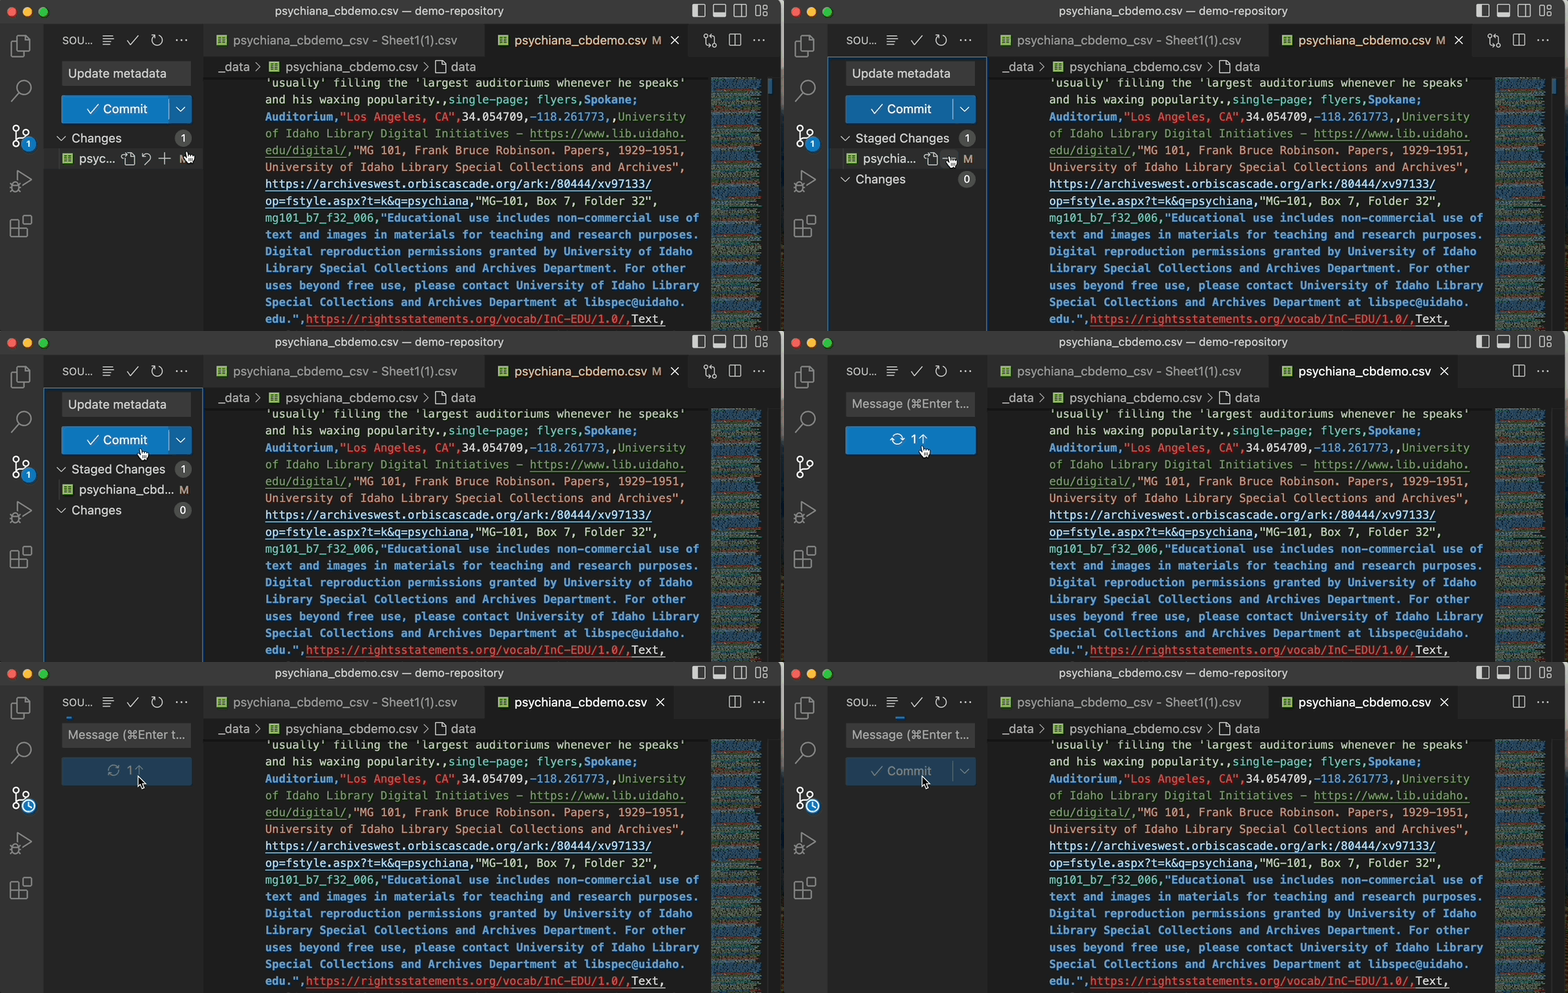
- To Push your local changes up to GitHub, click the blue “Sync Changes” button. This will sync your local changes with the GitHub repository.
Pro Tip: Copying and Pasting Metadata Using Visual Studio Code
1. Download your updated metadata spreadsheet
- Download your updated metadata spreadsheet as a .csv file by clicking File → Download → Comma Separated Values (.csv)

2. Open the updated CSV file in Visual Studio Code
- Locate the CSV file in the Downloads folder on your computer.
Warning: Do not open the CSV file in Microsoft Excel If you do, Excel often scrambles your UTF-8 encoding and/or your data (if you see weird dates, Excel might be the culprit). Excel cannot correctly export a CSV for use with CollectionBuilder, which is why we recommend Google Sheets or Office Libre.
- Right click the file and then click Open With… → Visual Studio Code.
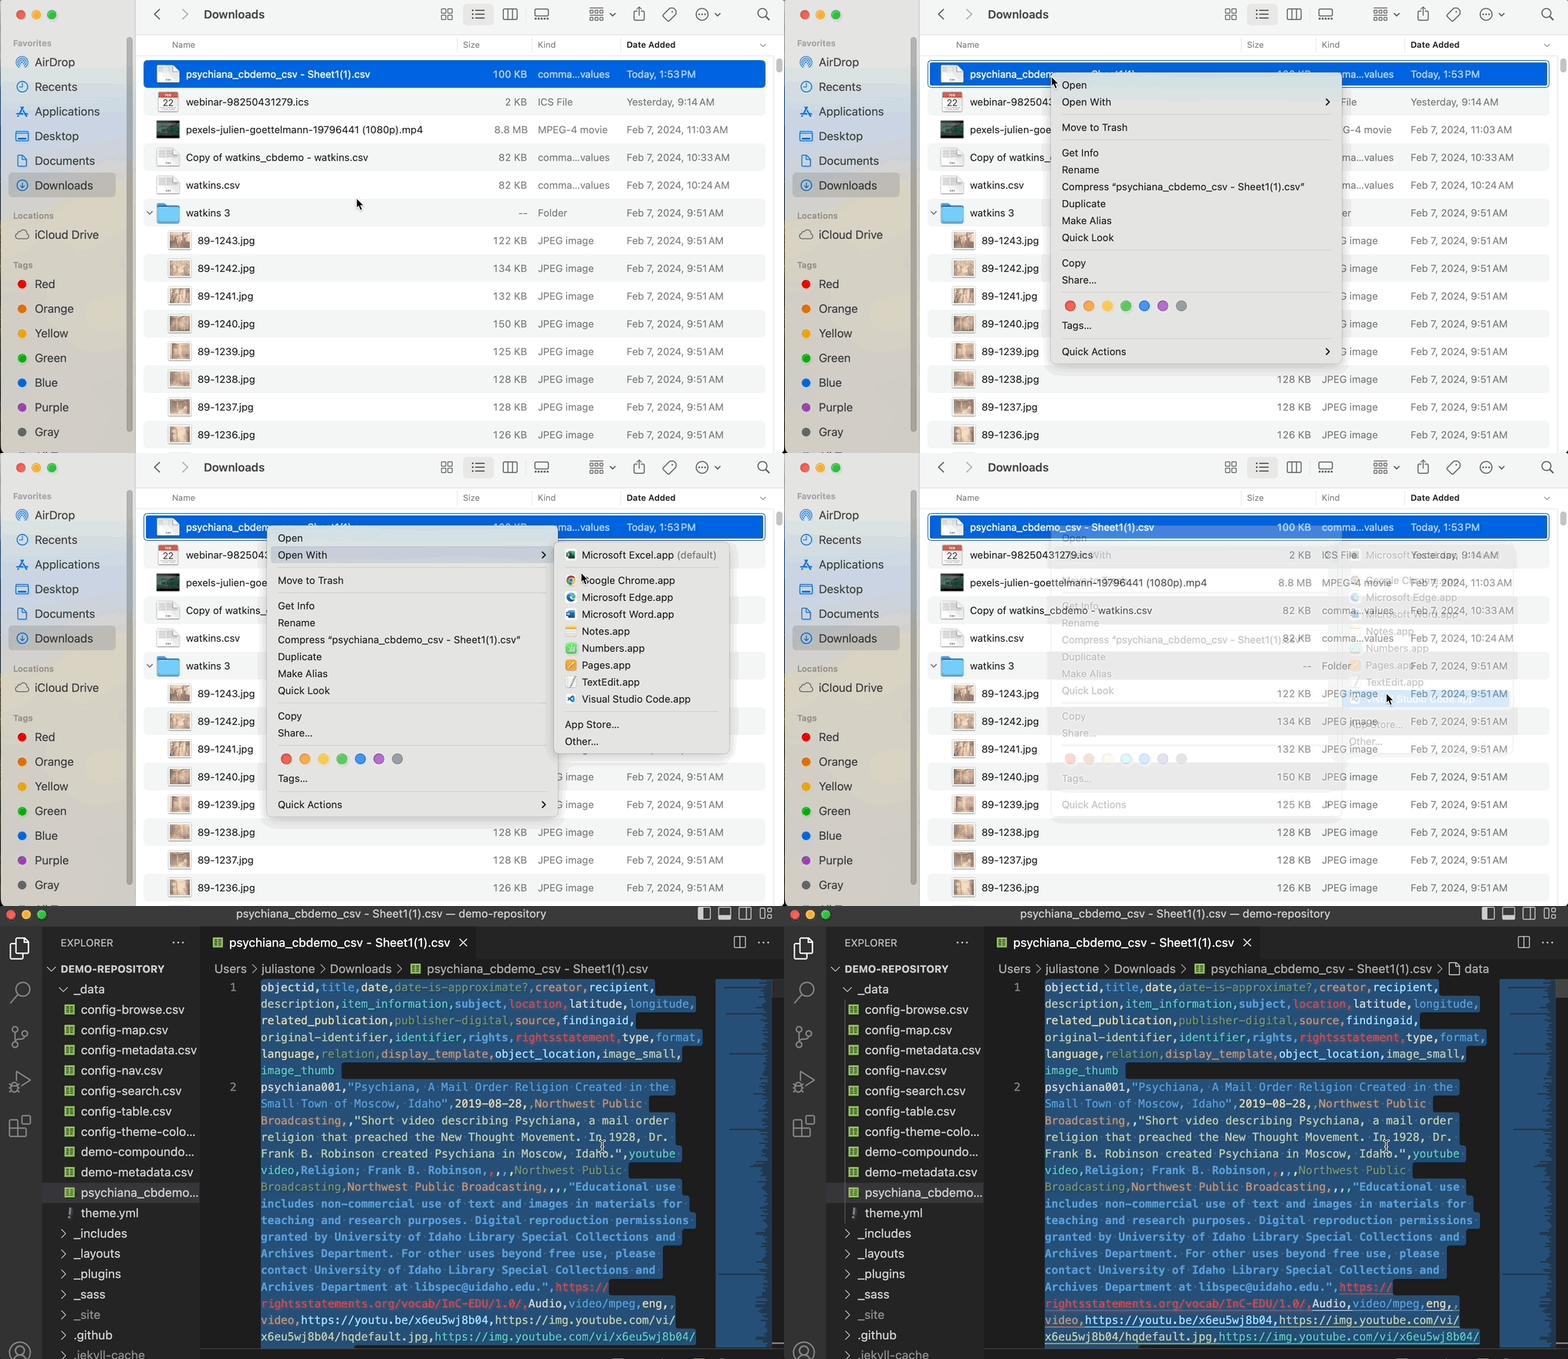
Note: If Visual Studio Code does not show up in your list of recommended applications, click “Other…“ and then search for “Visual Studio Code” in your Finder or file explorer.
3. Select all the text in the updated CSV file and copy it
Once you have the CSV file opened in Visual Studio Code, hit Command+A (on Mac) / Ctrl+A (on Windows) to select all the text.
Next, hit Command+C (on Mac) / Ctrl+C (on Windows) to copy all the text. Or, right click the text and then click “Copy”.
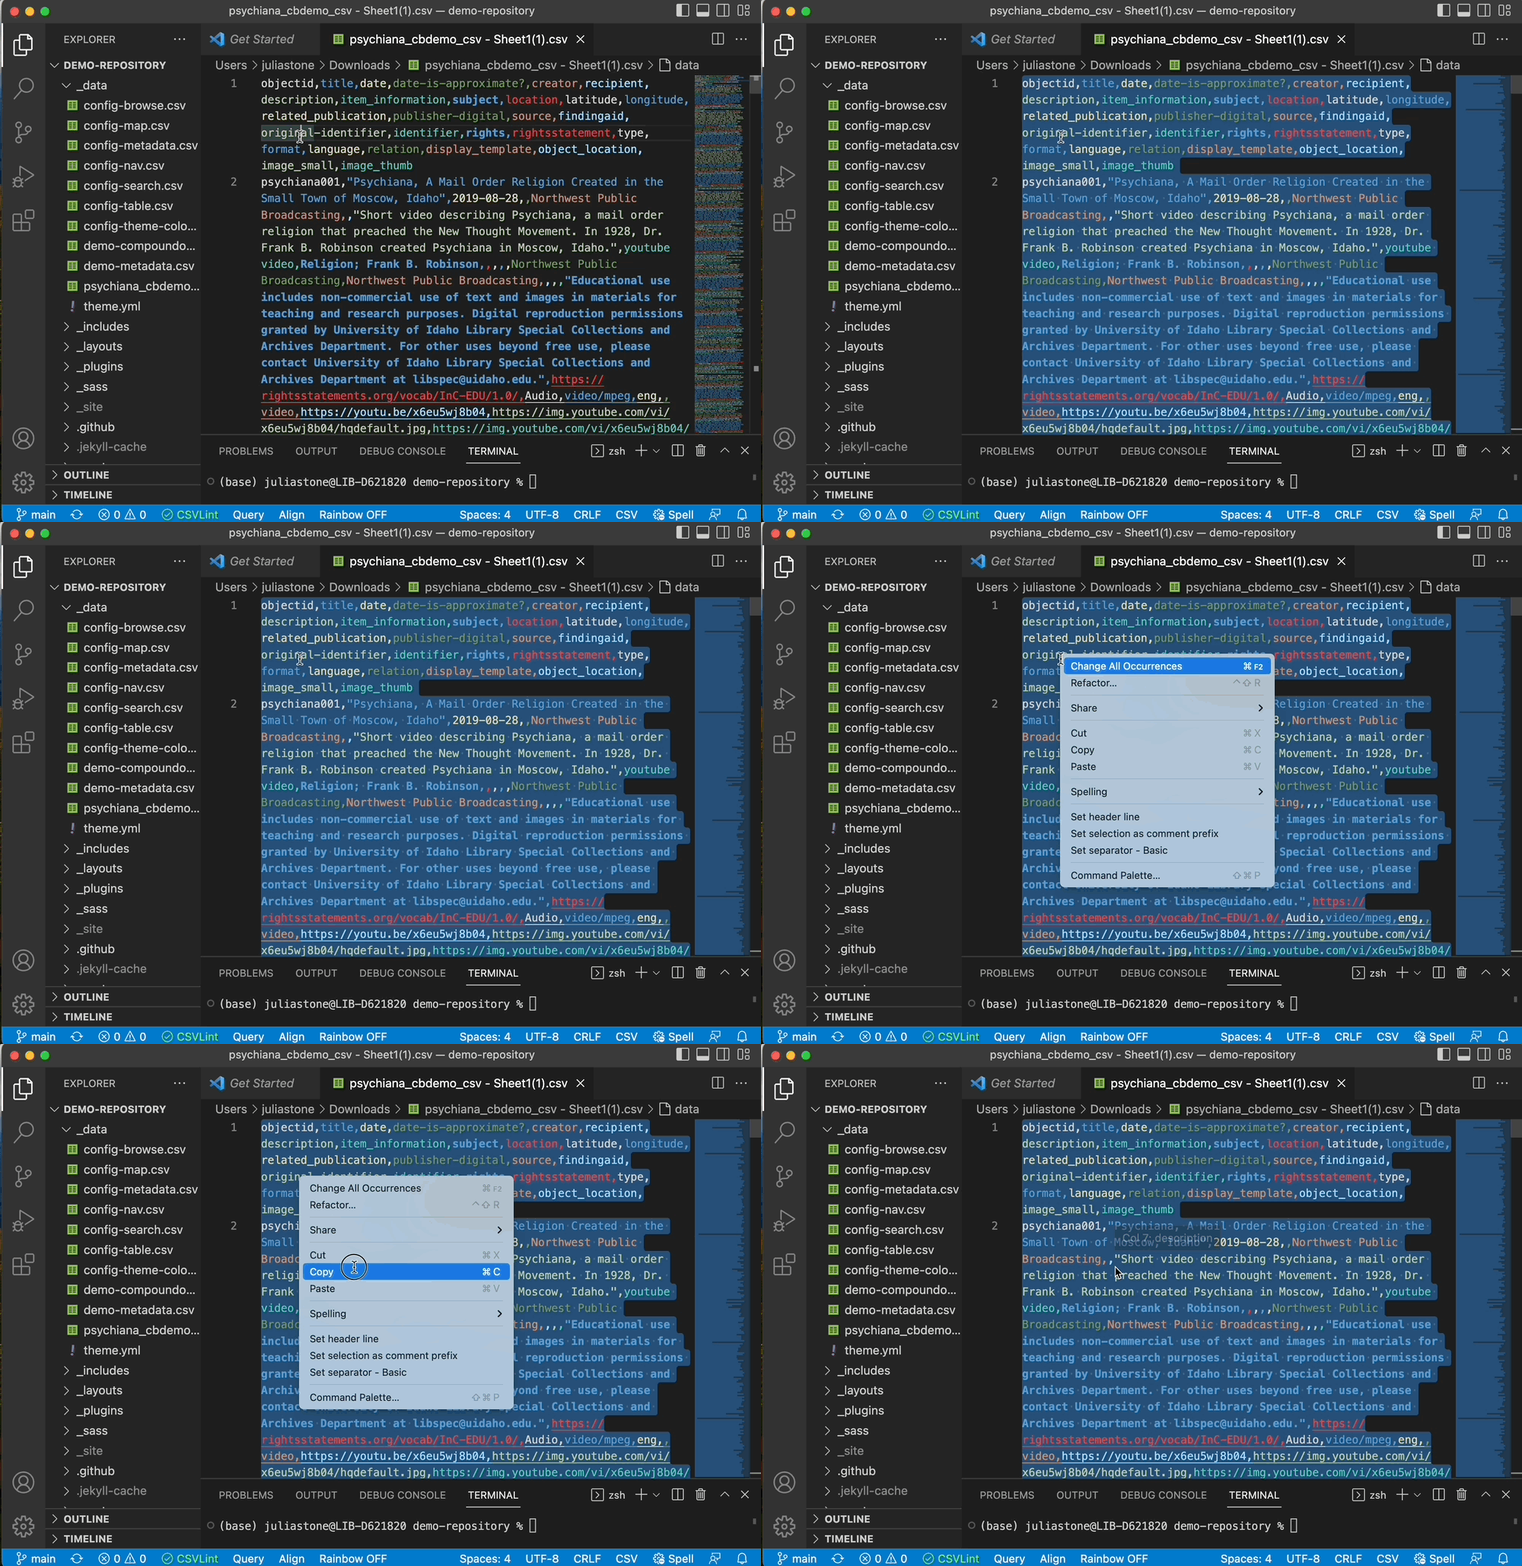
4. Paste the copied text over the old metadata CSV file and save
- Click on the old version of your metadata file in your “_data” folder to open the file.
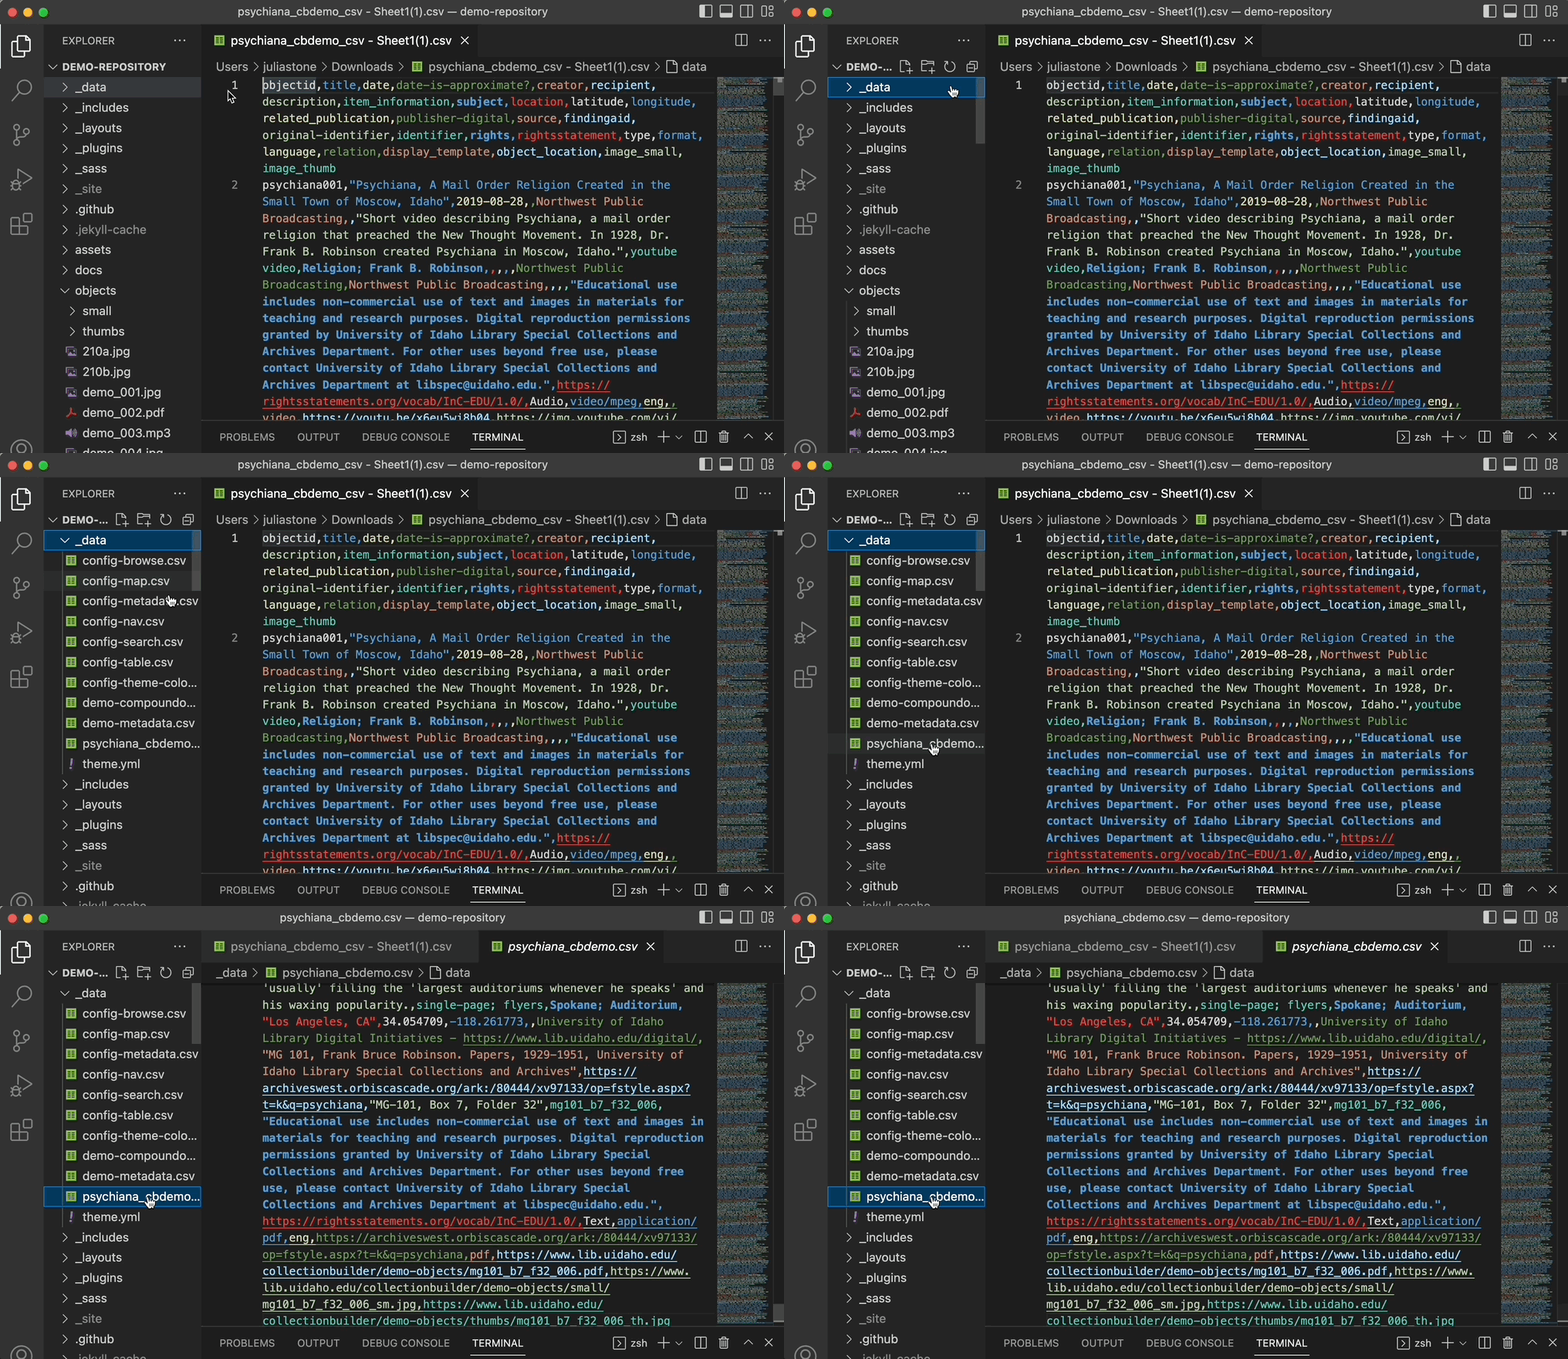
Press Command+A (on Mac) / Ctrl+A (on Windows) to select all the text.
Next, hit Command+V (on Mac) / Ctrl+V (on Windows), or right click the text and click “Paste”, to paste over the text with the text from the updated metadata file.
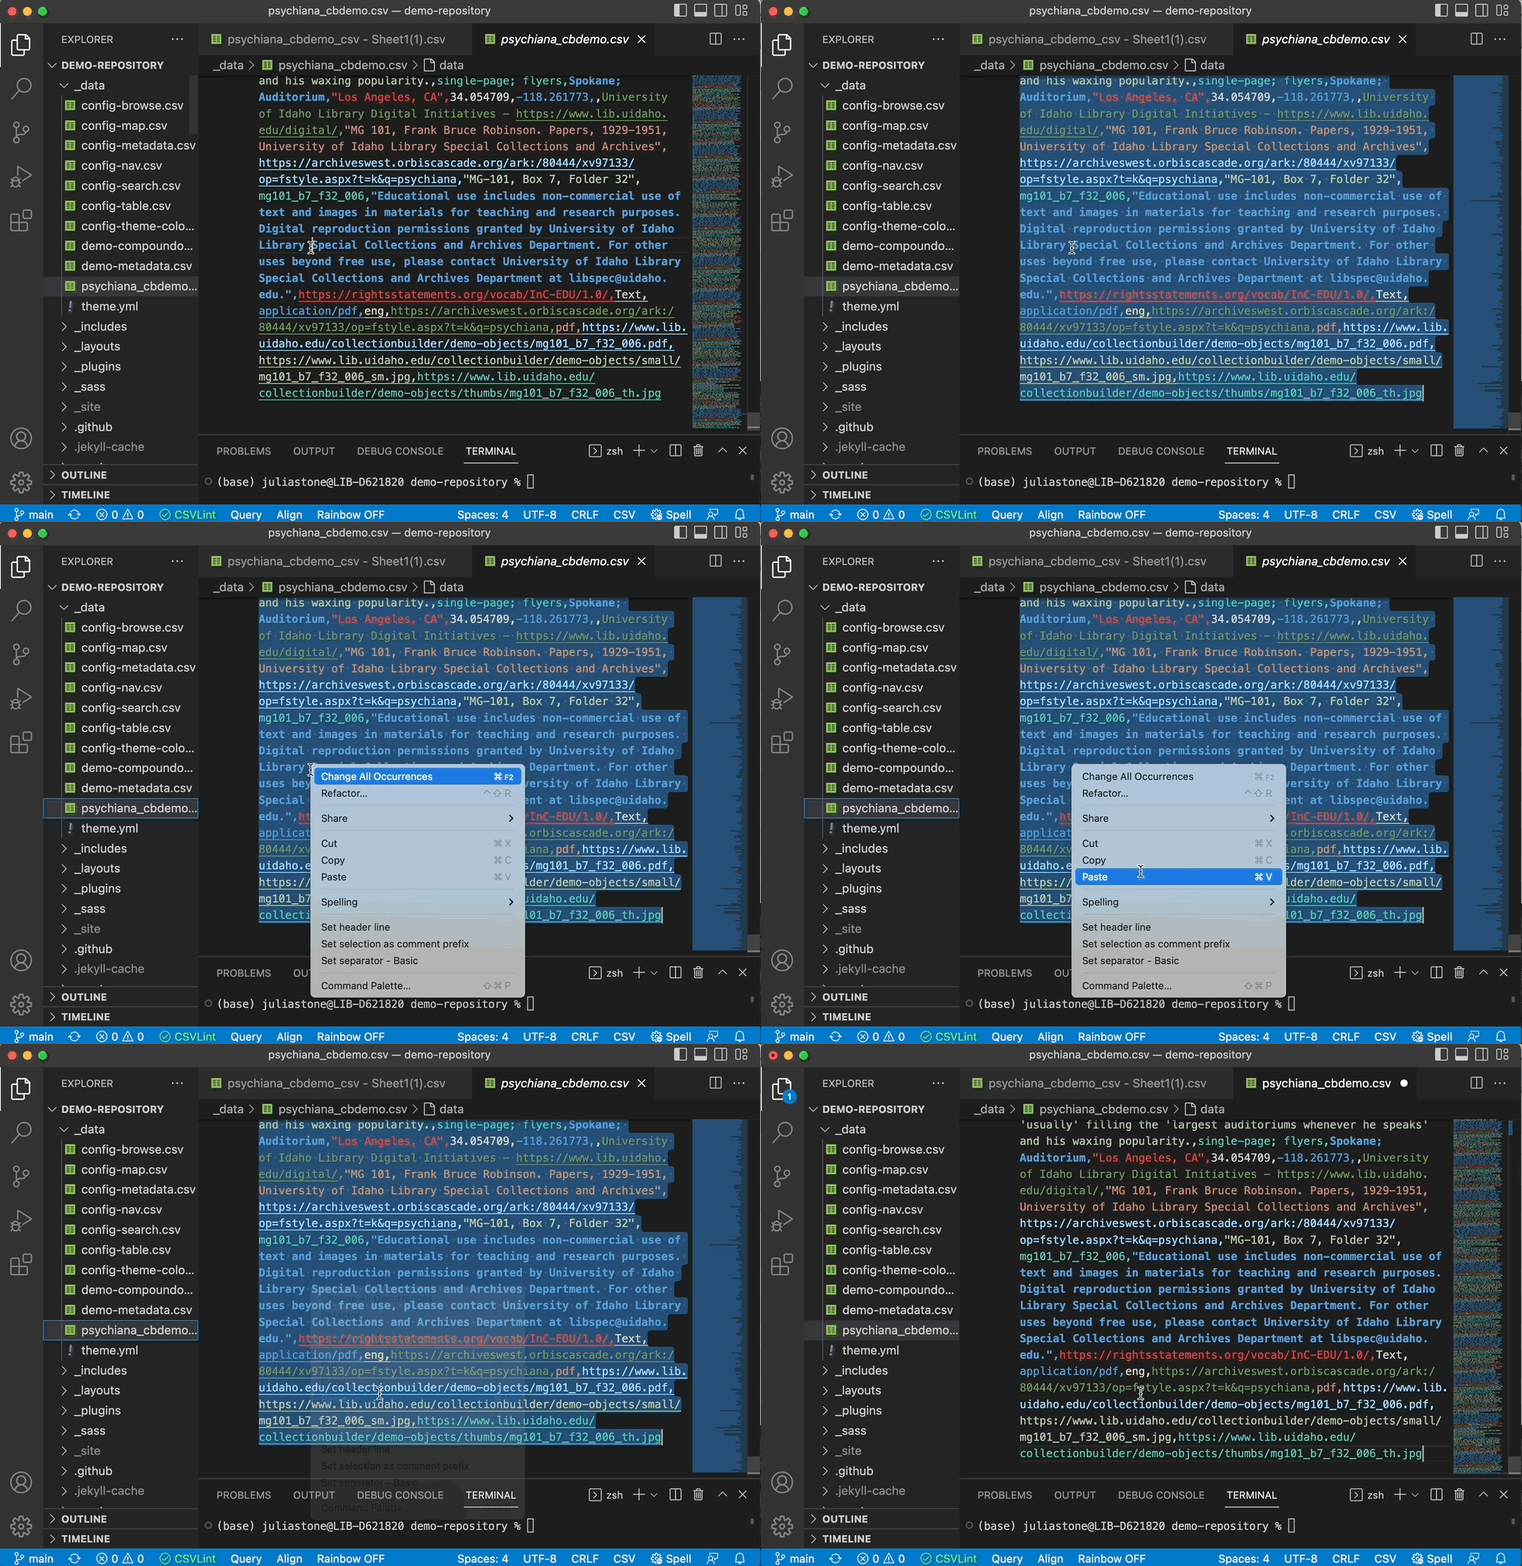
- Finally, press Command+S (on Mac) / Ctrl+S (on Windows) to save the file. This will update your old metadata file with the changes from the new metadata file.
5. Commit and push your changes
In VS Code, click on the “Source Control” icon, i.e. the network icon on the left side.
Changed files will be listed under “Changes.” Hover over the CSV file name and click on the plus icon to stage the change. Once added, the file will move to a new list “Staged Changes” and it is ready to commit.
Click in the text box at the top labeled “Message.” Type your “commit message” into the box (in this case something like, “Update metadata”).
Click the blue “Commit” button below the message box to commit the change.

- To Push your local changes up to GitHub, click the blue “Sync Changes” button. This will sync your local changes with the GitHub repository.
Metadata Tips: Need help with editing your metadata? Check out our guide to formatting your metadata, as well as our documentation on Metadata for CB-CSV and Metadata for CB-GH and CB-SHEETS.
